This stream auto-updates
- Last week
-
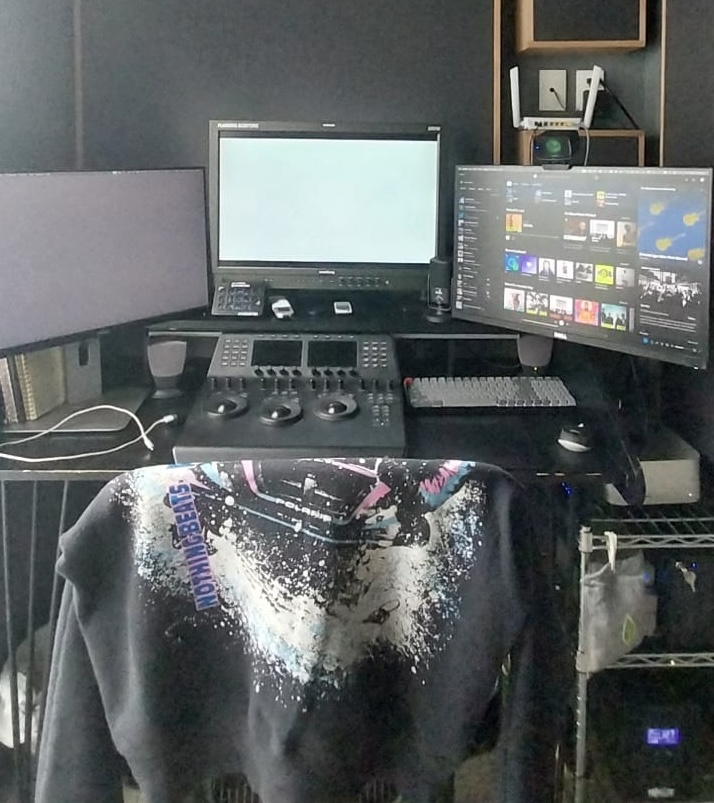
Abby! It depends on the work you do, I suppose. I'm not doing HDR as of now. Most jobs are TVCs viewed on the internet. Although, I recently did a documentary and my set up was fine. I use a Flanders DM240 (older HD model, but I get it calibrated every 6 months and its a work horse.) Mac Studio Pro, UltraStudio HD Mini, Louper for remote grading. I have a tiny set up, but it works for me:)

-
Hello everyone, I'm moving to Berlin in August and need to put together a remote color grading setup. I'd love to hear any recommendations. Also, if you're willing to share photos or details of your grading setups, I'd be very interested to see what others are working with. Thanks!
- Earlier
-
Hi everyone, it seems that the aaf file is not in the project files
-

Masterclass in Color Grading with Mark Todd Osborne
Willian Aleman commented on Lowepost's course in Color Grading Masterclasses
Watching this incredible masterclass, probably for the third or fourth time, five years later, amazes me with how MTO does shot matching without using any of the Resolve Viewer Wipe tools to compare the shots side by side. This shot-matching method requires a high level of memory from the colorist to achieve some type of precision. Cudos to MTO. -

Masterclass in Color Grading with Derek Hansen
Kento Ikeda commented on Lowepost's course in Color Grading Masterclasses
?? Why you don't color manage first? Applying contrast to log image? is that because 6 years ago? If you color managed, the image looks fine from the beginning. -
Masterclass in Color Grading with Lynette Duensing
Kento Ikeda commented on Lowepost's course in Color Grading Masterclasses
Thank you. One thing I wanted to confirm is by checking Use White Point Adoptation in CST, that set white point D65->D63 in this case. So if you uncheck it, that means the white point doesn't move and still D65. That's what I thought from my research but what do you think about it? -
 Thank you for reaching out. Our developers have been informed about this issue and will resolve it. If any other issues occur you can always reach out to our support team (support@lowepost.com) Edit: The issue has been resolved, thanks again for reporting it!
 -
 Hi, I've checked the site with Firefox Developer Tools. The JavaScript links in the 'Select your lesson' sidebar for the Lee Lanier VFX course are unresponsive/broken, while other courses work fine. Seems to be a specific bug with this course's JS-navigation. Best!
 -
Hi Admin Team. I tried downloading the project files two times now but the zip file is corrupt. Other project files on here work fine. Can you please look at it? Thanks! Best Thomas
-

Getting started with Baselight Look
Robert Rodriguez commented on Lowepost's insider article in Insights
Very well explained thanks !! -
Your account is not affected by this issue and has an active subscription. Can you mail us (support@lowepost.com) with the issue you are experiencing so our support team can look into it?
-

Multicam Editing in DaVinci Resolve
Emida (Seung) Yeun commented on Lowepost's course in Editing & Sound
Thanks for your lessons. I just have a problem after flattening down the the multicam clips I have finished with all the color grading and so. With the latest version, I get two options followed by the flatten multicam clip; Copying Multicam Grades and Retaining Grades from Angles. But neither of them keep my color grading works and go back to the original log file with no colors on. How can I fix this? -
Hello! Please do a manual cleaning for me too
-
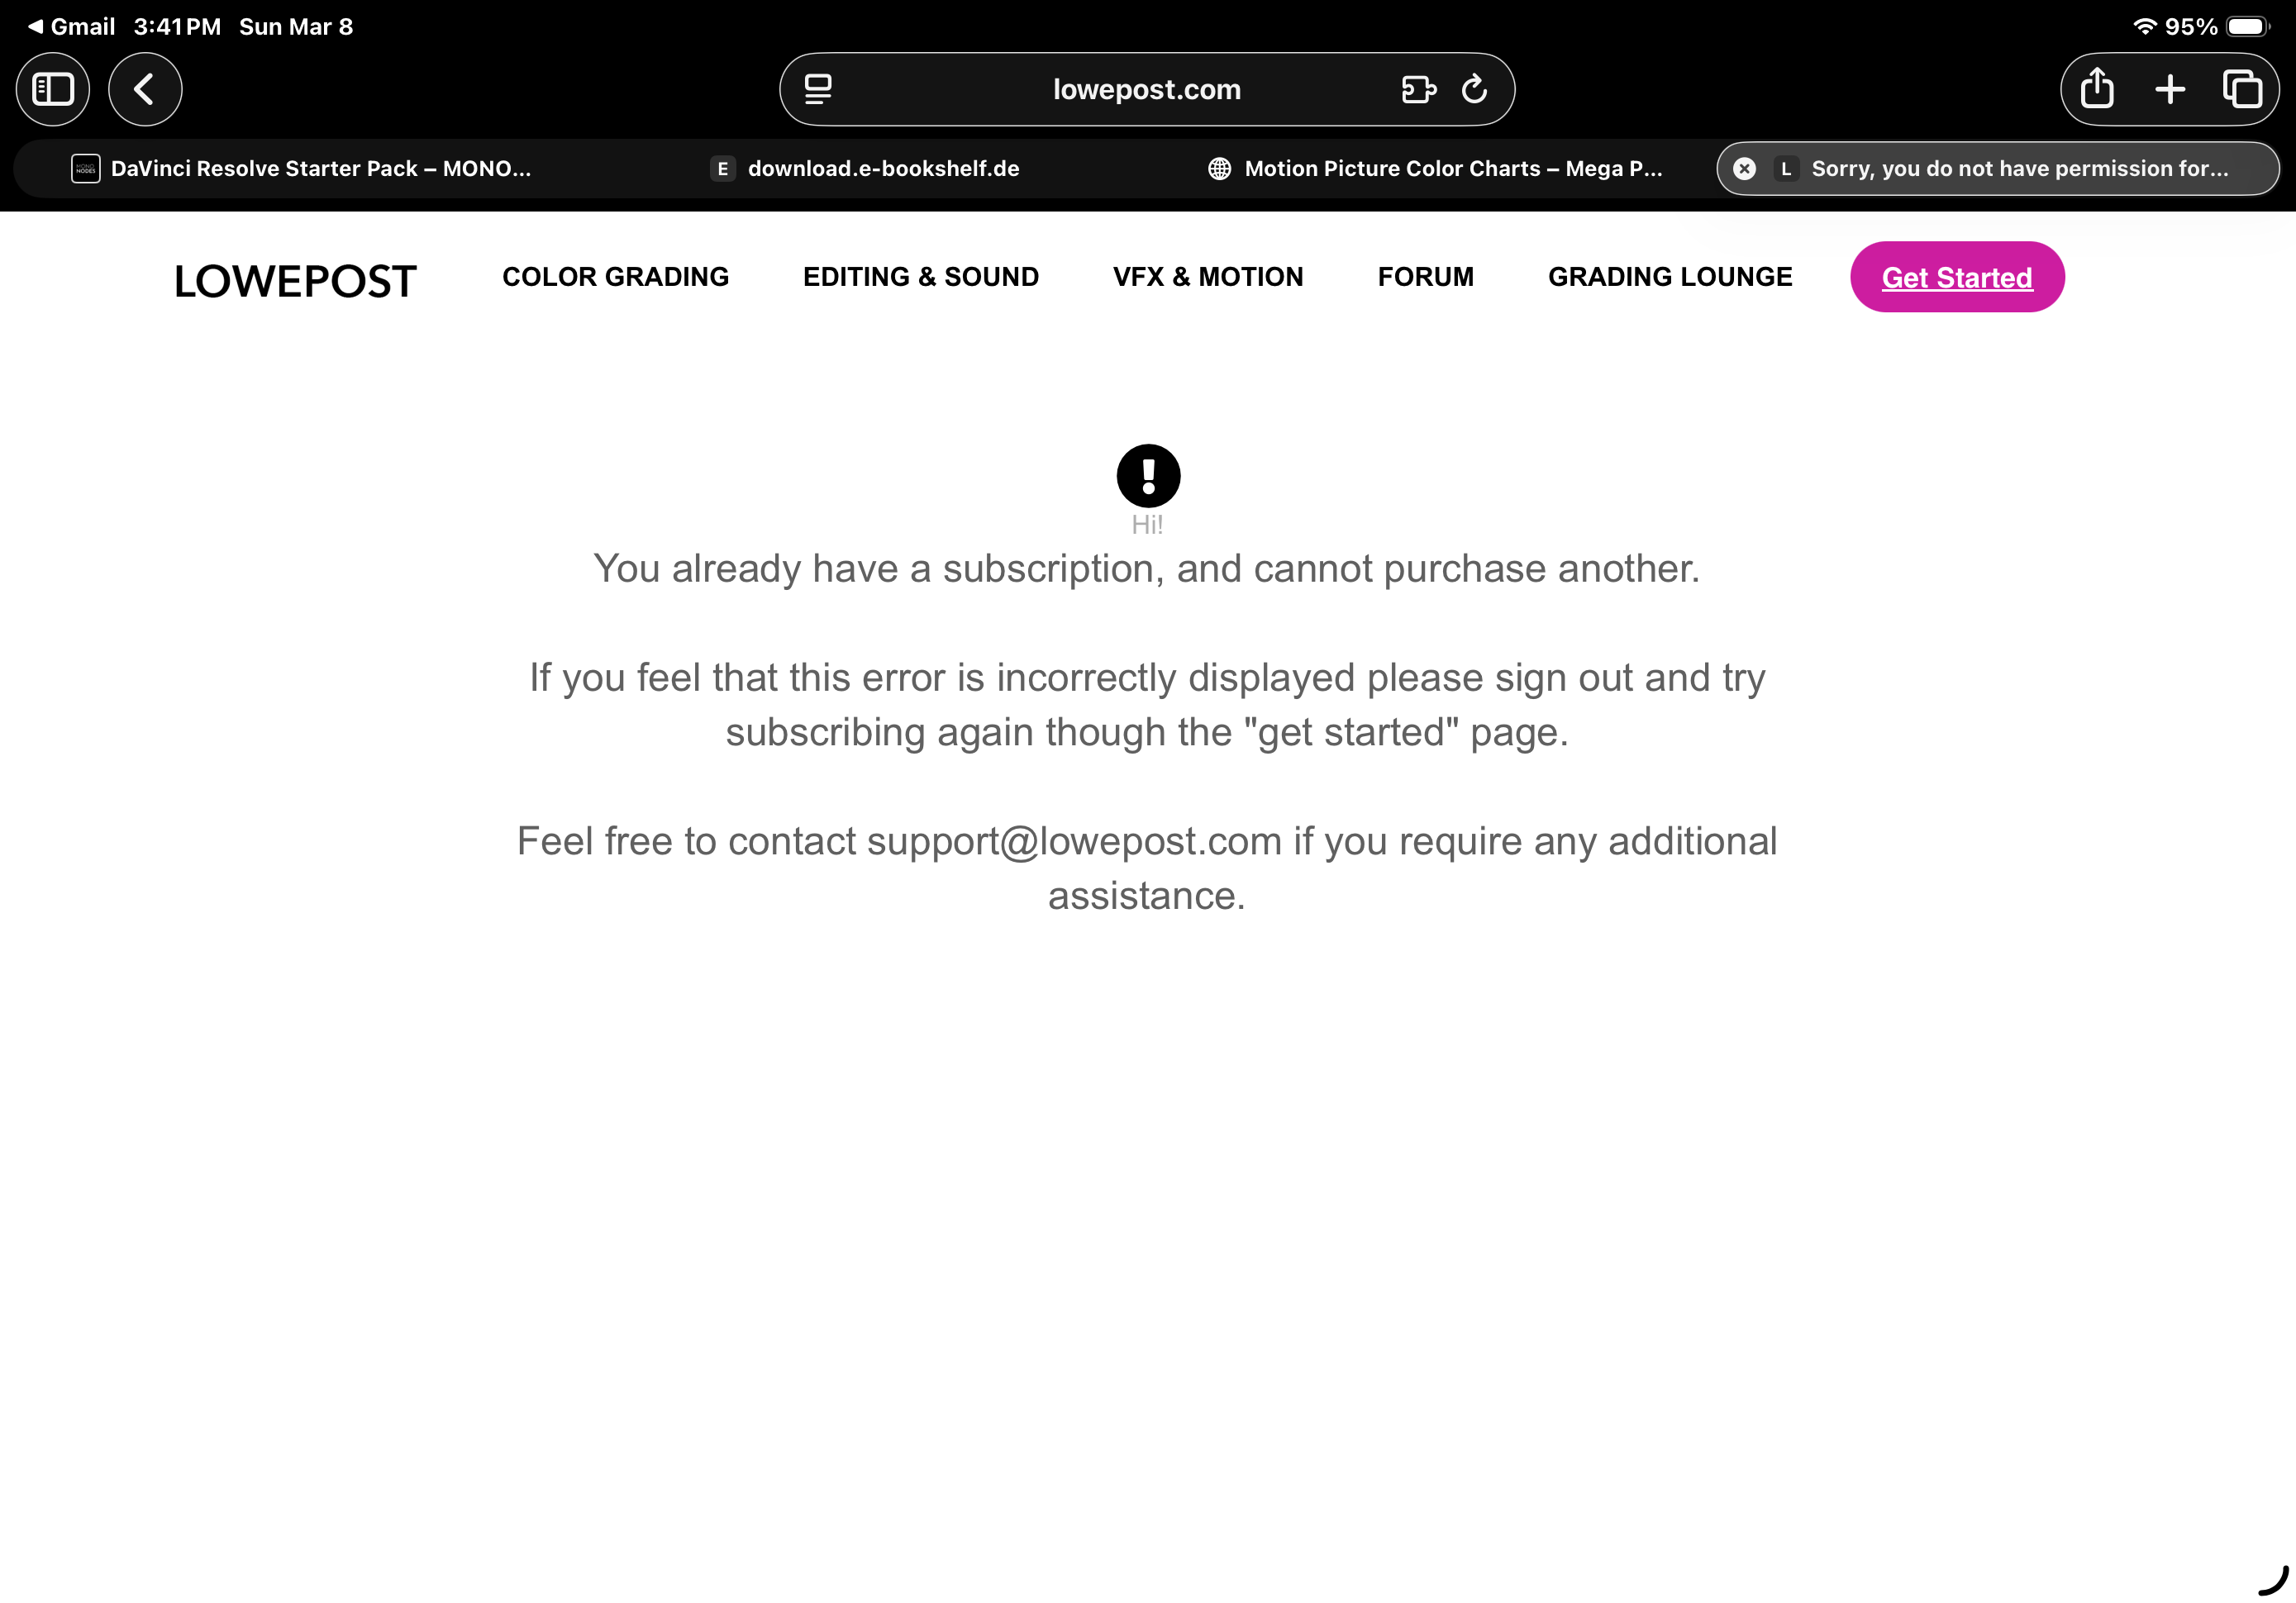
So I wanted to reach out to the people who are part of the Admin team as well as Support team and leave a quick comment to say thank you so much for getting back to me so quickly as well as helping me with the issue that I kept running into which every time I attempted to renew my Subscription service I would get a message stating that I was already Subscribed.. All because my Expired Subscription basically got stuck in Limbo and wouldn’t clear itself from their System! Haha Thank you again to the Admin and Support Team for all your help! Sincerely, Cameron Brown Color Creations Studio
-
Thank you for reaching out, sometimes when a subscription expired its "stuck" in the system and requires a manual cleanup - we tend to do that manually from time to time. I have cleared it for you.
-
So what doesn’t make any sense is when I click on join I get a message stating that I am already Subscribed and cannot purchase anything.
-
Hi! Just become a member and you'll get access to all the training on the site.
-
How can I join the Color Apprentice Course that Kevin P. Mcauliffe is teaching? I would really like to participate in this course and learn everything that being taught by Kevin. Thank you!
-

Color grading breakdown with colorist Tyler Roth
Wellington Samuriwo commented on Lowepost's insider article in Color Grading
Absolutely Love your work man. -
Works fine here
-
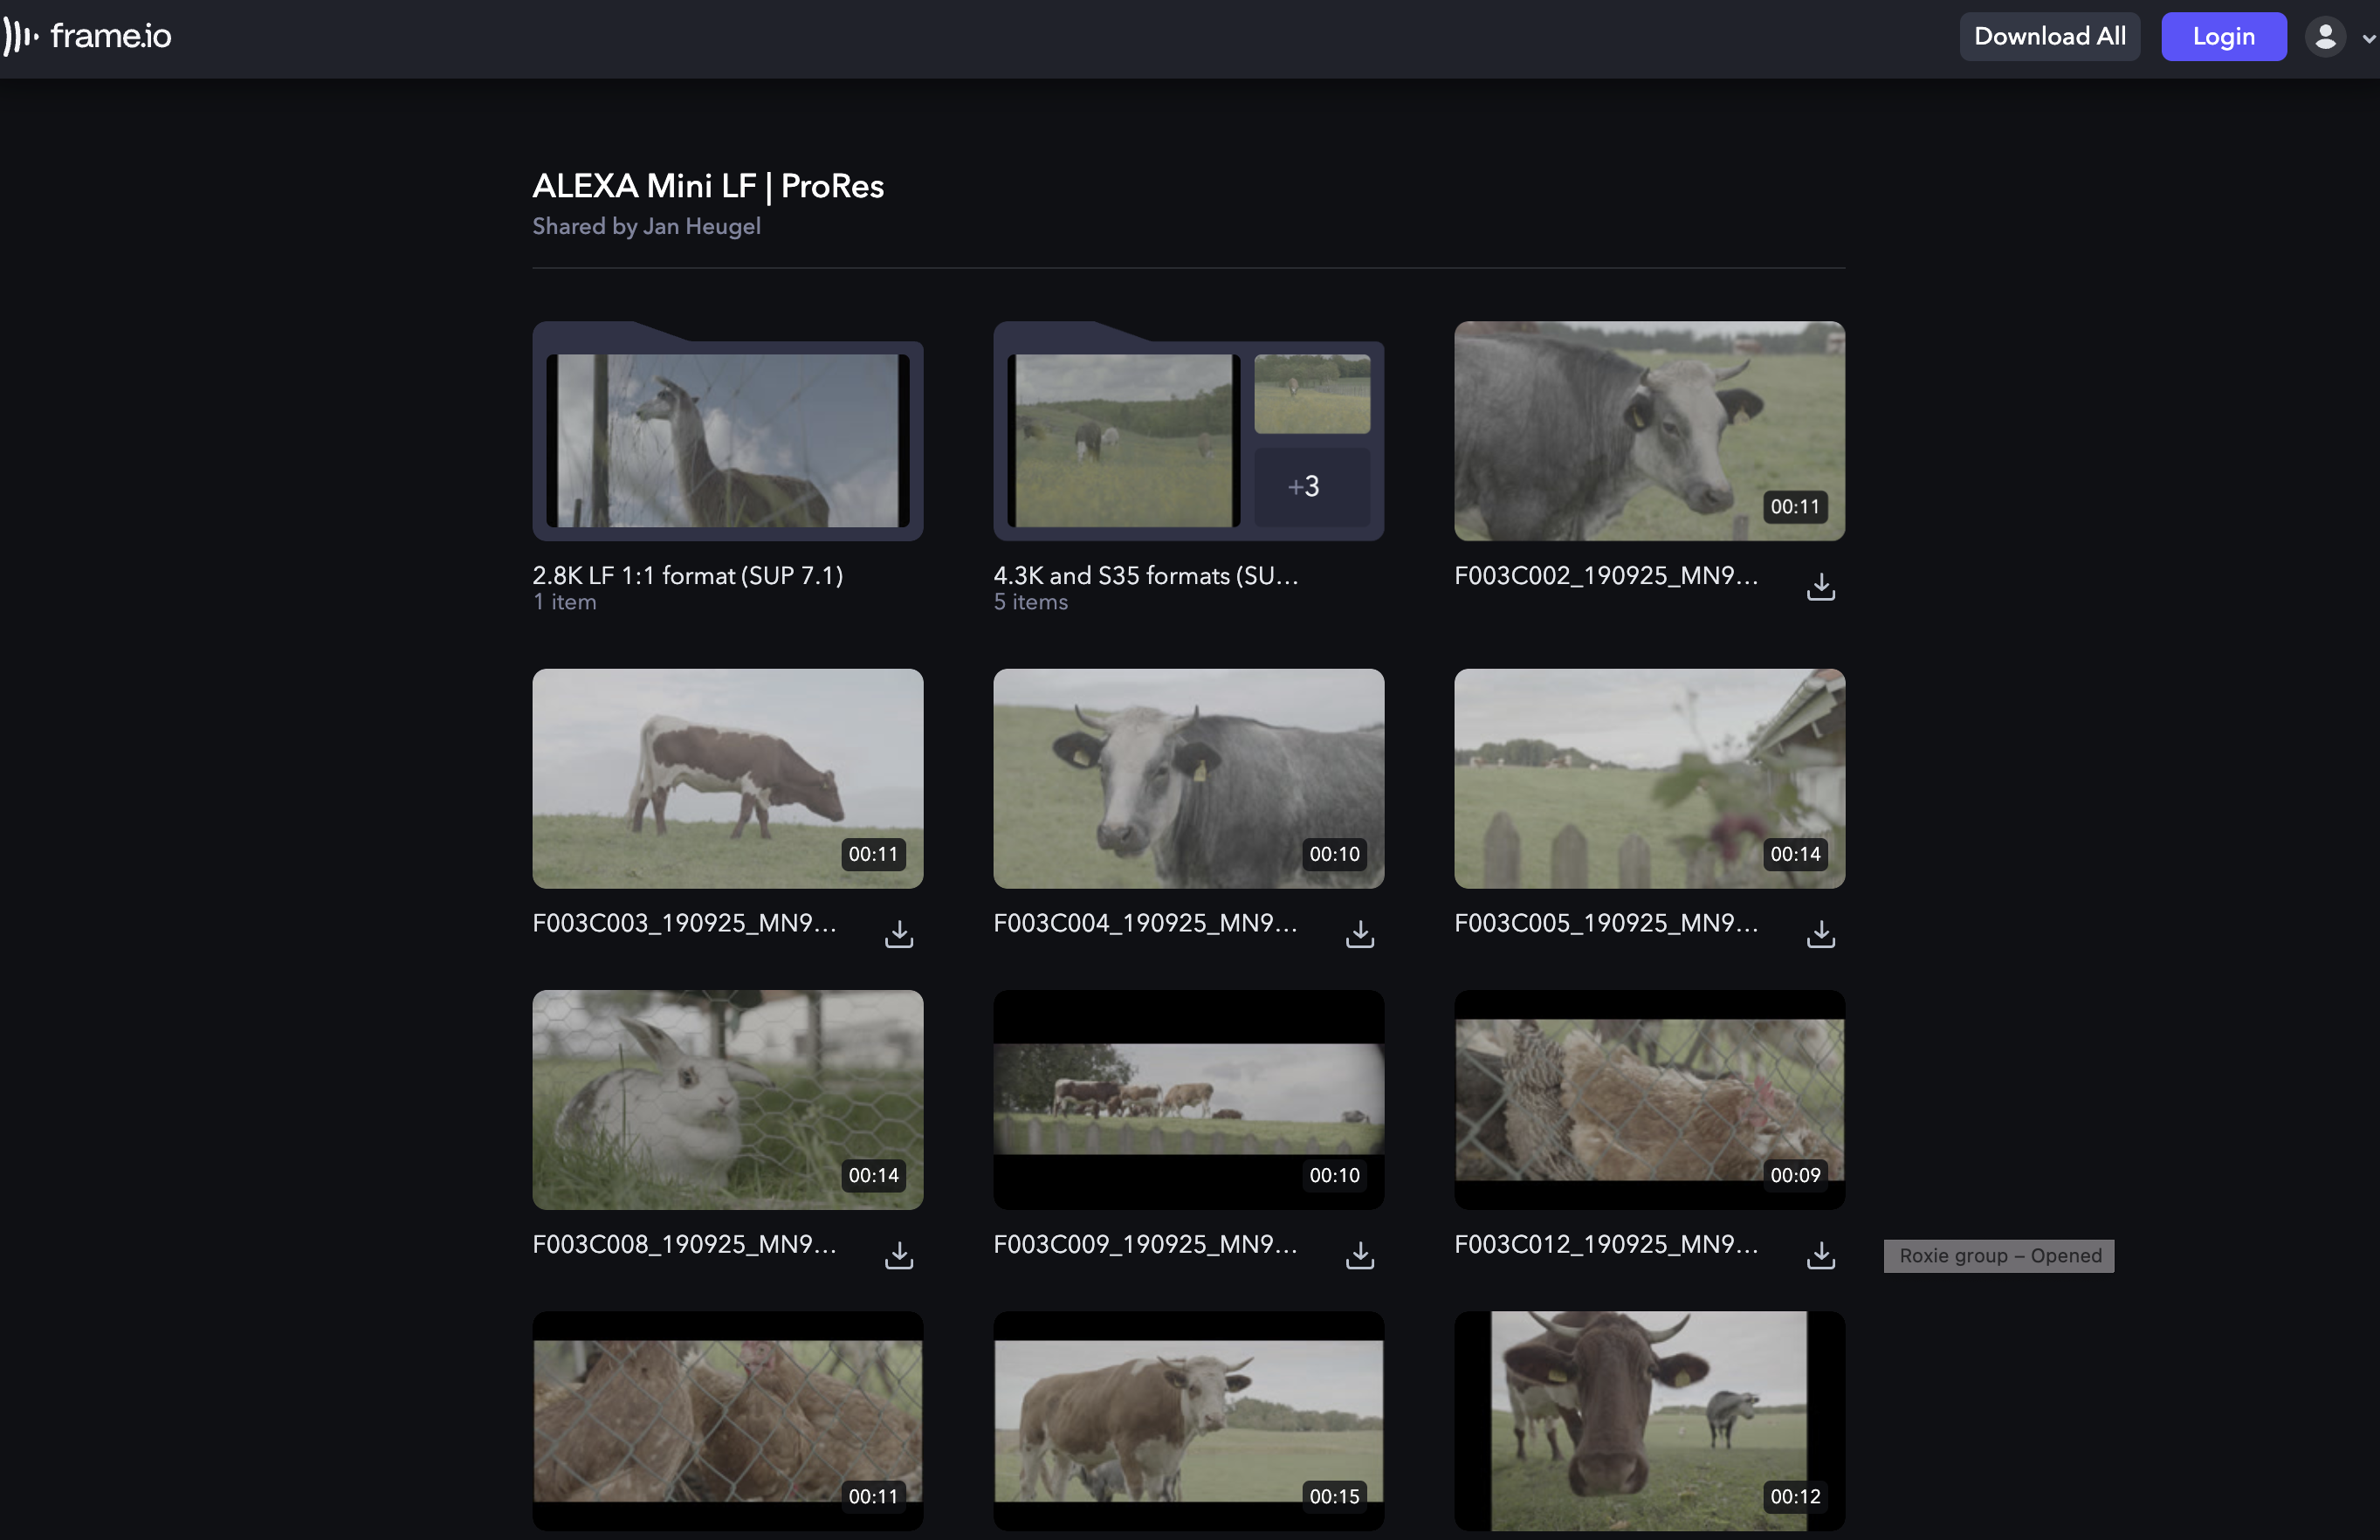
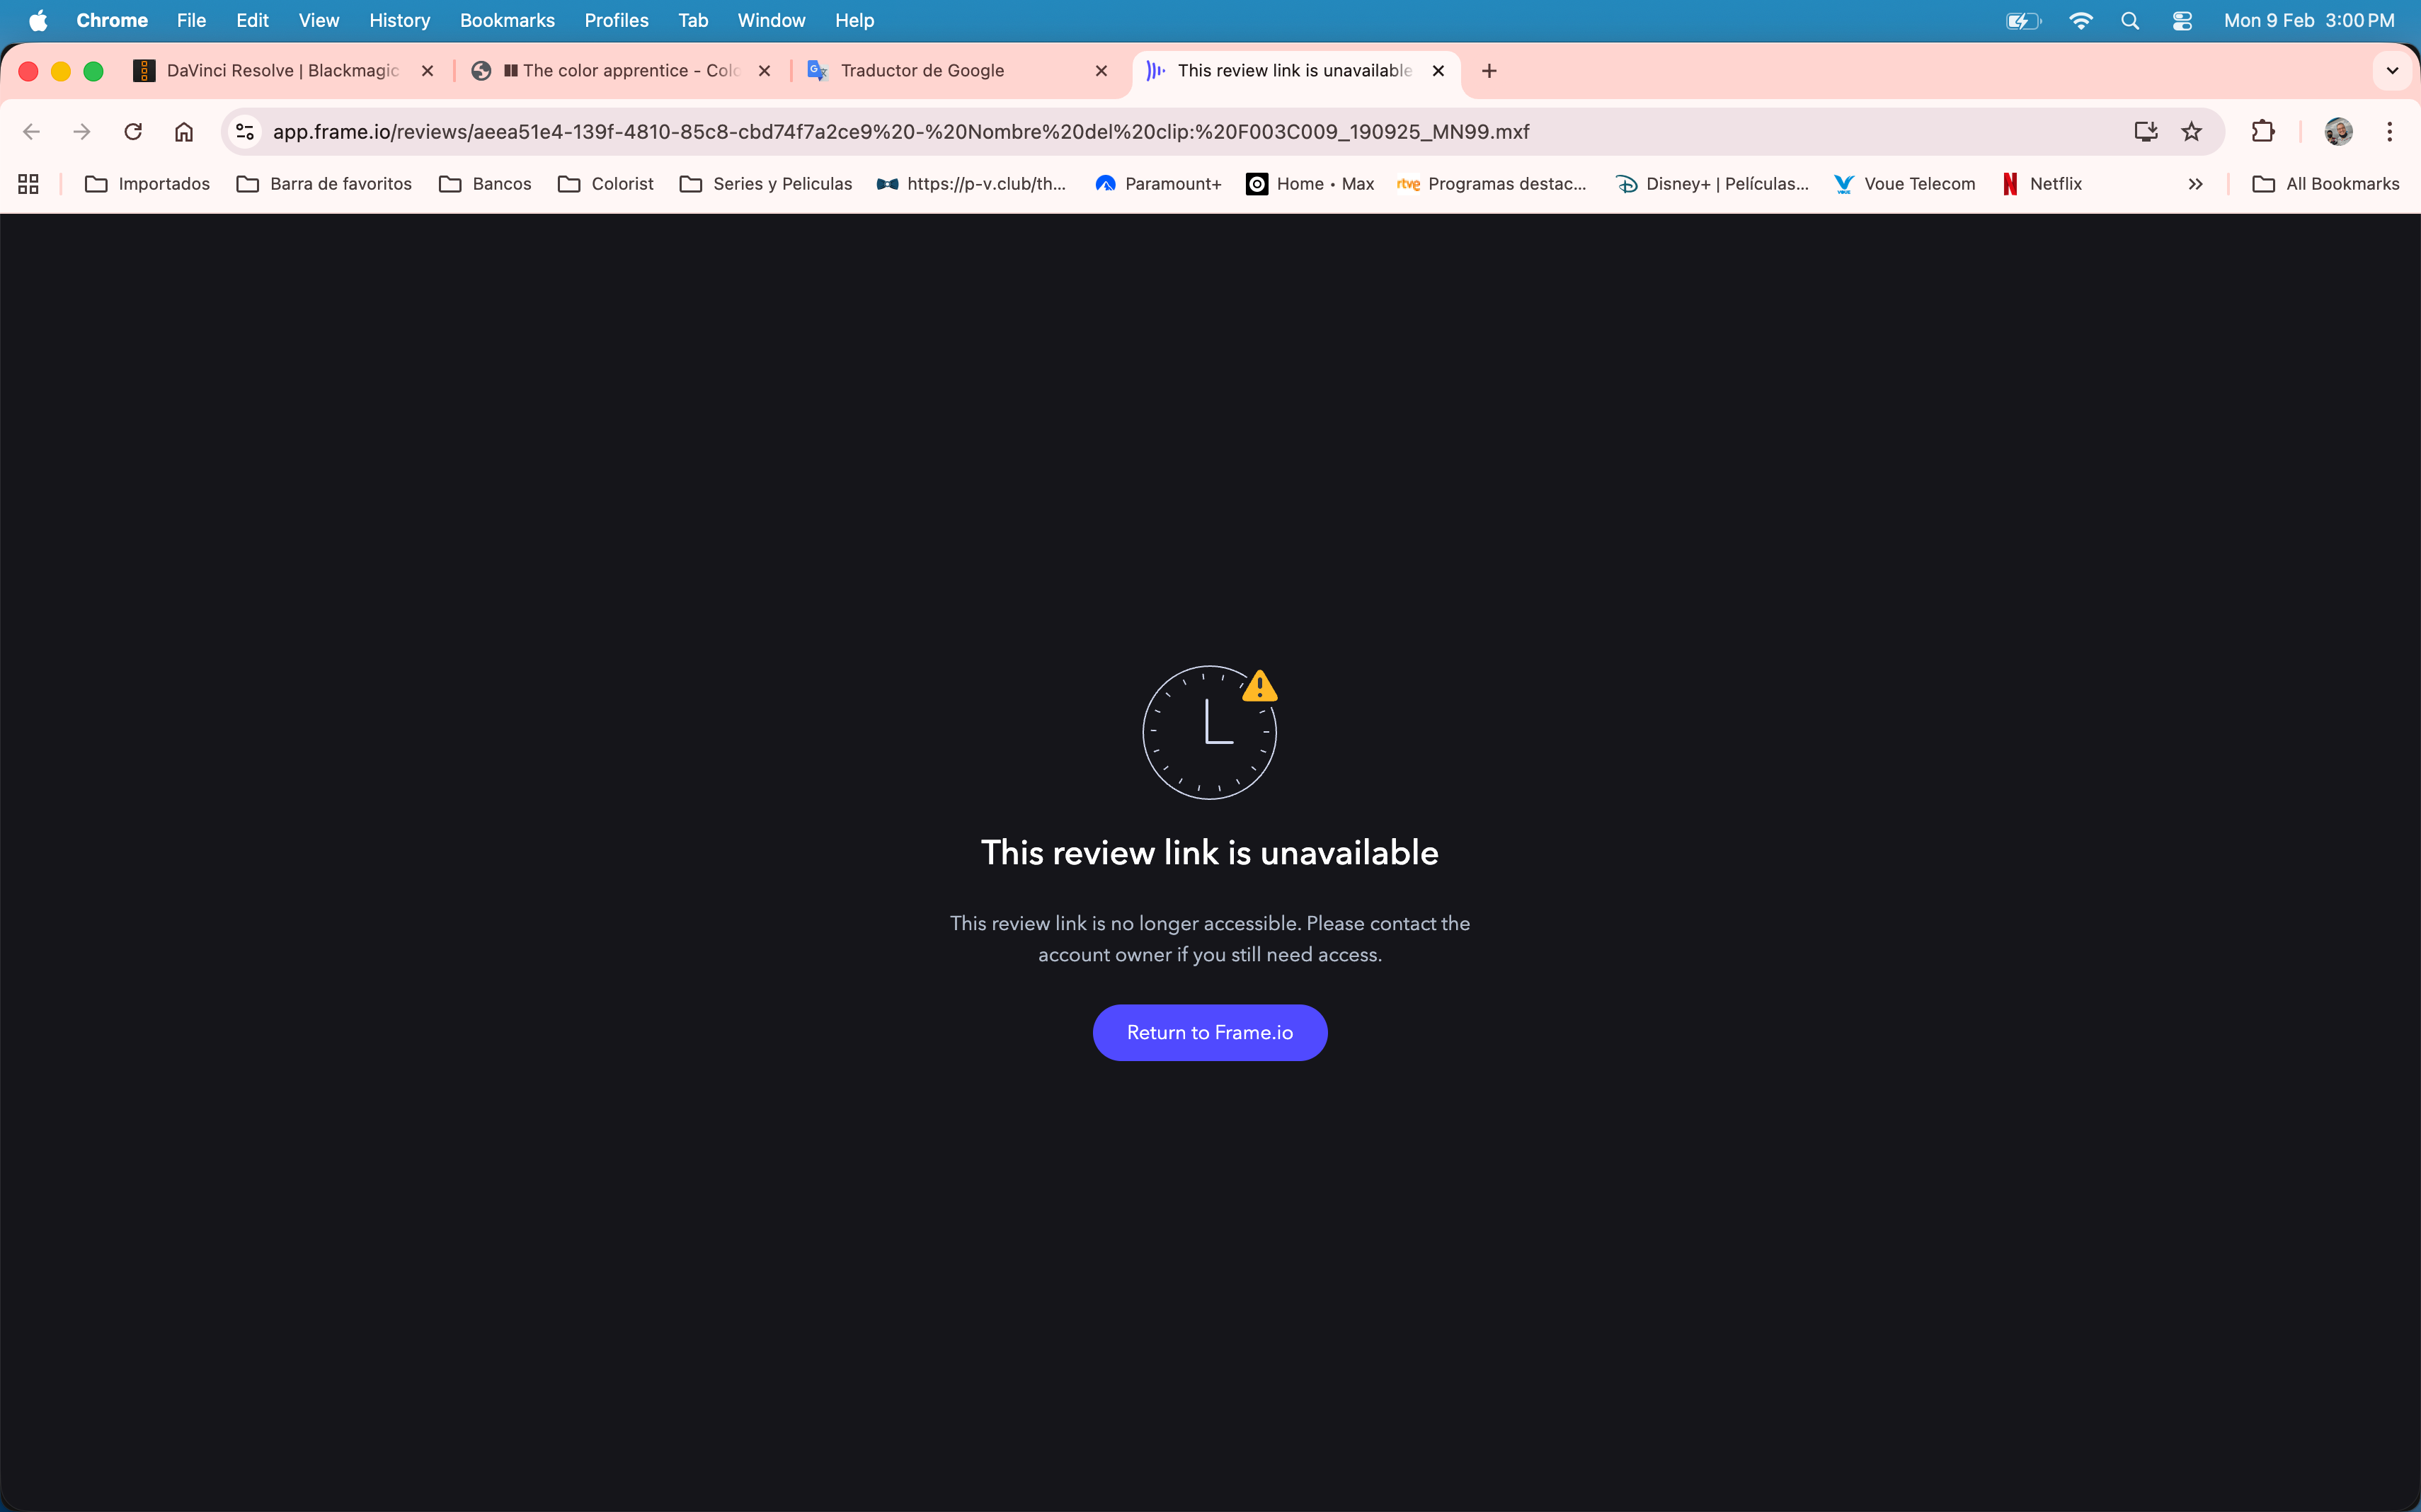
Hi, could someone please correct this? Aspects and Anamorphics footage can be downloaded here - https://app.frame.io/reviews/aeea51e4-139f-4810-85c8-cbd74f7a2ce9 - Clip Name - F003C009_190925_MN99.mxf, if you want to follow along. This is the answer after following the training link.
-

Masterclass in Color Grading with Mark Todd Osborne
Abby Bader commented on Lowepost's course in Color Grading Masterclasses
Well, I see what you mean, but his focus class is on explaining concepts and grading workflow rather than walking through specific footage step-by-step. As long as the principles are clear, you don’t actually need the exact same footage to follow along. The goal is to understand the process so it can be applied to any context, not just to a particular set of frames. If you want step-by-step tutorials I recommend the DaVinci Resolve training, for examples the ones with Kevin to start out with. -

Masterclass in Color Grading with Mark Todd Osborne
Julio Cesar commented on Lowepost's course in Color Grading Masterclasses
Without at least some of the material he uses, it's harder to understand what he's explaining, because it doesn't look the same in other contexts. He should at least provide a couple of frames so we can follow the same procedure; that's what he's paid for, right? -
To improve separation, try dialing in the contrast on a black-and-white version of the shot. Additionally, look at subtracting color from objects far away etc to help get better separation.
-
The VFX department should verify that the delivered files match exactly what they received. Please note that full-range vs. legal-range color space differences can cause slight color shifts.