

Lowepost
-
Posts
776 -
Joined
-
Last visited
Recent Profile Visitors
22,735 profile views


-
Hi! Just become a member and you'll get access to all the training on the site.
-
 W elcome to our training series on color grading assistance. Whether you’re doing conform on your own projects or aspire to persue a role as a color assistant within a professional facility, this course is tailored to meet your needs. Throughout this course, you’ll learn strategies and techniques to handle challenging conform tasks effectively. Our best practices will minimise the need for extensive fixes, ensure accuracy and a seamless project transfer between different applications. Additionally, you will learn how to most efficiently color trace grades to cut-down versions, update edits and deal with potential obstacles. You will get a better understanding of aspects, audio configuration, and how to prep balanced timelines for the main colorist. As we reach the end of the series, we’ll be covering how to finish up timelines for export with audio prep and smart subtitling. Download project files About the instructor This series is led by instructor Kevin P. Mcauliffe. Lessons overview 01: Fast-track approach to conforming a timeline: In this lesson, we will demonstrate a fast-track approach to conforming in DaVinci Resolve, following best practices to minimize the need for extensive fixes and ensuring accuracy when prepping a timeline for the colorist. 02: AAF / XML Troubleshooting: In this lesson, we will specifically address the challenge of effects not transferring successfully with AAFs and XMLs from grading applications. You will learn practical strategies to troubleshoot and fix this issue, ensuring a seamless transfer of effects between different applications. 03: Colortracing: In this lesson, we will explore the vital skill of efficiently copying grades between timelines. Color assistants must master this technique, particularly when faced with two scenarios: applying identical grades to an updated edit and transferring grades to cut-down versions of the edit. We’ll look at potential obstacles and how to deal with them. 04: Aspects: Kevin walks you through the fundamentals of aspect ratios, including workflows for setting up projects for working with anamorphic formats. 05: The color assistants “in the chair” tips: As a color assistant, your role often involves stepping in for small editing changes. We’ve got you covered with “in the chair” editing tips that will help you step in for small edits with ease. 06: Shot balancing fundamentals: Going through the core skill of balancing shots to make it “balance ready” for the colorist. 07: Understanding Audio: In this lesson, we will explore basics of audio configuration 08: Smart subtitling: In this lesson, you will learn efficient techniques for creating and working with subtitles, both inside and outside of DaVinci Resolve, optimizing your finishing process when working on tight deadlines.
 -
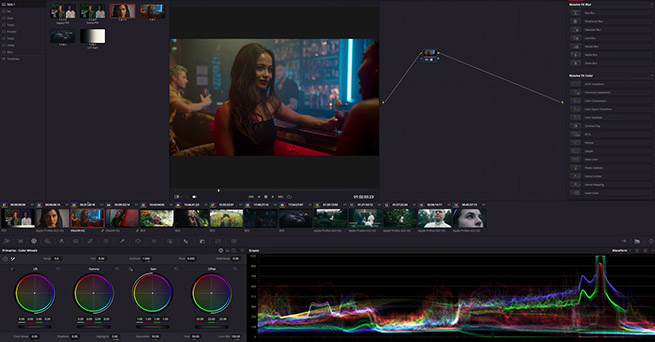
 This course focuses on developing a thorough understanding of color distribution in DaVinci Resolve. You will get a deeper understanding of how the main color correctors works through the study of the scopes and color viewers. It's also useful for colorists who want to effectively analyze and manipulate color within Fusion's powerful framework. The footage used in this course is available for download. Download project files About the instructor Lee Lanier has created visual effects on numerous features films for Walt Disney Studios and PDI/DreamWorks. Lee is a world-renowned expert in the video effects field, and has written several popular high-end software books, and taught at the Gnomon School of Visual Effects in Hollywood. Who is this course designed for? DaVinci Resolve users Compositors Finishing artists Lessons overview 01: Order of events 02: Understanding color viewers and color distribution 03: How color controls affect color attributes in Fusion 04: The color viewers in the color module 05: HDR in Fusion and color controls 06: Introduction to the HDR Wheels
 -
And this one: A new training series is just around the corner! We've been working day and night to bring you a fresh new look for Lowepost, and we'll be back to posting more regularly very soon.
-
 Tyhis course is about one of the most popular topics in the world of color grading; grading under a print film emulation. Cullen Kelly will walk you through the entire process of grading under prints in this 1-hour and 20-minute training series. He will reveal every little secret to creating bold and beautiful film-like images, and share tips that can't be found online. In the first part, he will show you how to select the correct emulation and set it up properly. Then, he will move on to cleanly tailor and tune the emulation and finally teach how to effectively grade underneath it. Stop searching "how to create my images look like film" online, it will only lead to confusion. Just watch this training series, and you'll quickly get up and running getting the most out of your images. Note that some knowledge of general color grading and color management is required. About the instructor Cullen Kelly is a renowned colorist and color scientist, that has shaped visuals for top brands, academy award films, and series for Netflix and HBO. As the host of Lowepost's Masters of Color podcast, he leads discussions with industry experts. He also trains for Blackmagic Design and consults globally, reflecting a deep passion for his craft and collaborators. Who is this course designed for? DaVinci Resolve users Colorists
- 8 comments
-
- 22
-

-

-
 Explore the true complexities of color grading in this in-depth course for colorists. In this training series we will explore fundamental color concepts and terminology, which is important to understand for colorists at all levels. You will learn the principles of mid gray, its role in look design and the journey from set to screen. Furthermore, you'll get a solid understanding of the science of tonal contrast, learn how to evaluate curvature and understand how it interacts with hue and saturation. A solid grasp of these foundational elements is essential whether your goal is to step up your color grading game and create better looking images. or just want to dive into more advanced discussions with industry colleagues and clients. As a special offering, course participants will receive free access to "The LUT Assistant" plugin for DaVinci Resolve, allowing you to seamlessly follow the many practical examples in the course. About the instructor Cullen Kelly is a renowned colorist and color scientist, that has shaped visuals for top brands, academy award films, and series for Netflix and HBO. As the host of Lowepost's Masters of Color podcast, he leads discussions with industry experts. He also trains for Blackmagic Design and consults globally, reflecting a deep passion for his craft and collaborators. Who is this course designed for? Colorists Post production professionals Lessons overview 01: Color concepts and terminology 02: Understanding middle gray 03: The role of middle gray in look design 04: Exploring tonal contrast 05: Advanced tone techniques 06: Incorporating new tools
- 12 comments
-
- 23
-
-
-
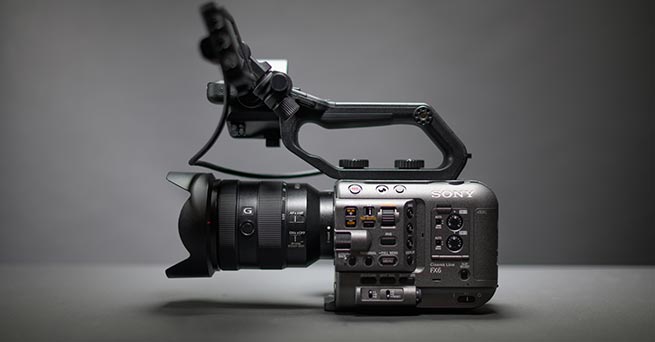 The Sony FX6 is a popular camera among professional videographers, thanks to its versatility, compact size, and powerful capabilities. But to get the most out of the camera, you need to build the right rig that suits your specific shooting needs. In this article, we'll go through some essential components that you should consider when building your Sony FX6 camera kit. Monitor While the FX6's monitor is certainly functional, some users may find it to be on the smaller side. This can make it difficult to see details and evaluate footage while shooting, especially in bright outdoor environments even though it comes with a monitor sun hood. Additionally, the monitor's built-in controls can be limited, making it challenging to fine-tune settings on the fly. One solution to these issues is to use an external monitor, such as the Atomos Ninja. This monitor is designed to work seamlessly with the Sony FX6 and can provide a larger, more detailed display with more extensive control options. With the Atomos Ninja, you can monitor your footage in real-time and make adjustments quickly and easily, even in challenging lighting conditions. Moreover, recording with the Atomos Ninja offers some distinct advantages. For example, the Ninja allows you to record in higher-quality ProRes RAW or DNx codecs, which can provide greater flexibility in post-production. Additionally, the Ninja's recording capabilities allow for simultaneous recording to both the Ninja and the camera's internal memory card, providing an extra level of backup and security for your footage. You could also consider Shinobi if you don’t need ProRes RAW. Overall, while the FX6's built-in monitor is certainly serviceable, using an external monitor such as the Atomos Ninja can take your footage to the next level and help you capture the shots you need with ease. Power The FX6 is known to consume a lot of power, which can result in shorter battery life than some users might prefer. To address this issue, many FX6 users opt to use external battery solutions, such as V-mount or Gold mount batteries, along with a battery plate that can be mounted directly onto the camera rig. While Sony offers their own line of batteries for the FX6, these can be quite expensive. One more price-friendly option is the Hawk-Woods line of batteries, which can provide reliable power at a fraction of the cost of Sony's batteries. These batteries come in various capacities and can be a great option for extended shooting sessions. It's worth noting that the Sony FX6 uses the BP-U series batteries, not the L series. Audio When it comes to audio systems for the Sony FX6, there are a few options to consider. Sony offers a range of microphones that are specifically designed to work seamlessly with their cameras, including the Sony ECM-XM1 Shotgun Microphone and the Sony ECM-B1M Shotgun Microphone. One of the key benefits of using Sony's audio solutions is that they are designed to integrate seamlessly with the camera, allowing for easy monitoring and control of audio levels from the camera's built-in screen. However, if you're looking for a super high-end audio system, you might consider third-party solutions from companies like Sennheiser. The Sennheiser MKH8060 Shotgun Microphone is a popular option among professional videographers, thanks to its excellent audio quality and versatility. With its super-cardioid polar pattern, the MKH8060 can capture focused audio while minimising background noise, making it an ideal choice for interviews and other situations where you need to capture clear, focused audio. Additionally, the MKH8060 is compact, lightweight and short in length, making it easy to mount on a camera rig without adding too much weight or bulk. Just be aware that the microphone mount on the Sony FX6 is too large for other shotguns than their own so you will need to buy a microphone spacer. This is available on most camera stores and on Ebay/Amazon. Overall, while Sony's audio solutions are certainly convenient, third-party options like the Sennheiser can provide superior audio quality and versatility, making them worth considering if you're serious about capturing high-quality audio for your projects. Lenses When it comes to lenses for the Sony FX6, there are several options to consider. For documentary work, the Sony FE 24-70mm f/2.8 GM and the Sony FE 24-105mm f/4 G are both excellent choices, providing versatility and quality in a compact form factor. Even though the 24-105mm is f/4 only it’s really all you need in most situations because the camera performs extremely well in low light situations. It’s considerable cheaper and got the extra zoom length. If you're looking for a more cinematic look, the Sony FE Cine lenses are in the higher price range but offer excellent image quality and a smooth manual focus. In addition to Sony lenses, there are more affordable third-party options to consider. The Sigma Art series and Zeiss Otus lenses are both popular choices for filmmakers looking for high-quality optics. Another option is the Rokinon Xeen lenses and the Veydra Mini Primes, which are available in a range of focal lengths. Memory Cards The Sony FX6 records to dual CFexpress Type A or more affordable SD memory cards. Both types of memory cards are commonly used in professional cameras, but CFexpress cards tend to be faster and have higher storage capacity than SD cards. While there are many options to choose from, it's important to invest in reliable and high-quality memory cards to ensure that your footage is safely stored and easily accessible. There are many alternatives but Kingston Canvas React Plus and Angelbird AV Pro SD are two of the most trusted options in the professional industry. They offers high write and read speeds making it ideal for high bitrates and resolutions. Both have advanced security features, including built-in write-protect switches, shock and vibration resistance and is built to be safe in extreme conditions. If you plan on shooting high-resolution video, such as 4K or higher, at high bitrates, it is recommended to use V60 or V90 cards to ensure the best performance and avoid the risk of dropped frames or corrupted footage. However, if you are shooting at lower resolutions or bitrates, V30 cards may be sufficient. V90s is the best option for shooting high-resolution video at high bitrates, such as 6K or 8K footage and slow motion. Sony also launched their own Sony Tough series that are worth considering for recordings in very demanding environments. No matter which memory card option you choose, it's important to invest in high-quality cards to ensure that your footage is stored safely and reliably. Camera Bag Investing in a high-quality camera bag or case is crucial for safeguarding your equipment during transportation and storage. A good camera bag not only provides a secure and well-organized space for your gear but also ensures easy accessibility during shoots. There are several outstanding camera bags available, catering to different preferences and requirements. The Lowepro ProTactic BP 450 AW II is a versatile backpack-style bag known for its spacious interior. If you prefer a rolling option, the Think Tank Photo Airport Roller Derby is a durable case that offers ample space and smooth mobility. On the other hand, the Peak Design Everyday Messenger is a stylish shoulder bag equipped with quick-access points and flexible dividers for convenient gear storage. However, the Tenba Cineluxe bag stands out from these options due to its unique and user-friendly opening mechanism. their patented "Doctor Bag" style opening. This design allows the bag to split in half, that ensures quick and effortless access, saving you valuable time on shoots. In addition, it offers superior protection, large space that fits the Sony FX6 and its accessories perfectly, and excellent organizational capabilities. This post might include affiliate agreements, for full information click here.
 -
Thanks for your kind words Julien! You do not have to bring your PFE LUT into a color managed environment to make the reference. Simply add the LUT to a Grey Scale with no color transforms applied at all, and the result you see on the Waveform will be what you want to recreate. Save a still so that you have a reference. Then you'll have to set up your color managed workflow with the transform curve you want, and project it onto the Waveform. From there on you can use your reference still and the curve operator to make an "offset" that basically will be the difference between your reference and the color managed display curve.
-
Thanks Ryan!
-
The ultimate guide to color grading monitors
Lowepost commented on Lowepost's insider article in Color Grading
The DM220 (HD) is FSI's new 22” OLED, the DM 240 is no longer in production. Mixed feedback on the Eizos. -
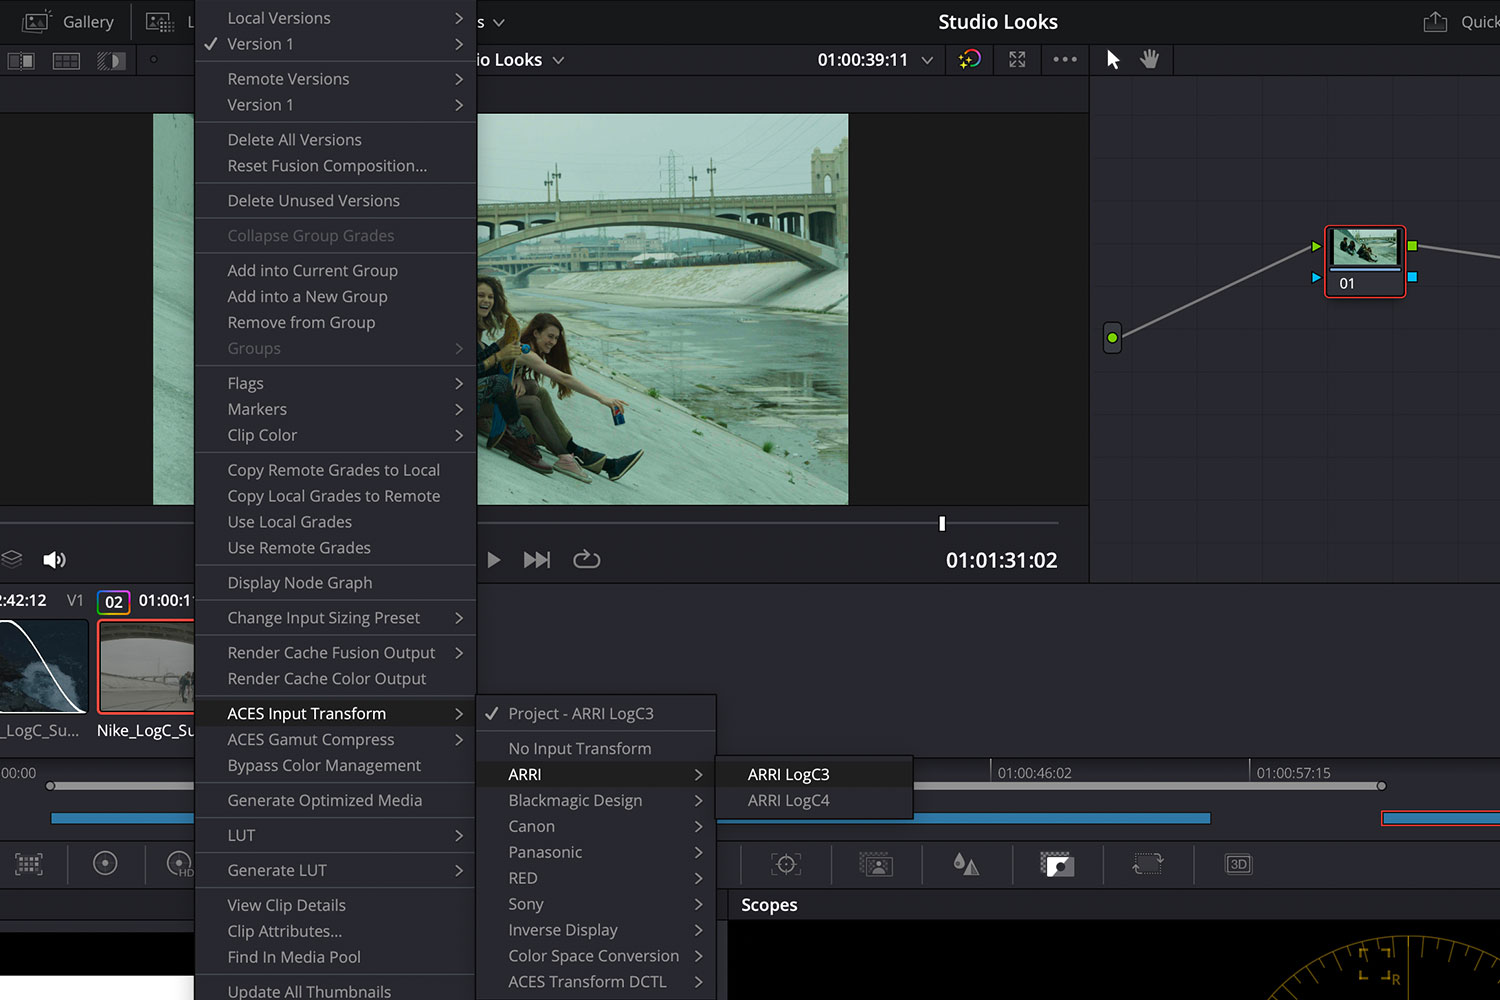
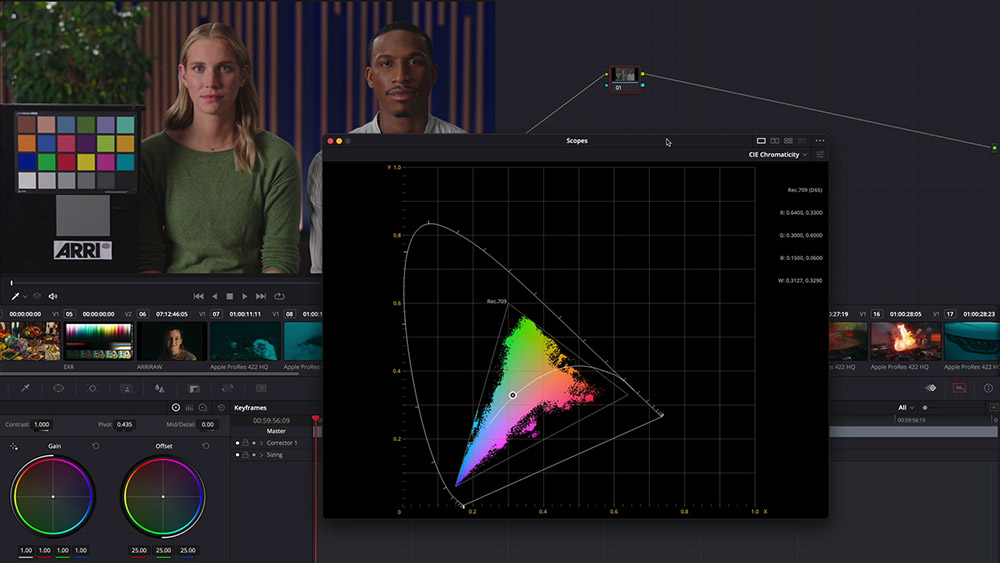
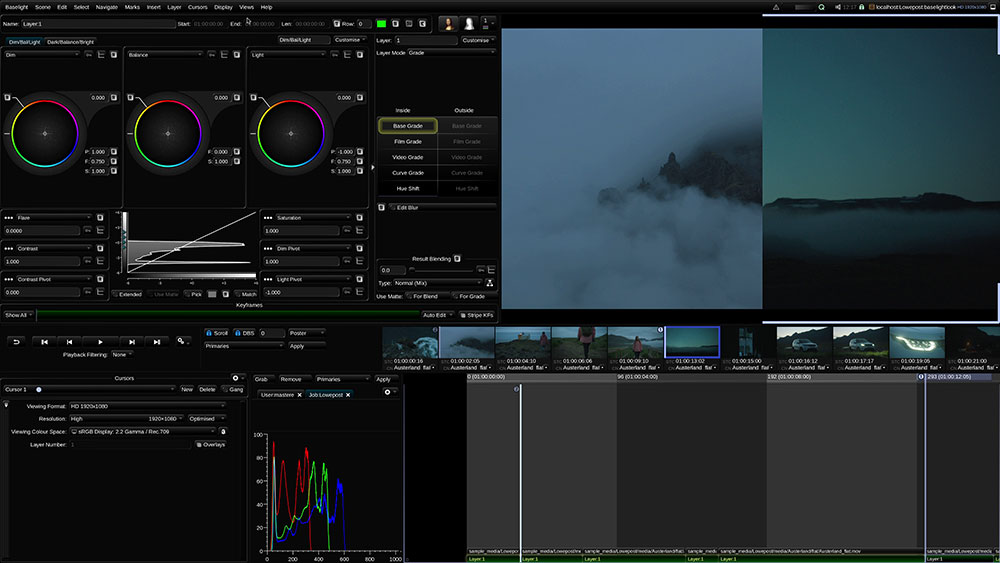
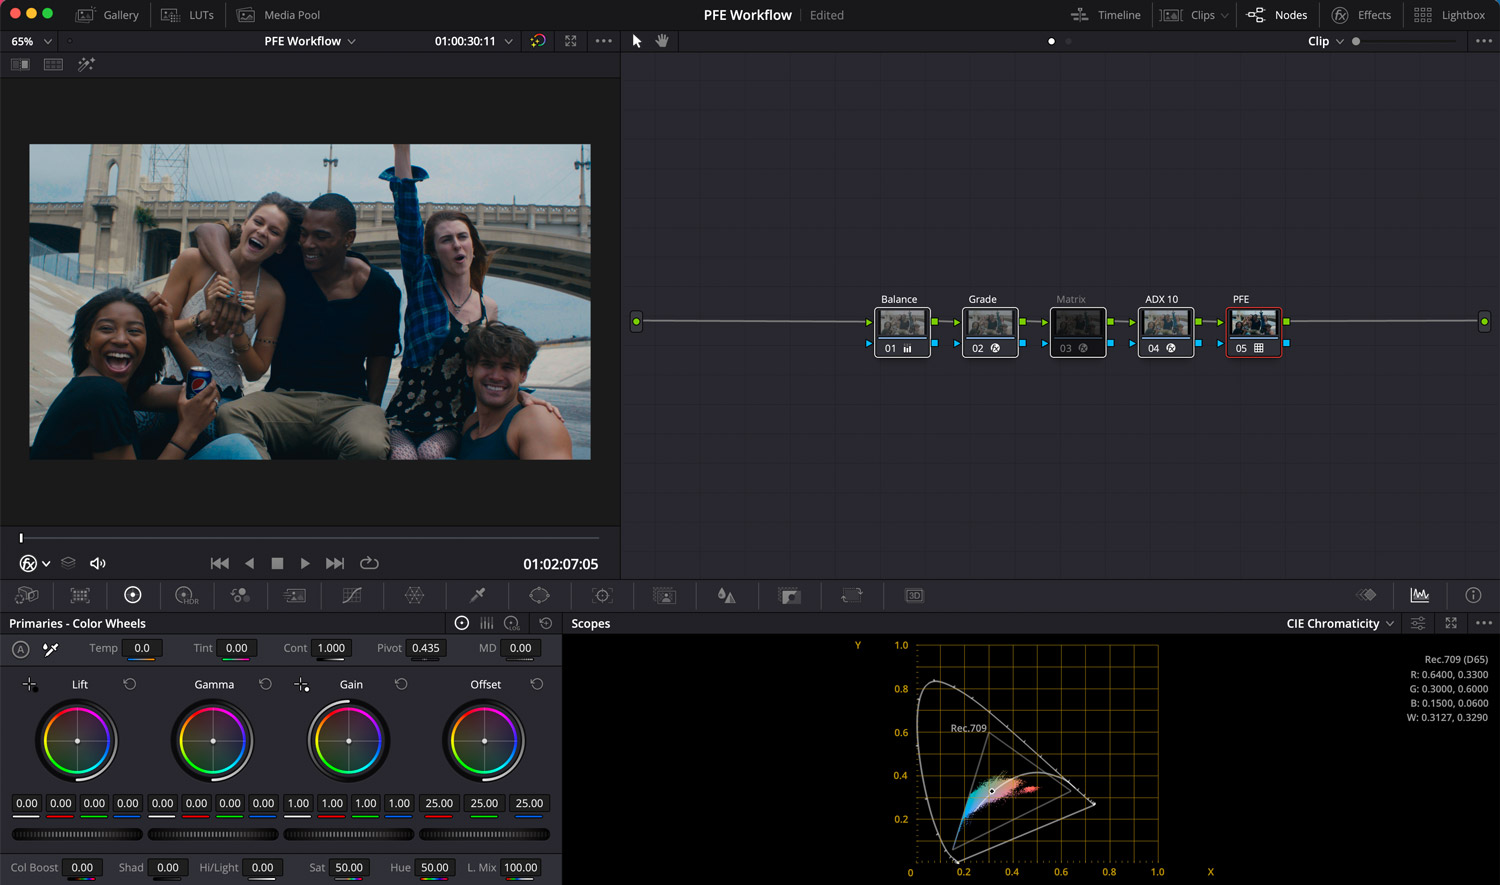 Print film emulation workflows are popular among colorists, and the idea is to create a film look by treating the image as if it was printed onto a specific film stock. This used to be a straight forward process, but new modern workflows have added some complexities that will be discussed in this post. Unfortunately, there are not much real print film emulation data publicly available, and it’s often protected by the owners and facilities. It’s part of their secret sauce. However, colorists can access print film emulations through a handful of standalone applications and plugins with added color management options, or as PFE LUTs. PFE LUTs Most colorists are well acquainted with the PFE LUTs available within DaVinci Resolve. They are based on ICC film emulations provided by Adobe, and cover a range of emulations from both Kodak and Fuji with different white points. The Kharma LUTs have implemented print film data from Kodak color scientist Mitch Bogdanowicz, Fotokem, Light Illusion and the ARRI Scanner. A set of Mitch's Kodak 2383 LUTs are also available for free in Ravengrades Look Development Starterkit. In addition to being a part of Kharma, Light Illusion have their own set of PFE LUTs and have implemented their data into the Koji LUTs. There are also some old Lustre PFE LUTs floating around online. PFE LUT Workflow There are several ways to set up a PFE LUT Workflow in DaVinci Resolve, and in the following example we use a combination of some custom color manipulations, a 3x3 Matrix and one of Resolves built-in Film LUTs. The footage is shot on ARRI and can be downloaded here. 1. Apply PFE LUT Start by adding the PFE LUT at the end of your node structure. 2. ADX 10 Transform The PFE LUT is designed to expect a film negative with a Cineon tone curve. The traditional method was to apply a Color Space Transform going from ARRI LogC3 to Rec709 Color Space and Cineon Film Log Gamma, but today we have a better method. By using the ACES Transform (without the need of working in ACES) to go from ARRI LogC3 to the Academy’s ADX 10 color space, we get a more accurate transform to an encoding similar to Kodaks Cineon Log. Besides, we’ll leave the display transform to be handled by the PFE LUT at the end. Just remember to apply a gamut compression as shown on the image below to ensure that out-of-gamut values coming into the ADX 10 color space will not be clipped. 3. 3X3 Matrix The traditional method of transforming from Log3 to Cineon with the Color Space Transform instead of using ADX 10, was often combined with the use of a 3x3 Matrix. A 3x3 Matrix is a data set provided by ARRI, and it's supposed to help bringing the hue values of the ARRI footage even closer to negative film scanned on the ARRI film scanner. By bringing them more in line with the hues of the “film scan”, the PFE LUT would perform better and more accurately achieve its intended response. A 3x3 Matrix is designed to be watched through a PFE LUT and is typically applied through a DCTL. Both of the color checkers below is shot with tungsten light and have a PFE LUT applied, and the 3x3 Matrix is applied to the one on the right side. Our observation though, is that the ADX 10 transform has incorporated the shifts and attributes that would come from the Matrix, such as irregular distribution of saturation and denser colors. This makes the use of Matrix redundant. Also note that the Matrix is originally designed for ARRI footage, but the ACES Transform change the data based on your camera. If you prefer using the 3x3 Matrix, it can be downloaded in the Look Development Starterkit. Another alternative is to manually insert the numbers from ARRI’s Whitepaper into Resolve’s RGB mixer. If you do so, make sure to untick the “preserve luminance” button. In Baselight, the numbers can be inserted in the CrossTalk operator for the same result. Note that a 3x3 Matrix created manually in for example Nuke will be more accurate as it allows 8 decimals, while the RGB mixer is restricted to 2 only. In the same Kit you'll also find a Matrix Removal that can be used to subtract the 3x3 Matrix from a LUT. This can be useful if you want to remove the 3x3 Matrix from an existing PFE LUT to built your own. 4. Exposure and balance Now it’s time to adjust the exposure and balance to get rid of any unwanted color cast and compensate for any exposure issues. This is important because we want a neutral starting point and good color separation for our film look. We use the offset controls as it moves the entire signal in its entirety and provides a clean result. Read more about exposure and balancing techniques in our printer lights master study. 4. Grade Lastly, it's time for some custom color adjustments. In this example we use GradeLab by Ravengrade that have implemented subtractive color controls for more film style look adjustments. Any color controls can be used, but many colorists prefer to use global controls such as printer lights (or CMY controls in GradeLab) in a film workflow. Global controls move the signal in its entirety, and avoid breaking the relationship between the different parts of the film curve in the PFE LUT. Not all PFE LUTs require Cineon Log, a 3x3 Matrix and Color Space Transforms (or ADX 10) even though Resolves built-in Film LUTs and others such as Mitch Bogdanowicz’s Kodak 2383 PFE do. The Kharma LUTs have all these elements built in, as well as preserved middle gray values so that they match the original exposure of the specific camera footage they will be used on. Information about how the LUTs are designed and what they require is often described in the metadata of the LUTs. A tip is to drag and drop the PFE LUT into an online HTML editor (or open in a desktop editor) as the most important information often is listed in the metadata. PFE LUTs are not for modern workflows This film workflow example above works perfectly fine for some projects, but most of the PFE LUTs are restricted to a Rec709 target. Another issue is that they all have built-in tone mapping (the contrast curve part). This means they can not be used in a color management workflow such as ACES and RCM, or in any other node based workflow with user-applied display rendering transforms. In addition, they can not be used inside of new cameras such as the Alexa 35, as they require the look files to be separated from the cameras built-in transforms. Inverting the display transform So to use the PFE LUTs in a modern workflow you'll have to find a way to extend it to a wider range than Rec709 and also decouple the print characteristics of the PFE LUT from the tone mapping. One way to decouple the print characteristics from the tone mapping that is often seen online, is to invert the tone mapping by using an exact Inverse curve - sometimes referred to as "making the butterfly". The idea is to invert the existing tone curve to a straight line, so that you’ll be left with only the print characteristics. The problem with this approach and why you don't want to work this way, is that a LUT on top of the LUT application will introduce quantization issues and rounding errors because the low precision of a cube. You will most likely not find a one hundred percent exact Inverse LUT of your PFE LUT either, and if the negative and positive values of the two curves doesn't match the inversing will not be accurate. An approach that works better, is to follow these steps. 1. Isolate the color Add a layer mixer with the PFE LUT applied to the bottom node, and set the composite mode to Color. This will isolate the colors from the LUT. 2. Isolate the tone curve Use the same setup, but set the composite mode to Luminosity. This will isolate the tone curve. Now that you have successfully isolated the two components, you can combine them back into a parallel node to get the exact same result as the original PFE LUT, but with individual control of each component. A third approach is to use external applications such as Lattice or ColourSpace from LightIllusion. They have automated the extraction process, so that you can subtract the two components from the PFE LUT automatically with a single click. Rebuilding with curves The isolation process above works great if your display target is Rec709, but if you want to use it for P3 or PQ HDR you'll need to rebuild the curves of the PFE LUT to extend their range. Rebuilding curves is best done using a curve operator, as they typically work in 32bit float and return great resolution. We recommend rebuilding the curves in for example NUKE as the precision of the curve operators in Resolve and Baselight is awful. Because most of you have access to Resolve we'll walk you through it, but be prepared for a very tedious process as it's a precision game to get the points in the curves to match exactly. 1. The PFE LUT on the Waveform Start by applying for example Resolve's built-in Kodak 2383 PFE LUT to a grayscale ramp to visualize the curves on the Waveform. You can expand the Waveform view for greater details, and analyze the curves to get a better overview of what will be required to rebuild them. We can clearly see that the reds and greens are lifted higher than the blues, resulting in significantly warmer highlights than the D65 whitepoint which is standard for Rec709. The shadows never reached true black, and the curves are steeper than a traditional technical LUT provided by camera manufacturers which means there are more contrast in the mid tones. Notice that the curves cross at the 60 IRE mark, and that they overlap several places. It's telling us that we should separate them, before rebuilding them. Before you move on to the rebuilding process, make sure to set the "3D lookup table interpolation" to "tetrahedral" in the color management settings. It interpolates the values between the data points more accurate than the standard "trilinear" option, and is therefore a better starting point for re-building curves. When this is done, save a still to the gallery. 2. Tone Curve As we have seen, some of the curves overlap and it will be easier to rebuild them individually. Go to the Waveform settings and choose “Y” to see the tone curve only. 3. Split the screen Now, disable the node and play the still you have saved with the wipe set to "vertical. This way, the Waveform will show both the tone curve from the PFE LUT and a straight line that you can modify to match. 4. Tweak to match Tweak the custom curve to match. By enabling editable splines (click the three dots), you can get really close by just using two points. Then finesse with single points. 5. RGB curves on the Waveform When done, disable the "contrast node" and add a new one labeled "color". Go back to the Waveform settings and swap the "Y" with the "RGB" channels to enable one of the individual color curves, for example the red. 6. Tweak to match Tweak the red curve to match, but before you do - make sure Lum Mix in the color wheel tab is set to "zero" so that the curve adjustment of each individual color channel does not affect each other. When all the Y and RGB curves are matched, the tone mapping is separated from the print characteristics, and rebuilt to high-resolution versions. The Y and RGB components can now be used with different display transforms or to perform operations like inverting, scaling and mixing. Rebuilding for display-referred There is nothing wrong with using the rebuilt RGB curve components with a different tone curve than the one we just created. The resolution is now high enough to be used in a color managed workflow such as ACES or RCM or in a YRGB workflow using Color Space Transforms. But, by swapping out the Y component from the PFE LUT with for example the tone curve defined by ACES or RCM you'll get a different result than you are used to from PFE LUT alone. That's why we recommend a slightly different strategy when rebuilding the curves of the PFE LUT for use in a display-referred workflow. Instead of building the Y+RGB curves from a straight line as in the example above, simply start the building process from the color managed tone curve you plan to grade under and tweak this curve to match the curves of the PFE LUT. This delta component can now be saved and combined with other tone curves in the color managed workflow. In Ravengrades Look Development Starterkit, you can download a Shape component that is created this way. It's wrapped into a cube so that you can easily apply it as a LUT inside of Resolve. It's print characteristics derived by a Kodak 5219 print emulation processed at Fotokem, created under a DRT in Baselight by John Daro at Warner Bros. There is also a Tone Map component from the same emulation in the download folder. You can get a good idea of how it all works in a color managed workflow by importing the two components into separate nodes and watching the result from a gray scale on the Waveform. If you prefer to work in YRGB, you can add a third component (AWG to Rec709/P3 or 1000nits transform) from the same folder at the end of the node stack and get access to the complete emulation. Not an exact match Even though it is possible to rebuild the curves and adapt them to work in color managed workflow workflow, it might not be worth the time. Unfortunately, there is absolutely no way to adapt the PFE LUTs without abandoning some of the print characteristics. Rebuilding the curves without considering the other attributes of a LUT will result in a strange and inaccurate film look. First of all, by decoupling the print characteristics from the original tone mapping you are left with two separate components that no longer are working in conjunction with each other the same way as they do in the original version. The truth is that these two components are designed to react on each other when being altered, and by separating them this relationship will be broken. Secondly, when swapping between different display target the relationship between the two components will change even more. Just as important are the other non-linear and non-additive aspects of the PFE LUTs that simply is impossible to recreate with curves only. One example is channel cross coupling that varies with exposure, and the non-predictive response of changes in channel color that also varies based on the film stock. Some say that these aspects are the secret sauce of the film look, and trying to recreate it 100% will be like trying to un-bake a cake with mixed ingredients. The bottom line is that you will only be able to extract the key essence of the original version, so to access the exact texture and behaviour of real PFE LUTs, you’ll have to use them as is and embrace their limitations instead of forcing them to fit into a modern workflow. Print film emulations in apps and plugins Colorists have a love and hate relationship with the original PFE LUTs because of the mix of beauty, texture, kinks and imperfections they add to the image. Because of their limitations and that using them requires some know-how from the user, there are some color management systems and plugins available that makes it easier to use them. One of the most complete standalone apps is ColourSpace CMS by Light Illusion. It supports color manage workflows and allows the user to create and alter FPE LUTs from Kodak Vision 2383, Premier 2393, and Fuji Super F-CP 3510 film profiles. Another one is Ravengrade’s Cinelook Plugin for DaVinci Resolve, which includes some looks based on Mitch Bogdanowicz’s PFE data as well as from Fotokem and the ARRI scanner. It handles the color space transforms and adapts the looks to work properly on any camera footage and display target within the plugin. Filmlight offer Truelight film profiles which is manually cleaned generic print emulations built into their Baselight color grading system, and After Effects have implemented print data in some of their tools from Adobes own ICCs. There are other apps and plugins available, but watch out as many of them are "created by hand" and lack the components that makes the real emulations unique. Whenever possible, if emulating film stock, having actual data promotes a strong starting point but I always try to leave room for growth or manipulation incase the creative’s memory or experience of what a film stock looks like is different than the data. - Matthew Tomlinson, Harbor Picture Company It’s worth mentioning that there’s no such thing as completely accurate print film emulation. The film measuring systems vary, the film itself is a variable, and the creation process requires a number of subjective judgements. That said, absolute accuracy is normally not required either, as print film emulations is normally used as a starting point for a grade or as a special sauce ingredient of the final look. Modular print film emulations As color managed workflows are getting more popular and colorists will be required to deliver their grades for multiple display targets, print film emulations and other film style responses will continue to exist as modular components decoupled from the display transform. High resolution components give full flexibility and colorists can take for example the shadow response from one emulations and mix it together with the hue, saturation or highlight response of another film emulation. The components can be saved in libraries, every parameter can be adjusted and they will work for all display transforms. However, as long as some of the unique and beloved attributes of the original PFE LUTs can't be fully recreated, it will most likely continue to exist for years to come. Lowepost Thanks to Eric Weidt, John Daro and Matt Tomlinson for contributing to this post.
 -
if you're interested in checking out Baselight, our instructor @Josh Petok has created a 20 minute long quick-start video for the free Baselight Look that includes everything you need to know for setting up a project, importing media, doing a simple grade and exporting a file.
-
 There is a lack of Baselight knowledge in the industry at the moment, and learning Baselight has generally been challenging because most of the systems are only available at the high-end post production facilities. Fortunately, Filmlight have released Baselight Look which is a free Mac-only "student version" that includes the same interface, color science and features as the full Baselight system. However, as Baselight Look primarily is a learning tool there are some restrictions. Rendering is limited to 8-bit H.264 files only. Projects created in Baselight Look can not be imported into a full Baselight system or into Baselight Editions (and vice-versa). Some color panels are not supported. Get started quickly Getting started with Baselight can be time consuming, and requires new users to go through hours of online tutorials. We know some just want to download the software and quickly get in there to see what it's all about. That's why we have challenged our Baselight instructor @Josh Petok to create one single 20 minute long video that includes everything you need to know for setting up a project, importing media, doing a simple grade and exporting a file.
 -
We have watched the available training before creating this introduction-course, and we'll cover the whole range from beginner to intermediate and more advanced.
-
New training! Josh Petok has created an amazing training series for Baselight Editions inside of Avid Media composer. It's an introduction course, tailored for DaVinci Resolve colorists and Avid editors that want to get access to premium color grading tools. Learning different color correctors can lead to a a deeper understanding of color grading and help to see your current workflows, techniques and methods in a new light. Watch it here