

sheriff
-
Posts
58 -
Joined
-
Last visited
-
Before we actually started grading Honda 'Ignition', a treatment was shown to me to give me a chance to think about the project before we actually started grading. It was very useful. There were no references as such for the grade but director Aoife McArdle and I had lengthy conversations about where we wanted the grade to end up. It was a fluid process involving trial and error to gain the achieved look. The commercial was shot on 35mm film which was a real treat as nothing really beats the feel of film. Setting the correct exposure My starting point never really changes from job to job, I always get the film looking straight with good contrast, which enables me to see what the Director of Photography was aiming for and then I build on that base. This starting point invariably begins with film exposure and a curve grade. LUTs can also be useful in getting you to a point, but I generally find them a little detrimental to the film as they can show up some anomalies. I tend to find you can achieve the same look and feel using standard grading tools. I think at the front end, setting the correct exposure and contrast is important as it keeps the integrity of the film throughout the grade. Vivid Colors The film was shot at the golden hour so some of the vibrancy came through from what was originally captured on the neg. Having said that, I needed to bring these out considerably to achieve the burnt orange hues and enhancing the strong accents in the sun and rocket fire. This was achieved in a number of different ways. When looking at an image as a whole, I was adding contrast through s-curves and adding texture and depth to the midrange of the colours. I also targeted separate elements of the picture using hue angle keys and soft tracking shapes to add extra depth and vibrancy. Some of the shots in the commercial had 20 or 30 layers with each layer chipping away and striving for a better-looking image. Each shot contained the layers, which ‘created’ the look of the film, whether this was the burnt orange hues in the highlights or the slightly purple shadows. Adding contrast and colour in the right place on the grading stack is very important. Quite an integral part of this grade was to make sure there was symmetry to it with the reflections mirroring the sky, so a lot of shapes were used to keep this harmony. VFX Some of the shots in this commercial were entirely CG like the NSX shot. The guys in 3D and 2D did an amazing job to sit the elements of the commercial together, and my job was then to make these images sit within the commercial as if they had been shot for real. I used real film grain, which was added through a blend to give these shots the similar structure to the rest of the film. For some shots, I did request a matte to grade through, as the required look needed this extra finesse. My best tip is to know your kit backwards. Never stop experimenting and don't get stuck in a rut - be open to new ideas. Listen to your director and creative and enjoy it. We are very lucky to be able to do this job every day! James Bamford All images and clips copyright © 2016
-
I first became acquainted with this spot on the morning of the first grade session. This is a fairly typical situation for a busy commercials colourist and especially where the shoot is essentially narrative based rather than a technical basis for a complex VFX heavy spot. Despite the increasing collaboration across all departments, it is still difficult to fit pre post-production meetings into everyone’s calendar and ,therefore, we learn to ask the necessary questions and get up to speed on a project quickly. This process is obviously helped by the strength of the relationships we have with our clients. In the UK, the strongest relationships exist between colourists and directors. In this instance, I am fortunate to have worked with Director Sam Brown on previous projects and therefore can relate to his sensitivities and ambitions for a film with minimal questions. The Director of Photography, Franz Lustig, has also worked with Sam before and he sent an excellent breakdown of his thoughts and intentions on a scene basis. He also used stills to illustrate his points. Whilst this gives me an insight it is not prescriptive and I never feel restricted by such input. The inspiration for any image comes from the photography and it is always good to have the Director of Photography’s thoughts. The essential vision for this spot was to celebrate the scale of the piece but retain a naturalness to each scene. Grading techniques The material was shot on Alexa and we graded directly from the Arri Raw files. This is pretty standard for our workflows and although we manage our pipeline with precision there is no need to instigate a grade from a LUT. Personally I find it better to manipulate an image with subtler tools than the LUT sledgehammer. Where we are working with non VFX-heavy projects my first balance will involve a mix of primary grade and saturation and will build over multiple layers. This is the base upon which the beauty layers will sit and is very important to the end result. It is the effectiveness of this balance that allows for the rapid development of the flow of a look through a piece. Given that a solid foundation leads to flexibility, it is time then to explore ideas and map out the colour ways for the scenes. The subtlety of the final result is based on many things and the particular offset of individual colours is only one technique to blend diverse scenes into a complete piece. It's the same as with long-form work but we have the luxury of time per frame. Technically, I use layers of multiple primary and secondary processing to form an image that can be pushed and pulled into shape. No single layer will ever represent the final result. It is their concatenation that is important. Skin tones People can be made to look real or plastic and everyone decides what he or she wants to communicate. The beauty techniques are the icing on the cake. Every job we do pays consideration to this in some way or other. However, it is important to get the cake right before you add the icing. A colourist needs the ability to listen. The ability to concentrate. The ability to be impressed. The ability to appreciate what's in front of you. Couple those with a wish to experiment and not necessarily do the obvious. Learn to accept that what you are doing is part of a bigger effort but still strive to get your stamp upon it. Then it helps if you understand or at least appreciate the science. Colour science and theory is necessary to know because it enables communication but the level of knowledge can vary. Having an awareness of perception and environmental effects upon that is sometimes more important than understanding the maths behind an exponential power law. The understanding of how best to enable the process of colour within a constantly evolving post environment is also useful. Finally, learn what the knobs do. Seamus O’Kane All images and clips copyright © 2016
-
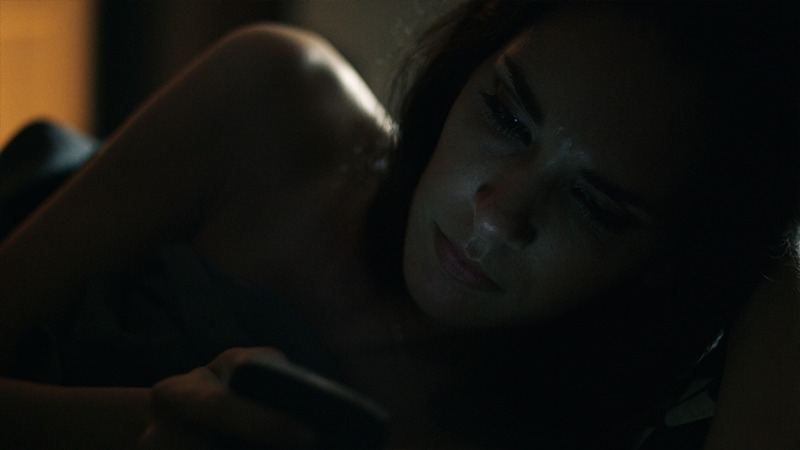
Just two weeks before principal photography started, I was asked by DoP Rob Hardy to come to Pinewood and compare the F65 and Alexa camera tests. I had previously worked with Rob on The Invisible Woman. We matched the cameras within a couple of minutes but the F65 and also F55 that Rob used gave a greater tonal range than the Alexa, and once we had resized the image to accommodate the 2x anamorphic lenses that Rob wanted to use, we all felt the F65 was the way to go. It's great to be on a project before it starts filming, and as well as camera testing and look development. I read the script and visited the set, giving my input on set colours and actors' skin tones. Rob gave me reference images from photographers such as Saul Leiter and we talked about a soft contrast with a painterly feel rather than having strong blacks. One of the main challenges was creating a natural look to the film that wouldn't date. We talked about how easy it would be to go for a high contrast "slick Transformers" look that might work for a year but would look very "2015" in a few years. 4K workflow Although the final delivery was 2K we ran the project as a 4K workflow except for the VFX which were requested by Double Negative to be 2K. We built LUTs for Rob to use on set and on location and started with these when the grade began. We used Baselight to conform and grade on and having worked on projects with images up to 9K, the 4K workflow wasn't a leap for us. We used Baselight's D-fuse plugin to add anamorphic flare to subtly merge VFX-composited-monitors with their surroundings, motion blur to make rain disappear, and neat-video degrain for a few dark dusk-for-day shots. Having graded one of the actors before, I knew his lips tended to go slightly purple under a cooler light so I asked makeup to address this when I visited the set. I also asked makeup not to add too much to the actors faces as it can stop light reflecting properly and can look matte. In Baselight, we completed a beauty pass for any skin blemishes. In the extreme close-up just before Ava attacks Nathan, I made the skin appear more artificial so that it looked like a synthetic rather than human. After selecting the skin tone, I blurred this horizontally to create a subtle artificial texture and make skin detail. Finishing the grade During the two week grade, I completed a first pass in three days, then went back and started adding grads and shapes and tracked faces. We didn't really need to lift any eyes as Rob had lit so beautifully. Both Rob and director Alex Garland attended the grade. After six days the guys gave me a day on my own to run through and finesse colour and contrast, adding a low-pivot bite to the blacks just to cut through the soft smoke on some scenes. After the theatrical grade was completed we spent a day tweaking the grade for HD deliverables. We're so happy with the look of the film; it's such a contrast to the Dickens tale of The Invisible Woman shot on 35mm. And it was so much fun to move from the lamp and candle-lit period film to a sci-fi one. Asa Shoul All images and clips copyright © 2016 United International Pictures
-
Joachim Trier is a director with strong ideas about how the film should look. He likes clean images. The blacks should be black and the whites should be white. The goal for Louder than Bombs was to achieve a natural 35mm analog look. The natural look makes the public come closer to the characters, and natural skin tones make the movie more tactile. This was essential for Louder than Bombs as a family drama, and I think that the look should not take the attention from the acting and the story. For me, this is a very difficult approach and one could find it easier to just desaturate or make a «two tone look» for the whole movie. But the movie should last, and be picked up ten years later and still be watchable. You should be able to see it without thinking «that look isn’t so cool anymore». Grading technique The movie was graded on a Baselight with the Truelight colour management system. I generally like to work from scratch, starting off from the Log C image to retain as much information as possible. I’m using a very basic approach starting off by balancing the image and then adjusting the primary exposure controls. I also use secondaries like the HSL qualification to adjust the skin tones. I will only use keys to take down annoyingly strong color patches or to clean the whites and blacks a little extra. DoP Jakob Ihre worked with us in the grading process, and he loves to use shapes. Every image in the movie has shapes either to lighten up eyes or to flag of a corner - to make sure that the viewer's eyes falls on the right part of the image. The revolutionary round I generally go through the film quite fast the first time, just to have a base grade to discuss with the team. I always ditch nearly 70-80 percent of my grades from the first round. But there are always some scenes that stick with the first grades through the whole film. In the first round, it’s very important to go forward and not get stuck working too long on one image. The second round I call «the revolutionary round», and this is where the look of the film is created. I think that at the end of the first round, the look starts to come through, and I find that the first base grade is essential to see what I had, and to not get lost. Comparing is very important. Etalonneur In French, you call the colorist an «Etalonneur», meaning that you «even out». Basically, the work a colorist does is to make the movie float and not jump from image to image. Your image will always be either green or magenta, and when creating a natural look you will have to stay balanced between them all the way. Rewinding Louder than Bombs makes me jump in my seat because it jumps from magenta to green. Director Jan Troell once said to me; "Never look at your movie backwards". The film floats in one direction, and If we suddenly mix the scenes of a movie, it will jump in colour match. The grading session lasted for three weeks. It took some time to get used to 35mm again, having not graded a feature on 35mm in a year or so. Working with digital for a long time makes you forget the greatness of the dynamic and contrast of the film negative. And of course, the beautiful skin tones you get with film. I find that I generally desaturate the film negative, and add a little contrast. For the digital image, I find that there’s much more work to get it right. You want to make the digital image look like film. Because that’s what we are used to seeing. With digital, you have to add color and much more contrast. Personally, I get a bit lost working with LUTs or Aces because I don’t see the flat «negative» anymore. That’s why I like to start from flat Log C and work from there, building up the image. I often have the Arri Log- rec709 LUT to compare. I also have a set of LUTs or just setups of looks that I like in a library that I use for more «looky» films. I find that working on RAW is imperative to achieve the desired potential of the image. Julien Alary All images and clips copyright © 2016 SFNorge / Jacob Ihre, Motlys AS
-
The director Otto Bathurst's vision for the show was for it to be unlike any British period drama. A family saga that was epic in scope and look. Unashamedly ‘big and bold’. Essentially a programme about men trying to cope after the first world war, impoverished and turning to a life of crime in Birmingham. Based on a notorious local gang the writing took on themes about the IRA, British Government, and Opium. Our main inspirations were 'The Godfather', 'Heavens Gate', 'McCabe & Mrs Miller' and 'Once Upon a Time in America'. A lot of people have made an assimilation between Peaky and the American series 'Boardwalk Empire' but it isn’t something I've ever watched and it was really interesting to note that Otto, on the first episodes of series 1, hadn’t seen it either, which kind of puts to be any argument it was trying to emulate the look of it. I've since seen some and I think it probably boiled down to the fact our points of reference were the same as theirs. The colourist's armoury George Steel and Simon Dennis, the DOP on series 2, shot everything so there was always atmosphere and a nice amount of texture and a slight noise in the lower end. I think this worked beautifully for this project and served the film/print ideas we had and the references we looked at. The look development was a process that started with George Steel when he was looking at cameras and lenses and someone to bring on board to grade the series. He wanted someone with a more commercial/promo background, and we had worked together before so he approached me. He shared the references for the project and the ideas he had about shooting, and we worked through these ideas and created some LUTs that were our starting blocks for the final locked cut. LUTs have become the colourist's armoury. For short form projects, you tend to have an assortment that you can bring up that you’ve created for different times of day or for different looks. Mine are based on my favourite films, a good point of reference for me. But for Peaky, George Steel and myself spent a few sessions testing lenses and footage before the locked edit so we developed our own LUT specifically for the project. For the upcoming project, we’re working with together, we’re actually looking at creating those on set as George has his own Resolve which enables us to interchange projects and files and remotely link to exchange grading ideas and looks. This can be very beneficial for DOP’s on set with trusted graders. I'm always open to this and it's a real honour to be included at this part of the process. READ: Mitch Bogdanowicz about LUTs Scene 1 A lot of the places we visit in the second series were there in the first. However, for me, it wasn’t as easy as just re-calling the grade we did for that. The second series had its own set of lenses, more smoke and its own aesthetic, so in essence, I was building on this. What I could always recall were processes I went through and the ideas I’d used. For instance, this scene as you can see on the rec 709 set up is green and there’s a fair amount of contrast and lifted highlights. We went through and nullified the highlights and suppressed the overall contrast. We also introduced the bluer brushed steel look and soft blacks. The LUTs we used all tended to suppress the contrast and leave a soft black. Again we wanted to mimic the 70s westerns and their print processes. Once we graded the rest of the scene to match, we saw that the skin tones had gone too grey. The firelights in the scene would have warmed them up more, so we isolated the skin and warmed them up. This gave a nice contrast to the colours and helped you focus a little more on the characters. Contrast A lot of colour grading is about contrast. Working within a show that had a definite overall look, you break down scenes into their own moods but again this becomes instinctive. There are some scenes in the series that require a darker more menacing feel and others which are lighter in tone and the grade will follow. I really enjoy this about working with long form. However, there weren’t fixed ideas and the whole piece was about breaking the convention of what you’d usually expect from a period BBC drama. Honestly, I think that's part of the reason I was looked at to grade the series. I had little experience in drama and George wanted to work with someone who would bring a different aesthetic. Skin tones Skin tones are the first point you look to in order to match in a scene, however, some scenes may have different light sources. This happened in Peaky a lot with daylight mixing with some of the oil lamps in the interior. I then go back to the way things are lit. If they’re lit well, and they were, my job is minimal in matching these. There was a couple of scenes where two cameras were used and one was slightly different to the other which would have an effect on the grade. Here you rely on your eyes. If I get something like this, I'll look at the two cameras in a raw state and look at the different colour bias and try and globalise this on the offending shots. Sometimes this will throw out qualifying keys you may have so you need to be aware of this. But this is all knowledge and it doesn't take long to match. There were some isolation on skin, but minimal. The biggest isolation I worked on was for the eyes. A lot of the protagonists have peaked caps and at times we needed to see more into the eyes. The ‘grading goggles’ came out a few times. I used some hand drawn shapes around these and tracked them through shots. Sometimes they were too bright and looked like exactly what we’d done so on reflection some had to be suppressed. Often you don’t know until you’ve tried. I may feel it's the wrong move, but you always need to be willing to try. As a colourist, sometimes you need to realise you may have done this before and that it didn't work. But the client or director may not. It's a visual language so just a few minutes of looking at something is better and much more transparent. Grading is about interpreting someone's vision. In color grading, there's a number of methods or techniques I’ll use, but no real magic formula. Once I’ve started, it becomes something I’ll instinctively know to use. It's all in the preparation and experience. If you have both of these, you will always be able to call upon whatever tools you need to get you to the place you need to be. There’s obviously an aesthetic we all have that we’re drawn to, but I wouldn’t add my Le Samurai LUT to a Californian Rom-Com. I trust my instincts and everything becomes fluid and free of intellectualisation. I work better this way. It's always good to then come back to the piece and view it again with fresh eyes and detachment. Sometimes, I'll sit in other parts of the room or stand to give myself a physical new view as well. Simone Grattarola All images and clips copyright © 2016 Tiger Aspect Productions
- 11 comments
-
- 14
-

-

-
After the success of the look of the season 1, the pressure was on to retain the 'Utopia' look but to propel the grade into something even stronger. Director Marc Mundon and the producers wanted to push the look of season 2 even more. I was very aware that recent programmes and dramas in this genre had looked very similar and I really wanted to create something different. The fictional characters and fantasy elements in Utopia gave me the visual licence that I needed. Visual references When I graded season 1 roughly 6 months before shooting season 2, I spent time with Marc researching reference books, magazines and film clips etc. for visual references. We came up with a diverse reference list; Gothic and Victorian postcards, Technicolor and Powell and Pressburger (AKA 'The Archers') the 1940’s film-making partnership who created The Red Shoes and Black Narcissus. A decision was also made to draw on “traditional” in camera and lab effects such as Push and Pull processing, pre-fogging and bleach-bypass. The only problem was that there was no budget to shoot on 35mm and The Red Epic was to be used. John Hinde Once again before the filming of season 2 commenced, we shared many tone and design meetings together. Whilst the work of photographer Martin Parr was always a reference for the look I was inspired by the work of Irish photographer and artist John Hinde who in the seventies photographed landscape and portraits from all corners of Ireland. These pictures were always on display as post-cards with very high saturation and his technique was to print and then paint over the image with high use of colour before been transferred to post-cards. As a young man, I recall being at the various location of where Hinde had photographed and was confused at how such a cloudy and overcast grey sea or landscape could be so beautiful in a postcard format. This was to be the benchmark and starting point for the look of season 2. The objective was to portray the landscapes and climatic conditions of an anonymous location and making it look almost other worldly. But yet retaining a reality, whilst filming in Liverpool in winter! I embraced the natural surroundings, landscapes and light provided by the stunning locations. Modern day From the outset of episode 2, we are and stay in the modern day and return to the wide-screen anamorphic screening ratio after the 4:3 ratio introduced in episode one. In every scene, I pushed and stretched the Red rushes to its limits with saturation, very strong hues, and contrast. There are many scenes in this series where you feel you can almost reach out and touch the characters and landscapes on the screen. In order to achieve the look, I had to use a huge amount of grading layers, adding sometimes frame by frame to areas of the screen. I worked initially on the whole frame and by using layers draw shapes to enhance specific parts of the picture. I also used vignettes to darken and lighten areas of the frame. Keeping the highly stylised consistency of the look was a major challenge and was of utmost importance to keep each scene as visually interesting and evocative as the next. Beauty seldom seen on the small screen! In many scenes I pulled all the colour out of the original image, giving me a simple black and white canvas then I would commence re-introducing original elements and creating new tones accordingly. Added to this, I created various original grain effects in order to give texture where required. My aim was to create a comic book effect to these scenes with very heightened colour and contrast. This might sound quite easy to achieve; however, this is an immensely difficult task in keeping the frame looking interesting but keeping the natural quality. I feel the series graphically portrays the visual world of this violent and dark comic book thriller. Seventies tone and mood The first episode is set in 1973 to 1979 and that challenged me to create The Utopia look, with a seventies tone and mood. I broke away from the anamorphic framing of season 1 and the whole episode is in the 4:3 ratio with black borders on the sides for effect. I also added various grain levels and textures for authenticity. Almost twenty minutes of the programme was set in Rome in 1973. The issue here was that no scenes took place outside the UK, meaning every Rome scene was green screened. Keeping the period feel and The Utopia look in a green screen keyed set of scenes was a major success in my opinion. The use of graduated filters, flares, glares and light shafts combined with layers of de-focus which enabled the dramatic transformation of many scenes, enriching the drama by shifting the point of focus and adding colour and density to emphasize meaning or simply imply mood, atmosphere and texture. In some scenes I got the footage bounced down to Beta S and back to HD in order to degrade the source footage. I used Digital Vision’s Film Master to grade the entire series from the raw data files produced by the Red Epic camera. It allowed me to use an infinite amount of grading layers, blurs, de-focus, vignettes, keys, and graduated filters. I created camera moves, tracks, zooms and re-sizes to obtain optimum creative framing within shots. I consider the grading processes used for this series, to be the most complex and demanding of my career to date; a truly striking and memorable piece of work. Aidan Farrell All images and clips copyright © 2016 Kudos
-
This was a particular project for me for several reasons. First of all, I was brought in quite late, about 2 months before the grade. The Childhood of a Leader is one of those typical co-productions, where all along production resources have to be divided in function of money received, and apparently at a certain stage, due to the Belgian Tax Shelter Incentive it was decided that both image and sound post-production were to be done in Belgium. It is not the kind of thing that I necessarily favor: of course, I prefer to be involved in the entire pre-production and production stages, but these days it seems to be how more and more productions are going. Another quite particular thing, but also one that occurs more and more, is that the choice of post-production house was already been made, and that this choice was made at a strictly productional level, neither DOP, nor I were asked about this (you know how it goes, money needs to be spent in a certain region, etc). It was through the people of the lab, and our Belgian Post-production supervisor that my name had fallen. The director Brady Corbet knew that the year before I had worked with Mia Hansen-Love, which he knows quite well, on her film Eden. So apparently he spoke to her and she suggested to work with me. Lol Crawley, the DOP of this film was, in the meantime, doing some research on me. He spoke to serval DOP’s I’ve collaborated with and the outcome was that he was also delighted to work with me. So the strange situation was that without ever meeting Brady or Lol, I was suddenly asked - by these 2 enthusiast guys, who seemed to have done a good background check- to do the grading of this film. For me, the choice to do a project or not is heavily influenced by the creative challenges, the story, whether or not it - the story and the visuals - touches me, but first and foremost also by the personal connection I feel with a Director and/or the DOP. And it was in these first contacts I had with these guys that I decided to do this film, even though at that point I hardly knew anything about the film. And because of that, I was kind of thrown into it. As said, we already had a post-facility: Studio L’Equipe in Brussels in Belgium. They have a long tradition in doing DI’s. They have their own lab for neg and positive development. And I actually have a long tradition in working with them. In the last 3 years, they have been working on Mistika, with a Barco DP-2K 20C on a 5meter screen. There were some reservations from Lol about the Mistika, which frankly I could understand, but choices had already been made and after I vouched to Brady and Lol that I would be able to deliver what they were looking for they both were more relaxed about it, for which I want to thank them. 35mm as primary deliverable Another specific thing about the project was that it was once more a real DI project, meaning the film was shot on Super 35 3 Perf, the negative was scanned, we graded in DPX on the Mistika and we were going to return to 35mm print! Brady was very adamant about the importance to him of the 35mm print. I was told I should regard it as the primary output format and that is something that in the last couple of years I’ve heard people say less and less. I’m very grateful to Brady for this, because for me, it was kind of a return to where I started, and I could offer to the guys all the experience I’ve reassembled in my career. As much as I love - at times - the ease of modern grading (where we do not longer have to take into account a return to 35mm, meaning that all choices of LUT are free to us and as a grader you’re no longer stuck with a laboratory-LUT that ensures a smooth return to a print) it was for me a nice thing to be confronted again with the old-school of doing things in DI. So, I talked to Lol and Brady and explained to them that if the 35mm was to be considered as our primary deliverable I preferred to work in P3 colour space with Equipes laboratory (calibration) print-emulation-LUT as a viewing LUT. It seems so strange that I have to stress this but, I think these days we’ve gotten so estranged of this workflow (in these times of ACES…): grading on Log_C-scans with a print-emulation-LUT at the end and giving to shoot-out a series of graded true Log images that translate in a beautiful print. So, in a way the choice of LUT was predetermined. On the other hand, since it had been quite a while since Equipe had done this process we had to refresh their print-emulation-LUT. All through post-tests were made and we also made several wedge-tests during grade, to ensure the perfect calibration (I must admit, it turned out to be a tedious process, especially since these days - with less and less development of film - the laboratories baths are not as consistent as we were used to in the days...). Of course, test-DCP’s were also made to ensure that all things were perfect. Scanning took place at Filmik, a partner-company of Equipe. All selected footage was scanned in 3K (2780x1572), with some handles. There was an extensive discussion about whether or not to scan in 4K. We made comparative tests, in which we actually decided to go for 4K, but due to budgetary restraints, we had to downsize to 3K. The film was shot on 3 perf Kodak (5207 250D and 5219 500T), with a 1:1,66 aspect ratio (resolution in the Mistika/resolution to shoot/resolution to DCP). That’s enough of the technical talk, let’s get into the creative things. Inspiration and references Before we got into the grade Lol, Brady and I discussed the look and the feel of the film and its images extensively. Brady and Lol had an extensive range of references, which I used as guidelines to establish an overall feeling to determine where the look should be going. Lol had drawn quite some inspiration in Harris Savides’ work and he had prepared me a document in which he referred to some of the choices he made in the lighting, blocking of the shots and lens choice on set. It was very enriching for me, in the sense that before getting into the grade it felt as if I could live his photographic choices. Further important references were the paintings of Vilhelm Hammershoi, particularly for the stark, day lit upstairs interiors (some of which we almost used as literal references and tried to emulate as much as possible). One of my favorite films of all times: 'Last year at Marienbad' was also a huge reference to them, especially in the formal style it has, and, finally, it was a huge inspiration to me. They also referred to Dreyer’s 'Gertrud', another one of my favorites. There were several other films ('Fanny and Alexander', 'Pola X', 'Elena', etc) that we talked about, as well as paintings (i.e. for the child’s dream sequence, Anselm Kiefer’s painting ‘To the unknown Painter’ was a huge inspiration). Apart from all the references we had talks about the feeling the look should give us. Our conclusion was that, even though this is clearly a film that is made here and now, it should have a very organic feel to it, almost as if it could have been made in the 60s or 70s by some Russian master (of course 'Tarkovsky' was also a huge inspiration) and that this work was in some way salvaged and restored (also one of the reasons why it was especially that we got a huge kick once we saw these wedge-tests - even with all its errors - because it is also the print that adds another rich layer to this feeling). We wanted the film to have a very rich, painterly quality, at times very dense, but with open, rich painterly blacks, as if watching the rich blacks, made of all kinds of dark colours, not just pure black. And we also almost wanted to feel a kind of reflection of a varnish coming through it, just to give you an idea of where we wanted to go. Apart from all these references, I always try to stick very much to the story itself. You know, apart from all the ideas one can have, it’s my approach to be guided by the emotional aspects of a story and use that asa roadmap to create what I call the ‘emotional rollercoaster’ of the look. I let the emotional intensity (or sometimes lack thereof) guide me to darken, lighten, colour or desaturate, guide the viewers look with windows, etc. And with this film, that’s a trip I took with Lol and Brady. Working with basic tools Because we were looking for something very pure, in a way it was also a very simple and basic grade. Not that this necessarily makes things a piece of cake, not at all. I approached the base in a very filmic way, my primary tools were exposure (printerlights), and contrast (very old-school Lustre-style). I hardly touched Lift and Gain, I’m pretty sure I (almost) never touched the gamma. For me, in this grade, the gamma was primarily determined by our choice of LUT. All colour work was done in printer lights, almost no stirring around in colour in lift/gamma/gain apart from the occasional cleaning up of colours in the blacks. This approach helped me to create this very old-school feel, it’s as if your grading with colour-filters instead of with curves. As said, for me, it was almost a textbook case of handling the basics well and using them to your advantage, of ‘keep it simple stupid’. It’s an approach I use as the base for every project, and from there I can play around as much as I want with colour selections, windows, etc. But my philosophy is that if you cannot get this right you’re probably starting off at the wrong base. I’m still very much a believer in choosing the right LUT (and sometimes, though not often there can be no LUT) to determine a base ‘curve’. Then, you set exposure, based on that exposure you determine if you need to alter the curve (using contrast, or lift/gamma/gain). Then, maybe you reconsider exposure. Then, you look at the colour. Also, there you determine the colour in an overall way with printer lights. Based on this result, you might consider that the colour needs to be spread (meaning creating colour separations in the curve), but sometimes - as in this case - that is not needed. Based on the colour contrast you then created you might want to reconsider contrast or density. And then, you might want to alter specific colours or zones. That is in the rough my approach, even for the most complex looks that involve numerous layers. In this project, we took our time to - with these simple tools - determine a dark, rich, organic image. That, at times, might feel very monochrome, but has actually hardly any desaturation on it at all. The feeling of desaturation comes from working in printer lights. By taking away a dominant colour, you actually make the image thinner, more transparent, with less colour, but not desaturated. This also gives you a more organic, painterly absence of colour. Also, because this is film, with the present of grain, through the grade we could enhance or lighten the texture and that is also something we used extensively. Secondaries Although let’s say 80% of the grade was created with basic tools like this, we also took it further. Sometimes we’d selectively alter a colour, though really not often. There was extremely little grading in keys on this project. What we used extensively though were windows, but also in a very old-school photographic way. A lot of old-school grads in all directions, but also big, blobby windows to darken or lighten zones. I believe very much in this kind of use of windows, but normally these days you’d use more precise windows, or you’d track stuff. No tracking in this film. Just big, non-determined windows, appearing and disappearing sometimes in time, hidden by their non-descript shape most of the times when things move. Once again, back to basics and as old-school as possible with modern means. This was all about giving a good base-density, having the right contrast, making sure the colour balance is what you want it to be. Not always necessarily always textbook correct, sometimes it is also a bit of dirtiness that is right for a scene. Grading for me is not about being correct or beautiful, it’s about giving a scene, in a certain context, the right mood. It doesn’t necessarily need to be a pretty still, but as a whole, it needs to be a strong look. The Hammershoi Touch In the scene at the village priest, we introduced this more transparent, but at the same time dense contrast. And we simplified the palette, giving the characters these pale, desaturated faces, giving the picture an overall very cool cast. The little bit of warmth that stays in is just enough to keep a nice colour contrast. We called it the Hammershoi Touch! We pulled down the highlights in the window, to get a maximum of transparency out of it. It keeps just enough kick to survive. Furthermore, there’s a window on Berenice and the kid, giving them just a bit of soft brightness. The desk was brought down a touch, to not attract attention. Skin tones There is, of course, no such thing as ‘one’ good skin tone, it is a culturally determined thing first and foremost, but it also depends on the overall look you’re looking for that you’re going to play with the skin tones. In this project, because we wanted this painterly quality, we looked at the global picture. It’s in the global approach to colour and contrast that we tried to have the right skin tone. Also, there are no separate keys to alter them separately. Overall, we wanted these muted, sometimes pale skins, but this was derived from our global approach. The richness of the film and the presence of the grain helped us to build the right tones. Also, because of the grain, there was never any need to beautify any of the characters extra. The grain just does its magic, and we sometimes helped with one of these little masks to just help the density or the contrast just a little bit to beautify the faces. We spent about 10 days in total on this grade, divided in 2 major blocks, because the cut was not yet locked when we started the grade and we were also waiting for archive-footage that took a long time to arrive. My partner and colleague Veerle Zeelmaekers, with whom I’ve done several films together, did the final grade on the archive footage because I was no longer available. Also, she and Brady looked for an as natural possible approach, resulting in a newsreel-feel, with almost the feel of a projector mask at the borders. Finally the film was shot back to film in a 2370x1428 resolution (that’s the usable part of our neg scan that we keep when applying a 1,66:1 aspect ratio) by Filmik on an AatonK on Fuji RDI stock and printed by Equipe to Kodak 2383 print stock. Printrushes and answer print were supervised by me. I’d like to thank Brady and Lol for giving me the opportunity to work on this wonderful project and these beautiful images. Also many thanks to all the guys at Studio L’equipe who showed that they were surely worthy of our confidence and who made this a delightful experience. Especially thanks to Aldo Mulone (my conform artist and DI-assistant) and Gilles Bissot (of Filmik, scanning operator and responsible for the return to film), because without their care we could not have done this. Peter Bernaers All images and clips copyright © 2016 Bow and Arrow Entertainment
-
 I was present in the conversations since pre-production, so we were able to talk about the style as early as possible, to make sure all departments (production design, wardrobe, etc...) were on the same page. The series had two directors, doing 6 consecutive episodes each. The vision was always to create a very expressive and stylized universe, but without over-doing it. We didn't want the series to feel too graded, but we did want to clearly separate the different worlds. Contrasty and gritty for the underground scene and "bad guys", more conservative for the governor, nice and bright for the jury discussion room, etc. As for inspiration, Watchmen came to the table a couple of times. Also some of the past work I did for Beneath and Chosen. But we also wanted this series to be new, not a version of something else, so we tried to push it in new directions. Grading technique The system I used for Sequestered was SGO Mistika. I've been using it for 10 years and I couldn't be happier. I've also used Resolve and a couple others, but nothing comes close. The Mistika toolset is huge and you have a whole toolset of compositing tools, not just color, that can help you immensely when you are on a really tricky shot. As for how I grade, I prefer to grade Log with a simple Log-Lin LUT at the end of my nodes. Sometimes I have used more creative LUTs but I generally try to avoid them, since they bias your grading and sometimes you spend more time compensating for it than actually using it. READ: Mitch Bogdanowicz about LUTs From the color toolset, I usually start with Primaries and printer lights. From there, I adjust finer with bands (5 luma control instead of three, so you have black, shadows, mids, lights and white) For individual colors tweaking, I work with 6-way fixed vectors and, if I still need to tweak color or light areas, then I go to soft selections, power windows, etc... I try to go from simple to complicated in a gradual way. We wanted to have light contrast, but also color contrast in most of the scenes. Timothy Burton, the Cinematographer, set-up most of the sets with different colored lights to give me the elements I needed to push it in the right direction. We also wanted it to be bright at times. The first episode was a great testing ground for most of the looks since it had most of the locations. I spent a couple of days per episode as an average, but on the first one, we did an additional couple of days for tests and crazy ideas. Some of those crazy ideas stayed. A few sequences were a bit rushed during production (as it always happens) and it was hard to keep the stylized look without the help of careful lighting. In those sequences, having my assistant, Francisco Lorite, doing a first pass based on my notes allowed me to focus on the creative process without having to suffer the technical side that much. With the jury delivery room, the color of the walls ended up being problematic and blending too much with the actor's faces, and it turned out to be a bit of a pain every time we had a sequence there, and we were there a lot! Keep things in a similar world I always try to start with the look that I originally set up for whatever scene, but then I evolve it from there to try to make it work within other sequences. Sometimes you want those sequences to be radically difference, but for the times when you want them to blend a bit more. I usually bring the worst offender closer to the other one. Sometimes, that is a whole-sequence decision, sometimes is just the first few shots so it starts nicely and then, once you are used to it, I bring back the original. Everything in color is subjective, and sometimes the best way to make a shot brighter is to make the previous one darker. I try to keep things in a similar world when I can, but I am not super strict about that. That helps you when you intentionally want to take something OUT of that to help it stand out against the rest. Skin tones The light dictates the skin tone. Sometimes a magenta skin is justified by the surrounding light, sometimes it's yellow, sometimes it's just skin. To ensure continuity, I play the sequence or sections of the sequence over and over again until I don't bump on any shot. I am lucky to have a very sensible eye to color/light differences and usually, the DP is happy with the continuity before I am. Once I'm done with the episode, I always play it again a couple of times to make sure I STILL don't bump and make sure everything is coherent. I try to avoid specific skin-color selections unless necessary because sometimes it can lead to unnatural color separation. In the case of Sequestered, I did have to make a few of those, especially on the Attorney's world since we were shifting it so much towards blue/cyan his skin was losing warmth quickly. Every skin reacts differently to light! Both power windows and advanced color selections are great tools. But I always try to make sure I am not over-complicating the grade throwing an insane amount of these at the beginning. You could say I use them as a fine-tune after I have a look more than for the look itself. But, as usual with color, there are always exceptions! Juan Ignacio Cabrera All images and clips copyright © 2016 Crackle
 -
Gold Coast is set in Danish Guinea (now Ghana) in 1836 during the colonisation. Slavery has just been abandoned and the young naive botanic Wulff is set out by the king to learn the former slaves to farm. But things don't turn out the way he had dreamed. I spent a lot of time talking with DoP Martin Munch and director Daniel Dencik. It's a very sensuous film and by adapting their words and thoughts, I could better assess how far I was able to go look-wise. We weren’t interested in giving the film a special look, nor boost or dim colours. Gold Coast is shot on Alexa Amira in 4444 ProRes with Zeiss high-speed optics, and no filters in front of the camera. It was my first job working with AMIRA and I was excited about it possibly giving me some limitations. But I really had a good feeling about it, all the way through. In fact, two more formats show up in a few places in the film; Sony F3 with Pix recorder in 4444 and Black Magic Camera in ProRes 422 HQ. It's up to you to find out where. The inspiration for grading were 'The Thin Red Line', 'The Tree of Life', '12 years a Slave', 'Imitation Game', 'The Hunger Games' and District 9. The common elements were the dusty blue/magenta blacks and slightly warm highlights. It was important for us that it didn't have a classic historic look but a fresh contemporary feel. The movie was color corrected on the Baselight Two system and projected with a Christie 4K. I’m always experimenting with different LUTs the first days of grading, but they all added an unnatural look, so we ended up using the Arri Rec709 LUT. It primarily provides the natural colour saturation and separation. I use the following basic set-up when color correcting: Grade LUT Grade Highlight key/grade Shadow key/grade Grain I use the first grade only for de-contrast adjustments before LUT, e.g. for burn outs or general softening. I create the look from the second node followed by keys, masks and finally grain. I am quite happy to use a highlight and a shadow luma key when inventing a look, I feel it's how I can give it my personal touch. Working with highlights is especially important to me. My highlight key starts very soft in the mid-tones and then I de-contrast it. Along with grain, I think, it approaches a film look.t The locations were, fortunately, a gift and a natural starting point, which just had to be followed. The exterior day shots in Ghana were very cloudy. But because of the strong sun through the clouds, the light had direction, making it truly magical in itself. It would have been a struggle to achieve our cinematic look without the cloudy weather. In the interior night shots, the idea was to go with fire. Everything was lit by fire and warm light, therefore, also naturally tough and shady. It offers some lovely conscious shock to the eye, going from hard fire warm evenings to quite dazzling bright daylight. Very early in the process, we found out that we would add film grain and even relatively heavy grain, especially in the blue channel. That was to simulate film in the style of the Kodak 500T. It was actually leading us to give the blacks a little blue tint throughout the movie, and the result just felt so beautiful. The blue tint in the shadows gave the dark skin a beautiful texture and helped the visibility. The grain was made with FilmLights AddGrain Plug-in. It doesn't have any pre-sets but is simple in its controls. My only preference is my own experience with film – I've been scanning film since 2002, and still working with restoration. I had the great privilege and challenge to work with very dark and very light skin combined in many scenes. The challenge was to get enough light in the dark skin and control the light faces. Although it sounds crazy, the directors approach to each new scene was just to make it look as great as possible, within itself. It was less important whether it matched perfectly with the previous or next scene. It was a great pleasure and reminded me of how you would approach still photography. Anders Bloch-Rose All images and clips copyright © Euforia Film
-
T he director Roni Ezra and DoP Philippe Kress had just finished a low-budget project when this movie got the green light. Before shooting, it is standard procedure to perform camera and lens tests and that was when I got involved. We wanted to create a vintage look, and it was nice to see what happened, or at least get an idea of what would happen with different lenses. In terms of color, we also wanted to see, beforehand, if it would be an issue to subtract green color in regards to the uniforms. The film was shot on Alexa with xxx lenses. April 9th was graded in Filmlight Baselight Two and we worked with 2K ProRes files. Ezra didn’t come with images for the grading session, but he came with a mindset of trying things out, also things you wouldn’t normally do. We tested a lot of different looks, and mixed them all together, subtracted a little and added some more. In the end, we found a vintage look that also looked somewhat modern. The trailer is a little more extreme than the movie ended up being because we found that we got a little tired of looking at that amount of grain and high contrast for 90 minutes. Green plants and trees Due to scheduling, the film was shot a little later in the year than April, so many of the plants and trees were a lot greener than they were supposed to be. And they had many more leaves. This would demand a whole lot of fixing in VFX, but there was little money left after the primary effects like fixing historically incorrect buildings, gun flares etc. In order to take the film away from the dominant green color, we decided to grade with an older Fuji-LUT, because the film prints were not good at showing a clean green color. With the Fuji-LUT the green color gets shifted towards either yellow or blue, depending on where in the green spectrum it is. Had we opted for an Alexa-LUT, the green would have been too clean, and we didn’t have the time to chroma-key every shot. Plus, we got more nuances in the color formerly known as green, via the Fuji-LUT. However, having applied the Fuji-LUT, the images still looked far too modern. We wanted it to have a feeling of the old reversal prints with not too many colors. In order to achieve that, I applied one of the fixed monochrome “looks” from the Baselight ”Looks”-table. I tweaked it to shift the colors towards blue/cyan and red. That gave the film an “older” look. This look also made the need for VFX on leaves and trees less necessary. On top of that, we applied massive amounts of grain. I always, when possible, grade both before and after the LUT. It’s a bit more difficult but pays off big-time in terms of control. It's a lot more to work with exposure-wise in highlights and blacks before the LUT, and I take the very lowest black to zero after the LUT. This should add extra nuances to blacks. When creating a look, I think it's better to overdo the look, then subtract. If you want an overly saturated look, then boost saturation to the extreme, and slowly turn it down. To me, that works better than going from neutral color and then pumping it up. Day for morning The very first shoot-out in the film was shot over five days, had 300 cuts in 5 minutes, and was originally supposed to be day-for-night. We made it day-for-morning instead, but it was quite a challenge to balance five very different days of shooting into one equal scene. The main light source was the sun, and all the soldiers wore helmets so we made vignettes for the faces in order for them not being too dark. I also tried to match the skies, sometimes keying them, for an overall feeling of flow and egality. As a colorist, you have to be able to match up all kinds of different shots to make everything look smooth. Overexposed shots need to be matched with normal or underexposed shots, and some could be shot months after the rest of the scene. This is actually quite difficult, and maybe not as exciting as creating looks. You will find that some scenes are hard to grade and hard to fit in with the rest, so you have to be patient, or learn to hide your impatience. You also need to be able to ”translate” what the client says into color. Some clients are close to or know exactly what they want, while others are searching for a feeling in the colors. You have to figure out what exactly that means to them. You also have to be patient in learning to see colors and understand what complementary colors do to the eye. Some colorists tend to be highly technical, while others are mostly artistic. Both things work, but you have to know a little of both worlds. I spend a year, 20 years ago, in the film lab doing color timing on film. That was my starting point, and it gave me a good basic understanding of film. Peter Diemar All images and clips copyright © Nordisk Film
-
I came on board for the beginning of look development for the second Hobbit film, "The Desolation of Smaug", followed by "The Battle of the Five Armies". While the pickup shoot was happening during the week, I was working on snippets of shots and scenes from various parts of the film and developing a bunch of looks to present to Andrew Lesnie (DP) on the weekends. We would then craft a little more and show director Peter Jackson some options after that. After narrowing it down to our winner and making any changes, I then put that away as our bible for the scene. A reference we often drew from was the work of painter Gustav Dore. He often created depth in his artwork by crafting pools of light in the background and leaving foreground elements in silhouette. For example, a few quick windows to drop down foreground trees and some more to light up distance patches of grass can really bring a frame to life. At times you can envisage a look straight away. The storytelling, time of day and cinematography give you very strong clues. At other times it can be a little tricky. When developing the Look, I think it is important to forget the rules and throw things around - that’s when the great discoveries happen. Out of this crazy colour “chemical reaction”, you can start seeing something that feels good, or at least a few elements that do. More often than not you discard those crazy throw-arounds and build something new, referencing all of the good parts you have found, but this time constructing in a much more stable and clean way. A good balance is everything I am a big believer in "a good balance is everything". An interesting look can be beautiful, but a good balance underneath a scene is what really makes it look great. I think a first balance is best done without any kinks or screwiness going on as they can hide many clues to where a picture needs to sit. Sometimes you don’t get the time to do that as thoroughly as you'd like on a film, but where I can, I spend a lot of time there. I made the decision to run with the printer light tools and keep to 1/4 trims in R G B highlights and shadows to keep a consistency across the grade team. It keeps trims consistent and quantifiable. Using a tracker ball is great and is my native way of working but it can be slightly volatile: What "add some red to the highlights" means to one colourist will be different for the next, and then there’s a variable in how that change is applied to the next shot and so forth. Working with printer lights kept colour balancing basic and manageable. They got hit quite a lot not only for balancing but also for developing the look as it is a nice stable way of doing things. Once the first pass is done with the picture in its primary state, I then put the look of the film in its own layer towards the end of the grade stack and go through the scene again. The rich bold look Luma curves are one of my favourite tools to use in achieving a richer, bolder look. By grabbing a still of how a shot sits with the desired exposure levels etc and playing with the curve in conjunction with Lift Gamma Gain, you are able to get some extra tone into areas of the picture that the standard tools can’t reach alone. Often you end up in the same place as your still with no perceivable difference, but sometimes, with enough experimenting, you can come up with some beautiful richness and depth and still keep the same exposure level to what you started with and desired in the first place, just a much richer frame in certain subtle areas. This doesn’t always work so you have to be judicious. Mistika moves the image around very elegantly and it can be very hard to break an image with most of its tools, but I find the curves can be very damaging if not respected. Having said that, I absolutely love them and used the curves to create many of the looks. They allow you to affect areas of the shot in different ways to what you can achieve with Lift, Gamma and Gain and therefore come up with something a little more unique. I often use the hue vs sat, but only in the slightest of ways, or if I can keep it contained within a key. The “Bands” control on Mistika is also a great tool in dialling in extra tone into a picture. Depending on the construction of the shot and where the light sits, I make a decision on where the image is looking “thin” or boring and using the bands control on Mistika, I would manipulate more density into that area. I also keep an eye out for geographical areas of the frame that look thin. For example top left of frame is drawing the eye but is also feeling bland. Throw a window in and drop a small amount of density in there in the highlights (just under white and above midtones) and now the whole frame has a nice weight to it. This is done on a shot-by-shot basis, but then I pull my focus out and look at it as a scene in relation to story, then see where the “thin” sections are. Is there something dramatic happening on screen and did the pictures support that? Can I boost something or pull back something to make that better and have more impact on the audience? I tried to keep things as simple as possible whenever I could, to keep the natural beauty and integrity of the shot, but often a slight kink of colour is added in isolated parts of the image to help give it some style. Sometimes it was a slight kink using normal balance RGB tools. Other times, I would use a key to give tighter control on a shot-by-shot basis. It really depended on the desired look and the challenges within a scene to achieve it. Sometimes a kink of colour in the shadows can really unmatch a scene as you could be cutting from a character standing in front of a dark wall to another character standing against the sky with hardly any shadows. On top of this, Peter Jackson has a true creative streak and he loves to try new things and he likes to keep his options open. Therefore when building a look, I needed to make it interchangeable and flexible. I needed to be able to move in a new direction and make the global change quickly on the scene. Skin tones I guess when I create a look, I try not to take the overall “bones” layer too far. I only push to where the skintones are on the border of still looking nice. If an extra kink is needed on top of that, I will often pull keys or look for opportunities for shapes to add colour or tone. When I come across problem skintones, I try to assess whether the change I would make within the skin would benefit the whole frame. Sometimes it does, as the problem was inherent within the whole shot itself, or sometimes it is just a mix of lighting and makeup on the character, coupled with the look graded into the scene. If the backgrounds and other parts of frame match and look good I would use a key and a window to isolate our character and make the changes to match them in. My approach is to dissect each shot and grade it accordingly to match. For example, if there is a close-up face with skin tone taking up 60% of frame, I grade my base with regard to the skin tone. If it’s a wide shot with only 10% being made up of skin tone, I often grade for the other 90% and then the remaining 10% skin tone in a secondary. Park Road Post have a VFX team who did a great job of taking care of most of the serious cosmetic/skin and hair work on the film. The grade team took care of the less tricky stuff - for example we took charge of lifting out eyes if they got too shadowy and of subtle skin tone lifts here and there when it was beneficial. Highlights Highlights captured on a digital format can often look harsh. I like to have ready a key that is grown a few pixels and gently softened. Within that, using curves or normal contrast controls, I bring the two extremes of black and white closer together to blend the harsh edges a little. Shots often need their own hand-crafted adjustment, both the key and the grade within. Sometimes a key may not be required and all that’s needed is to drop the extreme top whites down (if you have that sort of control on your grading system). I think the craft of colour grading is assessing each shot and each problem separately, having a few problem-solving options up your sleeve and choosing the best and simplest one for the job. Overall The Hobbit had a subtle highlight blur/glow effect which was dialled in strongly but reined back to a more pleasing and unobtrusive level across frame with opacity controls. Selection of hero shots One of the fundamentals in working effectively in a grade is keeping a comprehensive and up-to-date stills gallery of the best shots of various scenes and referring to them often. I like to keep a selection of hero shots on hand so I can throw them up when I am getting stuck or uninspired on a scene. Sometimes I even find my self briefly comparing something random like my favourite night scene with a day scene I am grading - the still is there because it is one of my favourites, a shot I feel looks good and is graded neatly and has that X factor of beauty. I find it then acts as a carrot for me to achieve the same level of quality on the shot I am currently working on. Referencing a few of the best shots throughout the film keeps you on the right track and helps with keeping a constant style, tone and level of quality. Another trick I sometimes use is to play through the film at high speed to get a quick overview of how it flows and to catch anything that bumps. On a day to day basis, the technical challenges were many. We had films that ran an average of two-and-a-half hours each. Both had a 2D and 3D version, as well as a 24 and 48 frame delivery requirement. Final VFX shots were being handed over to us right up until the last moment, so maintaining the consistency of the grading process required a large grade and support team to manage and churn through the work. The team at Park Road Post are an amazingly capable bunch, and we couldn’t have met these tight deadlines without their expertise, dedication and stamina. Trish Cahill All images and clips copyright © SF Norge AS
- 5 comments
-
- 13
-
-
-
I was introduced to Guinness ‘Sapeurs’ when the director, Nicolai Fuglsig of MJZ, and the editor Rick Russell, of Final Cut, came in for the grade. The commercial was shot on RED and already looked incredible thanks to the work of director of photography Alwin Kuchler. Our vision was to retain the beautiful, photographic, and cinematic quality that already existed in the film. I wanted to use a bold but graphic grade to boost the colour whilst protecting the finer details. The key was to retain contrasting light and colour to guide the viewer to the action. Another crucial aspect was to guide the viewer’s gaze into what I want them to look at. The drawing of the eye works exactly as it would with a painting and can be done through lightening, darkening, pushing and pulling colours to create depth. I set the first balance and that was a critical step in the process, as the image can really make or break at that point. I also used primary controls and curves to set the proper exposure. Once a good exposure was set, I built a good base layer of contrast using primary controls and curves, retaining crucial picture information. I used elements of a custom film emulation. I worked on building colour and contrast into each image in different areas, and I used various shapes to enhance the light and dark areas of the shot. Because there are so many tools available besides basic levels of colour correction and the power of the system that we now have, I very often end up keying and tracking shapes to control specific areas of the frame. We effectively graded the commercial twice, initially from the camera files, then revisiting after all the finishing work and clean up. The master grade was then finessed alongside the creative director, Dave Buchanan and creatives Nicholas Hulley and Nadja Lossgott. The first and foremost core skill a decent colourist needs is patience. Another crucial skill is a thorough technical understanding of the colour corrector (lose being used) and an excellent aptitude for recognising colour balance. It’s important to have an interest and understanding in how cameras capture the image in the first place and a working technical awareness of the digital image that is being treated. It’s also incredibly important to have strong communication skills in order to collaborate with a variety of different creatives, directors and clients, and to be able to interpret what their desires are in order to translate that onto the images that have been provided. With this commercial, the spot builds in colour throughout, reaching a pinnacle with the sapeurs in their vibrant suits. It’s with this in mind that the first few shots are slightly more neutral and I’ve purposely maintained the detail of the fire. I’ve also used complimentary colours to create separation. I wanted to make all the individual characters stand out in their environment. I did this by using light and darkness to make each character really pop. For the shots that took place inside the bar, I set the base look and then it was a matter of pushing or reducing colours to enhance individual elements such as the colour of an item of clothing. I would then add colours into the background to enhance the selected details - for example, the blue/green of background elements with the pink of the jacket. I also brightened the main character’s face, to emphasise his facial expression. When working with the correction of skin tone, my general rule of thumb is to get them to a place where they work within the overall image and grade. If I need to, I’ll then isolate them either by keying or with shapes to control them separately. In this commercial, the definition and contrast of the skin tones kept them strong within the colourful palette. In the final shot, the process was to enhance and increase specific colours. I created some overall contrast, a slight brightening of the main characters in the centre of frame and added a subtle darkening of the outside of frame in order for that to fall away. I brightened individual faces and increased the colour of items such as the blue trousers, orange jacket and green trousers. In some cases, I changed the individual hue of colours to enhance the definition. I think every project is a collaboration of ideas for the director, the DOP and the creatives. Using visual references, films and stills are an insightful start to the process in order to work out what everyone is trying to achieve. Aside from the obvious technical and creative side to what we do as colourists, one of the most difficult parts is to interpret the creative direction and emulate it with images you’ve been given. I selected this project to talk about as it really stands out from other projects I’ve done over the years. It’s certainly one of the most interesting and best looking. It ended up winning various accolades including ‘Best Colourist’ awards at the British Arrows and AICP. Also, from a human perspective, I love the images. We often get beautiful work, but I appreciate the narrative and Guinness as an advertiser has always produced inspiring work. AMV BBDO, alongside Guinness, have consistently taken creative advertising to a new level. I’m proud to be involved. Adam Scott All images and clips copyright © AMV BBDO / MJZ
-
The Ward was unusual for me because I was actually somewhat involved fairly early in the process. Due to scheduling, I did the DI on "The Joneses" for the same producers with the same DP Yaron Orbach (Amber Heard was also in both films) during The Ward’s prep. Yaron and I had a couple of conversations about The Ward because I would be supervising the dailies. Read: Tim Maffia about The Joneses Director John Carpenter’s vision was pretty straight forward for a horror film; dark and contrasty but with a natural feeling. Stay away from a digitally manipulated look was his main note. Since the goal was to avoid forcing a digital “look” on the film, most of what I did was to enhance what was done on set in subtle ways. The lighting and set decoration really set the looks, and I just pushed it a little further. Shot primarily on film The DI was done at Modern Digital in Seattle; a post facility I worked 10 years at that, sadly, no longer exists. The film was shot on 3-perf Super 35mm, framed for 2.39 but protected out to 16x9. The video was cropped to 2.39. I did the anamorphic squeeze for the film-out digitally in the DI. Looking back, I just realized The Ward was my last project, other than restorations, that was shot primarily on film. The video dailies were done primarily by Bill Lord on our Sony Vialta datacine. He also did the 2K scans on the Vialta out to 10-bit Log DPX files. The dailies were in standard Rec. 709 HD. In the DI I used a proprietary LUT simulating a Kodak 2383 film print from Alpha Cine Lab via their Arrilaser recorder. Grading technique I did the DI using an Autodesk Lustre’ (Lustre’ 2010 I believe) and its’ Log controls for balancing the shots. The choice to use the Log controls was really dictated by Lustre’s design and the tools that were available in that architecture. Lustre’ gave me some control over how broad or narrow the range of affected values were so, I could be specific in my work. When I worked with John and Yaron in the room, I used printer lights, because it is a great and handy tool for responding to comments. If they would say 2 points less magenta, it was easy to reach over and click that. I love the tool for reviews because most notes tend to be of the too bright, too green, etc. variety and you can respond quickly. In general, I like to keep it fairly simple and try to do as much I can with the basic tools before reaching deeper into the toolset. READ: Dan Muscarella about Printer Lights Natural look Often looks today are about pushing an overall tone onto the image and that’s what I had to avoid. Since the desire was to be natural and stay away from the feeling of a computerized “look,” it was really about finding subtle ways of enhancing the images. Adjusting the contrast either locally or overall is really where I did my main work. That allowed the movie to be manipulated without feeling manipulated. I also worked a lot with very soft feathers on vignettes, and tried to be very conscious of where the viewers eyes tended to go in the frame so I could then direct it toward or away from something. In this shot, I created a very soft window on the far left just to direct the eyes a bit more to the right. In this shot, there are some soft windows tracked around her to allow me to bring some contrast into the background and darken it. When it comes to matching shots, I made sure that the contrast and saturation levels were consistant throughout the movie. Most of the time, correcting for the skin tones was all that was neccessary. The still store remains the most basic tool for matching clips in Lustre, but it also has a nice storyboard tool that allowed me to display 16 images at once. Clicking on a single image made it live and I could correct it in context. In addition, it has dual playheads, which I loved hopping between. Backlighting from windows The real tough part was dealing with the backlighting from the large windows. The front lit faces looked great, but those with the heavy backlighting suffered from the light wrapping around. It was always a compromise trying to keep the room consistent, but not losing the face. Often I’d get the room close and then track a window around the face to allow me to bring the skin closer. There were a lot of bright hot windows in this show, especially in the common room. Keeping those from clipping and preserving the detail while not letting it feel too flat was a big challenge. That said, holding detail in the highlights is one area where I think film currently still remains superior to digital capture. Depending on the shot I might try a Log highlight control, or perhaps just a soft roll off on a curve, or I might just pull a key. Whatever gave the best results for a given circumstance. Shot of the creature's face In the pre-title sequence, there is a CU of the creature’s face. I believe it’s 2 frames long. They had cut it out of a longer take that had a practical lighting effect but used just the dark frames. It was catching my eye as just a black hole during playback. I gave it as much contrast as I could then put a window over the right half to darken the flat wall, and to direct the viewers' eyes to the eye. On the face, I found the highlights, which were really just a few percent brighter, and pushed them up as bright as I could. Originally I remember making a window to brighten the eyeball as well, but they pulled me back on that. Flashbacks and jump cuts On some of the flashbacks and jump cuts, I was able to have a little fun. Filters or corrections had been applied during the edit for a specific feeling and I had to manually match those. While I couldn’t stray too far I remember doing some fun things to duplicate the look. For example, there were a few negative frames in many of the quick cut sequences and I found just inverting the luminance channel only looked better than a straight invert filter. As long as it felt organic rather than digital I could really push it. On some of the flashbacks, I also recall adding a slight bleach bypass look, and a diffusion filter glow to create bloomed highlights. Taking a break Fundamentally, it still comes down to nothing more sophisticated than watching the film a few times to see how well it all works. Taking a break or moving on to other scenes usually helps too. The best idea comes from my friend DP Sean Kirby. If possible, he likes to start timing on a Tuesday and finish on the following Monday, so there’s a weekend in there to rest and rethink but most importantly be away from the room for a while. Tim Maffia All images and clips copyright © 2016 Echo Lake Entertainment
-
I came to SUITS after the pilot got pickup to series for the USA network. At the time the look of the show was a bit edgy and ground-breaking in comparison to what the network was used to broadcasting. The network's standard look was blue skies, lots of color and not too much contrast, light-hearted. SUITs was dark, extremely contrasty, colorful but muted and stylized and edgy. This was done on purpose and everyone seemed to love it. When I came on SUITS, the Pilot had already been colored by another colorist and the basic look of the show was generally set. Through the many episodes, the show's look has evolved into what it is today. Now, I would describe the visual universe of the show as clean, tight, bold and sharp, a lot like the charters of the show. Rich contrast, saturated and crisp, no filters, curves or noise reduction. Blue steel look Season 5 that I'm currently working on is shot on the Alexa Amira 2K. Previous years it was shot on the normal Alexa at HD. I introduced more of a, what I like to call, "Blue Steel" look for the office. Teal blue is a big part of this look, but when I have time to create “a look”, I approach the image from several different ways in order to compare which approach will achieve the desired effect. Each look is different. I try to keep the contrast levels the same, changing only the tone depending on the scene or location, this can help but it's always a challenge when working with bold looks on a TV show. My cues and tones come from the DP, the dialogue and the emotion of the show, and it's been a collaboration between the various DP's, Kevin Bray (Producing Director), Nathan Perkins (Associate Producer) and myself. The biggest challenge grading on this series has been maintaining the look of the show with the different DP's coming in each season. I'm working on season 5 this year and we have our 6th DP. Grading technique I color on a Davinci Resolve, it's a remarkable color corrector and some-how year after year it just keeps getting better. I use most of the tools available, but I always start with primaries to get a good basic grade. A base grade with separated primaries married back into each other, with the keys being pulled from separate channels before a final tweak at the end. I prefer to work in Linear and then use the Log controls to tighten up the image. The curves help clean up the tricky parts but I've found the real magic in how and when to use the various mixes of nodes and how to combine and subtract the same image multiple times. You have to use windows to help shape the viewing window. Most of the time windows are used for masking and blocking but also to follow faces and garbage matte complex curves and keys. To get really good separation I use the combination of nodes and it's how I construct those nodes to build the image in a particular way. Pretty much every colorist I know has a least one secondary color correction just for skin tone, with the secondary, many tools can be employed from curves to softening, to noise reduction, etc. I use Log and Linear on everything. Not too much skin pro mist, in this case, it detracts from the look of the show. Although this year we are going in a new direction, should be interesting. Chris Jacobson All images and clips copyright © 2016 Universal Studios
-
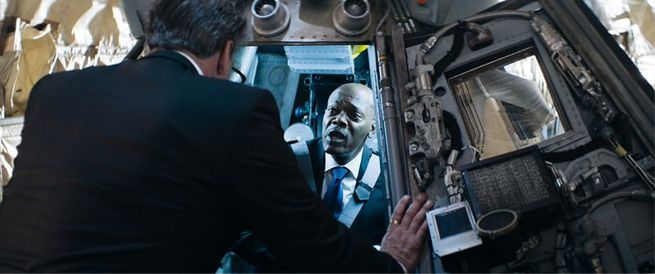 I got involved a few days before shooting began in September 2013 and the team had shot some lens, costume, and lighting tests. I met director Jalmari Helander and DP Mika Orasma in the grading suite and we instantly started to work on these tests. Our main references were the action blockbusters of the last years. But what I usually do before a feature film job, is to watch previous movies of the director and DP. In this case, I watched 'Rare Exports', which gave me a better understanding of their visual style. We did not try many different looks in this test session because they had a pretty good idea, how the film should look and after a few minutes all of us were quite satisfied with what we had achieved so far. The film is an action-comedy and was meant to look like a Hollywood action movie - but a bit more colorful, because it should not be too serious. The shots had a strong contrast and were tinted a little bit cold, especially the night scenes. A slightly blue/cyanish tone should join together all the scenes. So the general look went a bit into the famous teal and orange direction. But in this case, we did not key and warm up the skintones to enhance the effect even more. After a few days of principal photography, we met again and tested our grading approach on some key shots of the film. At this point, I got a pretty good idea how the film should look and feel. This was important because the next time I met with the guys was the final grading months later, and in the meantime, I had to do a lot of pregrading for the VFX plates. The whole project had a tight schedule. For the final grading, I had only around 12 days. On the first two days, the director and DP were present, and we created looks for every scene in the movie. Additionally, Jalmari wanted to try if some problematic shots he had discovered during editing, can be used or repaired. Luckily we were able to find a solution for all of these, so the edit remained as it was. The next days, I applied our look to all of the shots of the movie. And on the last days, the three of us worked together again to put the finishing touches and to adjust arriving VFX shots. Although it was a tough schedule, there was always a relaxed and amusing atmosphere in the grading suite. Camera and lenses The film was mainly shot on ARRI Alexa with Hawk Anamorphic lenses in ProRes 4:3 format. The anamorphic lenses show some distortion and the uniformity of the MTF can be problematic, especially at the edges of the frame. Therefore, they used Master Primes for the VFX shots and the Arri RAW format, to avoid compression artifacts in the mattes. For some scenes, additional cameras were utilized: A RED Epic for slomos up to 200fps, a Phantom Flex for capturing scenes with even higher framerates, a Blackmagic 4K Camera as a 'Crashcam' close to explosions and a Canon C300 to shoot some inserts during editing. ACES For feature films, my default setup since 2013 has been ACES. The camera footage is converted without loss to a common scene-referred high dynamic range color space (ACES), in which the grading is performed. Scene-referred means that pixel values are proportional to captured photons on the movie set. In theory, ACES images are in linear-light space. But because there are no grading tools for linear footage yet, I used a Cineon-Log tone curve in conjunction with the ACES AP0 color gamut as working color space. On the output path, the HDR images are getting tone-mapped to LDR (low dynamic range) in the so-called reference rendering transform and after that converted to the appropriate display, in this case, a projector calibrated to DCI-P3 color space. This conversion was done with a creative white point adaptation to D60, instead of using the “greenish” native P3 white point. To this point, I graded all of my ACES features with a D60 white point because it gives the images a pleasing look. Film had a quite 'warm' white point and from my observation D60 lies roughly in the middle between analog film and television with D65. A theatrical feature film should retain a little bit of the film feeling, and differentiate itself from TV content. The same is true for the colors, therefore I used the ACES RRT version 0.1.1, which gives a very nice color rendition, roughly in the middle between analog film and a clean 'videoish' image. In the course of the project, the ACES RRT 0.2 got released but I stuck to the previous one because this update introduced a different look in the RRT. Pentagon scenes In the Pentagon sequence, the idea was to show as little of the set as possible and to convey the tense feeling in the room. Especially these scenes gained a lot by hiding big parts of the frame in the shadow. We wanted to keep it quite dark, and also quite cold, but the skintones came out way too cold in the primary grade. That's why I keyed them and warmed them up. Due to the tight schedule, I was not able to support the key with precise masks on every shot, so I tried to find a general solution, that would work on most of the shots. Additionally, as mentioned before, we darkened the background and edges of the frame with feathered shapes. The first image is the ungraded version (In this article 'Ungraded' always describes the ACES base setup, with no grading applied). The same image with the primary cold grading applied. Since the skintones came out way too cold in the primary grade I brought them back to a natural tone with a key. By balancing the light levels and colors with shapes we achieve the final result. The night scenes in the forest also needed a lot of local darkening. We needed to hide the character of artificial lighting in the frames because it is impossible to shoot in a forest at night without any lighting. Trees close to the light source get unnaturally bright, due to the inverse-square law. We darkened these areas with shapes and also added strong vignettes to generate an even darker mood, without losing the faces. The first image is the night scene with primary grade applied, and the second is the final grade with shapes to darken the surrounding. Grading technique Filmlights 'Baselight' is my grading tool of choice. I don't think that any other grading solution gives the colorist as much precise control in the grading tools as well as in creative color management. Because I work in a logarithmic color space with a display rendering transform, my main grading tool in Baselight is the 'Film Grade' operator, which is comparable to the 'Log' tools in other grading software. Especially for 'shot by shot' matching, this is the most suitable tool for me. While working in 'Film Grade' I adjust the pivot points of the operators a lot. The 'Film Grade' consists of two pages, 'Exposure / Contrast / Saturation' and' Shadows / Midtones / Highlights'. With 'Exposure / Contrast / Saturation' usually, I do the heavy lifting of the primary grade. Exposure works like printer-lights in the lab and is the most important tool for me. With Exposure, I can adjust the brightness of a shot, almost like changing the aperture of the lens. Additionally, I adjust the white balance with it or I remove the color cast of an optical filter. In this shot, I did a tiny primary correction with printer lights to remove the green color cast caused by the ND-filter. For fine tuning, creative touches and to create special looks, usually I use the other Baselight tools like 'Video Grade', 'Hue Shift' etc. To change the color of a light source or to add a new virtual one, for example, the 'Gain' tool in the 'Video Grade' is my preferred tool. 'Hue Shift' is a nice solution to fine tune skin tones and to bring disturbing areas, that are too colorful, under control. I do a lot of fine-tuning in the highlights and shadows, although the ACES RRT does a very good job in these areas. If the DP wants something to blow out in the highlights or to be crushed in the blacks, it should happen in a pleasing way. And if he wants to save some information at the ends of the tonal scale, a natural look must remain. The tonal contrast and color in these regions are extremely important to me. That's what I use the Shadows / Midtones / Highlights tool for. In this shot, the highlights were blown out and recovered with the highlight tool, to look less digital and more natural. Expose to the right rule The movie includes an underwater sequence, which is usually difficult to grade. That is because underwater areas in the frame, that are further away from the lens, have a strong tendency to get milky. As a colorist, you have to crank up the contrast and stretch the recorded code values a lot. The 'expose to the right' rule gets very important in these situations, because a digital sensor records a lot more code values in the highlights than in the shadows. Luckily for me, DP Mika did everything right while shooting the scene. He exposed quite bright (just before clipping) and switched to the RAW format to record as many code value steps in the highlights as possible. The ARRIRAW format is very robust, and I did not have to deal with any typical problems in this situation like banding, (quantization) noise or boosted compression artifacts. Challenge with changing weather One of the first scenes in the movie was quite a challenge for me because it was shot under heavily changing weather conditions in the alps. After the edit, the shots alternated between sunny, cloudy, rainy and even snowy. In addition to that, lasting almost five minutes, the scene is quite long. We tackled this problem step by step. First, I tried to find a general look for the scene, that looked nice on the key shots. Then I spent some time, roughly matching every shot to the others and building a weather plot for the scene. After that, a few visible weather jumps remained, so we decided to add digital rain/snow to a handful of sunny shots, that were cut in a rainy sequence. In the end, the continuity of the scene is probably not 100% perfect, but the main goal was, that the audience does not get distracted by the changing weather, which is what we accomplished. And on top of that, we achieved that the subtle weather changes support the dramaturgy of the scene by getting worse, while the tension between the characters increases. Enhancing the lighting with shapes In this shot, the president sits in his rescue pod aboard 'Air Force One'. Inside the pod, he is lit by a cold light source. The reverse angle ungraded. When I applied the primary grade, the face still feels too warm compared to the other shot. I then added a cold light bounce with a tracked shape. The final result with the shape matches to the other shots in the sequence Another example of enhancing the lighting with shapes. This is the primary grade of a frame showing one of the villains entering crashed Air Force One With a few shapes, I created a much stronger light from the outside, which makes the entrance of the character more dramatic. Keep it consistent Usually, I try to use the same grading approach for the whole project, to keep it consistent. I know that many junior colorists struggle with this task – I had the same problems when I was a rookie many years ago. In the beginning, it helps to constantly compare your current shot, to previous ones. And to do sufficient breaks to relax the eyes. With experience, most colorists get a lot better in this regard. My technique to check if everything is working nicely together is to watch the film over and over again - sometimes at higher playback speeds. In the beginning, I will stop often to make adjustments, but as less work needs to be done, I watch without stopping and add marks to the shots instead. Helicopter scene In this ungraded helicopter shot, the outside is back projected. With the primary grade applied, the projected outside looks a bit too saturated. The outside could be easily isolated with a key on the saturation. The final result looks convincing. In this case a neat and cheap alternative to green screen. Sharpening and local contrast enhancement For me, color grading is not only working on the colors but applying the whole arsenal of available tools if reasonable. That includes sharpening, reframing, stabilizing, camera movement, denoising, adding texture, clarifying, softening, retouching, diffusing etc. For example, I stabilized or added camera movement to at least two hundred shots in 'Big Game' to improve the shot flow. And I did a few simple touch-ups myself, like removing the cross on the summit of a mountain. Local sharpening of faces or only the eyes is my standard practice. This does not mean, that I apply local sharpening to every shot, but to every one where I think it is reasonable. It also depends on the overall look and feel of the movie. Sometimes, overly crisp images are destroying the atmosphere of a film. I sharpened around three-quarters of the shots in 'Big Game', I guess. In addition to classic sharpening, I used a lot of local contrast enhancements. The Hawk lenses got a bit soft when the aperture was open and there was a fair amount of backlight. Actually, that is one of the reasons you chose those lenses, because they produce wonderful flares. But sometimes, e.g. for cloudy day shots with a bright background, this effect gets a bit distracting. Then I used a special technique to “clarify” these areas in the frame, by increasing the local contrast, especially on the background areas. The final version of the shot looks crisp and three dimensional. Andy Minuth All images and clips copyright © 2016 Subzero Film Entertainment