Andy Minuth
-
Posts
150 -
Joined
-
Last visited
Content Type
Profiles
Case studies - Free
Case studies - Premium
Resources
Insider
Courses
Forums
Store
Everything posted by Andy Minuth
-

Perception of the Colour Green
Andy Minuth replied to Priyanka Patel's topic in Editing , Color grading & Finishing
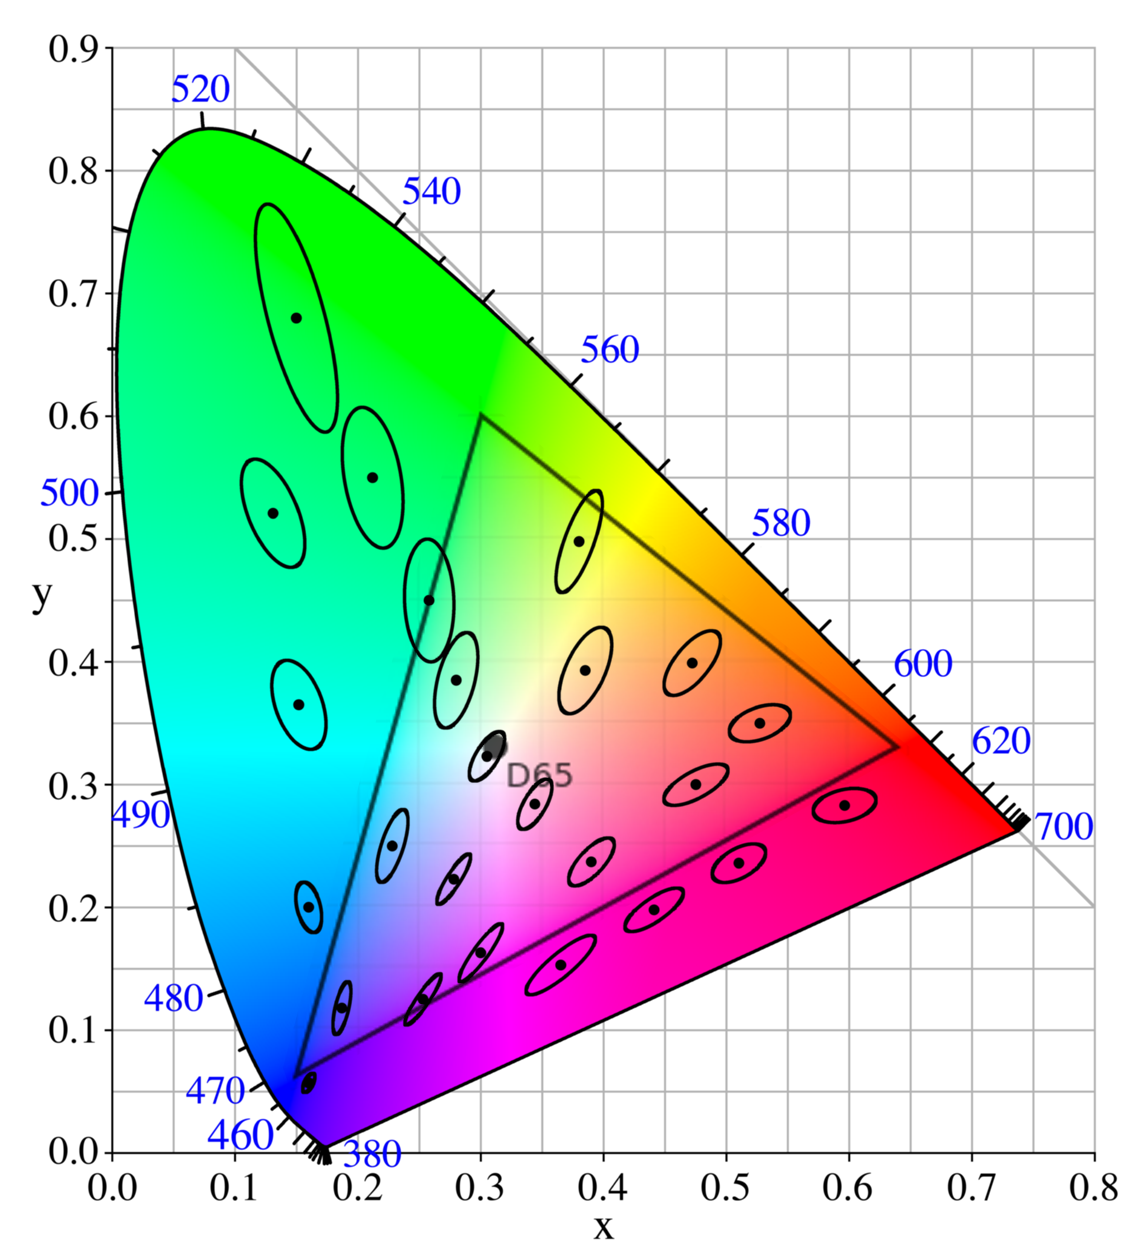
My guess is that the creators of the game did not pay enough regard for human color perception. I recommend to read a bit about MacAdam ellipses. An average human can not distinguish the color at the center of the ellipse from all colours inside it. In this picture the ellipses are 10x magnified in size, I overlayed the sRGB gamut, which is the one a computer display is usually working in. It is very obvious that colour differences in the green area are much more difficult to notice (ellipses are bigger). To explain the reasons for these perceptual differences, is beyond my knowledge.
-
Colorist podcasts
Andy Minuth replied to Nicolas Hanson's topic in Editing , Color grading & Finishing
I am also interested in finding new podcast content. The Colorist Podcast that Nicolas mentioned is great. I listened to The Digital Cinema Cafe podcast. They touched color grading from time to time, but they stopped producing new episodes. Also 'The RC' by fxguide.com was interesting, but more focussed on digital cinematography. But got cancelled, too. What remains is the fxpodcast by fxguide.com. It is focussed on VFX but sometimes they are also touching color. There is one episode with Peter Doyle for example. -
Thanks for sharing Your first experience, Asa. Yeah, I think a bit more pop makes sense, and in my opinion one of the important things about HDR is to get more definition in the specular highlights and shadows. But I guess the tricky part is that bright objects do not get too distracting. But I guess that Ex Machina with its dark and also landscape sequences will look even better. Are You working from your original Baselight scene, so that You can adjust the old layers? Or do You have to work with the rendered out master, which would be quite difficult I guess... ?
-
Thanks for the kind feedback guys
-
Thanks for the kind feedback guys
-
I can not share first hand experience, but at least some observations I made at IBC this year: There was a panel where the technical VPs of the big studios discussed HDR and WCG (wide colour gamut). They projected some A/B examples of standard P3 digital cinema and Dolby Vision. They told that until now, they graded the SDR main delivery first, and then asked the filmmakers and colorists to do the HDR/WCG version after that as a trim pass. They agreed, that none of the filmmakers disliked the 'bigger canvas'. But they also agreed that the filmmakers were probably less courageous with the new technology, because they already found a pleasing SDR look for their film and did not want to alter it too much. The goal should be to do the HDR/WCG version first and trim passes for the SDR deliveries. I enjoyed the examples that they showed a lot, but I also noticed two things: - 108 nits in the cinema is nice, but not as impressive as some people might expect. Basically it is just around one additional stop in the highlights. Way more interesting are the increased details in the shadows. - technical issues with the footage like noise get boosted a lot. There is definitely less range for us to deal with footage that was exposed suboptimal . DPs will have to work more precise, until the next generation of camera sensors might improve the situation again. Walking around the exhibition floor, HDR was THE THING this year. But looking at all these displays one could easily get the impression, that HDR means: an extremely saturated picture with ugly clipped highlights, that is very bright. Nice looking examples were rare. About displays: In my opinion the Sony X300 seems to be the best choice for HDR mastering at the moment. Hope to hear about more hands-on experience in this thread... So long, Andy
-
The standalone tool is intended to do a classic DI calibration. This means that its main purpose is to generate and tweak a 3D LUT from a set of colour-patches that went through an analogue film lab. This print emulation LUT was essential to get a decent film-out. With film labs closing around the globe, this workflow is getting less important. But Truelight can also be used to tweak or convert existing LUTs. Besides the main application it also includes a set of command line tools (tl utils) that are intended for advanced users. To answer Your question: I think TCS (inside Baselight) is the more modern approach and probably the better way to output different LUTs for other systems. But it is nice to have the standalone Truelight additionally.
-
A few days ago I listened to this episode of fxguide podcast: fxpodcast #312: Take Care of Your Eyes I think this topic is very important especially for us colorists. Our eyes are essential for our work, we should keep them in good shape. On the linked website they published these advises: Additionally I noted these things during the podcast: - avoid too much airflow (AC, Ventilators, etc.) because it might dry out your eyes too fast - working on a projector is probalby less fatiguing for the eyes than working on a monitor that is much closer. The accommodation muscles in the eye are in a more relaxed position, when you are focussing on something between 6m and infinity. Personally I made a similar experience. I always felt that working long shifts on a display, that is quite close is more fatiguing than working on a big screen, that is meters away. What is your opinion on that, and how do you approach the topic of eye health?
-
I think it depends on the use case. If you just want to calibrate your display devices, something like CalMan or LightSpace is probably the best choice. If you want to build a consistent color pipeline across many departments, I think You will need several of the mentioned tools. OCIO is great to set up the VFX part, because it is available in Nuke and AfterEffects. But for the main color pipeline in the grading system, I use Truelight Colour Spaces (the colour framework within Baselight) and Truelight (standalone color management tool). What I like about these tools: - I am a Baselight user, so it is quite handy to use the built in colour engineering - Besides technical, I have a lot of creative choices (e.g. DRTs), and I can easily add a creative grade to a transform - The scripting language is not too complicated. I am not a software developer and also not a colour scientist. But I am able to create new custom color spaces, and TCS takes care of all the rest. - It can import and export almost any kind of LUT. For example it is quite easy to export a custom lookup table for the Nuke artists, so that they can see the intended look of a show in sRGB or Rec1886, while You are working in P3. In Baselight 5 they will add some new interesting features in this area, for example a mastering colour space, that is a gamut limiter for wide gamut deliveries, etc. To be honest, I never intensively used the color management of Resolve, Autodesk, Scratch, etc. That is why I can't judge their performance in comparison to the Filmlight tools. I just wanted to explain my point of view.
-
My Resolve knowledge is not up to date. I can't help You with this one, sorry.
-
Yes, for all cameras that are listed with a camera icon color-space (mostly log color-spaces). The camera manufacturers are using log curves to solve the problem of storing HDR images from the sensor in an efficient way. Most cameras can also shoot in Rec.709, which means they produce a video signal, that can go on-air immediately (and is SDR). In this case, a DRT is not needed, because it got already applied inside the camera, but You are loosing latitude for the grading.
-
Yes kind of. The DRT is needed for conversions from HDR (e.g. Log) to SDR (e.g. Rec1886). The DRT is applying a tone-mapping (usually like a S-curve in the luma channel), that tries to compress a lot of the highlights and shadows into the final image. Otherwise they would be clipped. Something comparable happens with the colours as well. So basically the DRTs are different approaches, of how You can display an image with a high dynamic range on a low dynamic range display in a 'pleasing' way. I recommend to watch this tutorial of @Daniele Siragusano, it covers this topic as well: Part 1 Part 2:
-
The DRT is about how this conversion is done. They offer different looks. When You switch between them, You will notice changes in contrast and colour. I advise against setting the DRT to 'None' in this workflow, because then the final image will not look like intended. BTW: I forgot to add in the first post, that You have to set the render colour space according to Your cursor colour space.
-
Hi Abby, I assume You want to do a batch conversion of some kind of log footage into a video color space. Put the footage in a scene. Set the scene working colour space in the 'Scene Settings' to whatever kind of log flavour Your footage is. e.g. Arri LogC WideGamut, etc. If it is a film scan, I recommend ADX. The 'Input Colour Space' can remain at 'No Conversion'. If You have different kind of log flavours, set each clip to the according camera with the 'Input Colour Space'. Leave the 'Grade Result colour space' at 'From Stack'. Now change the viewing color space in the cursor to your preferred output. Usually this will be Rec.1886: 2.4 Gamma / Rec. 709 Because the conversion is going from a scene-referred color space (camera icon) to a display referred color space (display icon), a DRT should be applied. Which one You choose is a question of personal taste. Generally the 'ACES 1.0 (Dim surround)' is a good choice. The ARRI Photometric is applying the same look, that an official ARRI LUT from LogC to Rec709 would do. But You can do it on any kind of camera. 'Truelight Film 1' applies a filmic look, that mimics the result of a print stock. 'Truelight Video 1' i do not recommend for a batch conversion of footage. The idea behind this DRT is, that Telecine-style colourists, who are only used to grade in a display colour-space, are still able to benefit from some of the features of 'Truelight Colour Spaces'. They prefer a very flat image, to start their grade with, that is why this DRT is outputting a quite low contrast image, which needs some additional grading, before it looks "right". I hope this answers Your question. Andy
-
Whats Your opinion on grading trailers and teasers for a feature film? I am aware, that the time schedule for a feature is not in the hand of the colorist, but do You prefer to do it before the main movie, to have an approved look reference? What if the trailer is done after the main grading, do You adjust the shot by shot grading in context of the trailer edit? I don't like to do the trailer before the main movie, because I prefer to select important shots as a look reference by myself. Additionally I see a problem with the available time to find the right look. During a trailer grading You don't have much time for each scene to find the best look, and then during the feature grading often I discover something better. Changing the grading in trailers and teasers on purpose, for example because of different context and edit, is something that I do regularly. Because I think the trailer has a different purpose than the feature, it is a commercial for the movie. So I think the look of a trailer might be a bit less courageous and more appealing to a broad audience. I might change especially very dark shots, because often also the editing in the trailer is much faster and we have to help the audience to get the important things in the images. I would love to hear your opinions on that? Andy
-
Neat Video is great for denoising.
-
Bright top and bold contrast
Andy Minuth replied to Nicolas Hanson's topic in Editing , Color grading & Finishing
First the corrections are applied, then the LUT. You are looking through the LUT while grading. Just put a grading operator before and after a LUT and observe the behavior on the waveform as you change the brightness in each one of them. You will notice a big difference. If you use a gradient from black to white (left to right) as source image, you can see the s-curve on the waveform. -
Bright top and bold contrast
Andy Minuth replied to Nicolas Hanson's topic in Editing , Color grading & Finishing
I am not 100% sure, if I understand how this technique works. But when you grade before a typical Log-to-Video-LUT is applied, You are benefitting from the soft highlight rolloff. Which means, your grade is sent through a s-curve, that becomes very flat in the highlights. So when you make the image brighter, the result will not clip easily, but only when you push it very hard. Basically you can make the image brighter and darker without clipping in the blacks or whites or loosing the general contrast. The contrast in the highlights will be reduced of course, because of the flatter curve in the LUT. I hope this makes a bit sense -
BaseGrade will not replace VideoGrade in Baselight, it will be an additional tool. I think it is the right way to go, because Lift, Gamma, Gain was developed for telecine workflows, so basically to apply the grade in a video space. Lift, Gamma, Gain was built with a SDR video signal in mind. The reference points for a telecine colorist are black and white. A simplified approach is to take the darkest point of the image and make it 0% and the brightest spot 100%. And with the gamma, you adjust the curve between these two points. One of the problems here is that specular highlights are ignored, because originally they were just clipped. Today the colorist has to take care of them manually with special techniques. For DI this is not the best way to work, thats why FilmGrade or other Log-grading tools were introduced. They are more practical, when a print emulation LUT or another display rendering transform is applied after the grade. In DI film is the foundation. It is extremely difficult to measure maximum black and white with film, because the transfer curves are very flat and non-linear in these regions. That is why the 18% grey patch, roughly in the middle of the curve is the anchor point. You do not think about, if something is 100% black or white, but more about the general brightness and contrast of the image. This is already a more natural approach to grading - in my opinion. And now with HDR deliveries, I think it is a very good idea to introduce new tools, that were designed to work natively in HDR. BaseGrade will not be based on a specific video signal or film, but on the human eye. To me this sounds logical, because in the future we will be less and less restricted by technology. Our perception will become the limit for the grading. For example BaseGrade will not offer just one control for highlights, but several highlight regions, which is probably necessary to effectively sculpt a HDR output. I am very excited to do a test drive with BaseGrade and to see, how it shapes images.
-
Hi Rakesh, I have not watched them, but You can find some video tutorials on http://www.baselight-tutorials.com Best, Andy
-
@Mazze: I will definitely visit these booths. @Lucia: I already registered for the Colorist Mixer. See You there.
-
For me the look of the movie was the star! Magnificent work, Eric.
-
Hi all, who is attending ibc this year in Amsterdam? What do You think about a meet-up? I will be in Amsterdam from Saturday until Tuesday and I am always happy to meet new postproduction people. CU, Andy
-
OP-Atom means every essence (Video-Tracks, Audio-Tracks, etc.) is in a separate file - Atoms. This is the lowest level of MXF. OP1a supports several tracks muxed into one file. As Stig pointed out already, Avid prefers OP-Atom.