Lee Lanier
-
Posts
124 -
Joined
-
Last visited
Content Type
Profiles
Case studies - Free
Case studies - Premium
Resources
Insider
Courses
Forums
Store
Everything posted by Lee Lanier
-
I would create a new part of the network that creates a version of the character that is cut out but has no arms or head. If possible, branch this off the MediaIn. Then merge the result of this new branch near the end of the network under the arms and head.
-
Depends on what your network looks like - but you might need one branch for a static body that uses a mask to cut off the arms, and a separate branch that uses a second iteration of the body that cuts the arms off for animation. In fact, you probably want to operate each arm separately, so that is three branches. Not sure about the glitchy part - I've never had anything render poorly that looks right in Fusion,
-
There isn't a puppet tool in Fusion, but it is possible to build your own with a bit of work. If you haven't seen it, there is a discussion on this over here: https://forum.blackmagicdesign.com/viewtopic.php?f=22&t=44435
-
I just tried an import with DR16.1 Studio. No problem bringing in the PNG files. (If you are opening a project and the files are missing, you have to use Relink Selected Clip or Replace Selected Clip).
-
I haven't seen that particular rendering error. I would try rebooting and restarting Resolve. Also, test different parts of the tool network and see if there is a problem with a particular tool. You can export a 3D LUT of your color grade from the Color tab and apply it as a View LUT in Fusion.
-
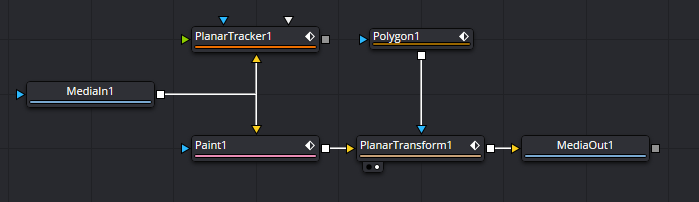
Disconnect the Tracker tool from the Transform tool. It looks like you have the Tracker connected to the Effect Mask input of the Transform. There is no need to have a direct connection between those two tools.
-
I've had issues applying tracking data directly to mask nodes in the past. Try connecting a Transform node to the mask and apply the tracking data to the Transform node. It might help to avoid strangeness.
-
Here's one idea... If you use a Stroke brush with multiple Clone strokes on a single Paint node, you can connect a Planar Transform to the Paint node. To avoid the entire frame from appearing after planar distortion, you would mask the Planar Transform node so that only the masked, cleaned-up areas appear over the original footage. Something like this...

-
Yes, you can track with the Tracker and then apply the tracking data to a Paint node or a Transform node connected to the Paint node. Sometimes, I just find manual tracking faster, so it's good to have both options.
-
Unfortunately, there is no way to download. Streaming only.
-
You can mask and color grade 360 VR as you would any footage. You can do this in Fusion or in the Color tab. To do this in Fusion, it's easiest to view the footage in the LatLong format, as shown in Lesson 07. For exportation, you can render it through a Saver in Fusion or render it out of the Deliver tab as you would any other footage. In general, 360VR is rendered out as LatLong, although you can use a Panomap tool to change the mapping before rendering.
-
Combining Multiple Delta Keyer Nodes (Fusion/Resolve)
Lee Lanier replied to James Conkle's topic in Fusion
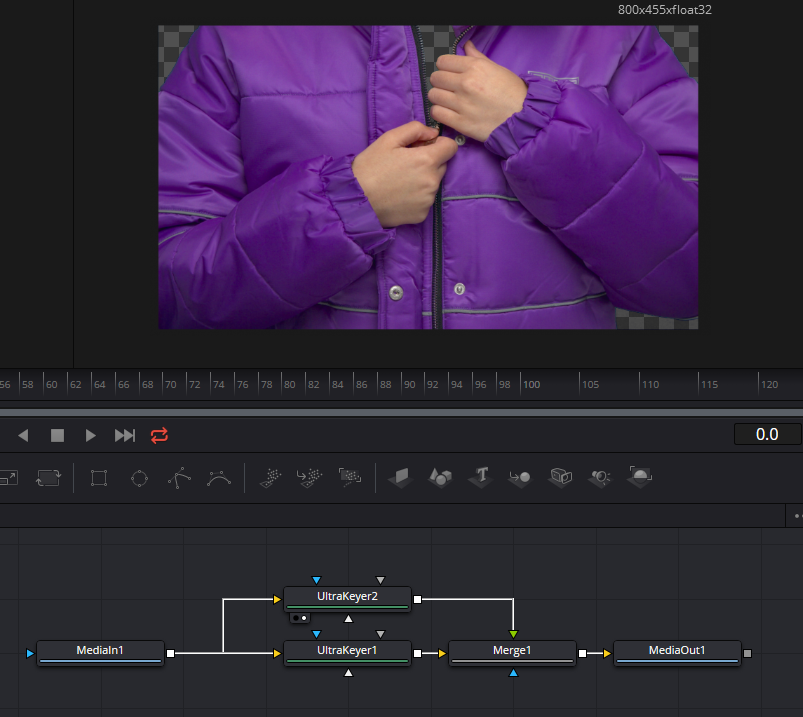
Generally, you don't have to change the operator - but one thing you may need to do is add a mask to each green screen tool to limit what area of the frame each tool is working on. Otherwise, one tool may negate or cover up the result of the other. -
Combining Multiple Delta Keyer Nodes (Fusion/Resolve)
Lee Lanier replied to James Conkle's topic in Fusion
You can probably get away with a single Ultra Keyer and target the lighter green. However, you can always combine the outputs of two keyers with a Merge tool, like so. Each Ultra Keyer can target a different screen color.
-
Currently planning a "working with HDR" series. It will be the next one I record.
-
If you are using RCM, and the footage is not RAW, then you'll want to try to apply a matching Input Color Space. As for the clipping, perhaps there is a mismatch between the camera exposure LUT and the default Rec 709 space in Resolve. If there is clipping, maybe skip the Tone/Gamut Mapping and instead grade the footage into an acceptable range in the Color tab - at least that pushes any destruction of color values to the end of the pipeline. Not sure if that helps - I must admit color pipeline issues can be very convoluted.
-
Introduction to visual effects in DaVinci Resolve Fusion
Lee Lanier commented on Lowepost's course in Introduction
Go to the Settings tab (4th tab) on the Tracker tool. There's a Motion Blur switch you can activate. The motion blur will naturally erode the edges. For additional edge blur, you could insert a Blur or Erode/Dilate tool between the Screen sequence and the Tracker (you can force a tool to work on the alpha channel alone). -
The Loader tool is native, as well as OCIO Colorspace. However, with the OCIO Colorspace tool, you'll need to download the OCIO config file and load it into the tool. The config files are here: https://opencolorio.org/index.html#
-
You'll have to RMB-click on the clips in the Media tab, choose Replace Footage, and browse for the missing image sequences.
-
Hmm. Unfortunately, I am running Resolve Studio 16 but not the Fusion Studio 16 standalone. Are you unable to open the .comp files or is there some element of the motion tracking or node network that is not working?
-
After doing some testing with a PNG logo, I see that the PNG transparency is interpreted poorly with RCM - even when the PNG's input color space is set to sRGB, The workaround would be to import the PNG directly into Fusion through a Loader tool, which essentially allows it to bypass RCM. This would require a bit of color grading in Fusion to match the PNG to the sLog footage, which would come in through the MediaIn tool. You could also consider pushing the PNG into sLog space within Fusion by adding a OCIO Colorpsace tool.
-
The Tracker is sensitive to the sizes of the search and pattern boxes and the exact placement of the tracker center. That said, the word on the skateboard should be fairly easy for the tool to track. Try adding a new Tracker tool and scale the tracker boxes down so they do not extend past the skateboard edge. As a test, I applied a new Tracker tool to that footage and tracked with the default settings and it worked just as it did in the video. I'm using Resolve Studio 16.
-
Multiple Media out to Color doesn't composite when in Edit
Lee Lanier replied to Richard's topic in Fusion
I should also mention that you can combine masks in Fusion by simply running the output of one mask into the input of another. There is no limit to how many you can chain together, -
Multiple Media out to Color doesn't composite when in Edit
Lee Lanier replied to Richard's topic in Fusion
The workflow between Fusion and the other tabs is a bit odd. One workaround would be to stack clips in the Edit tab and give each clip a unique mask in Fusion. The Edit tab will combine the masked clips correctly. To switch between clips in Fusion, toggle the film strip on/off button for each clip in the Edit tab. Each clip will appear in the Color tab, but each will have it own node network; however, you can copy the color grade from one clip to another pretty easily. When both clips are turned on in the Edit tab, the resulting combined stack of the Edit tab will be seen in the Color tab. -
If you go to Fusion > Fusion Settings > Flow and turn on Arrange To Grid and set Pipe Style to Orthogonal, the grid snap and orthogonal pipes are activated for any new project. If set this way, it will also affect old projects you may open (although this seems inconsistent).
-
Yes, you can re-use the tracking data by applying it as Unsteady Position. However, if the domain has been changed, as it has with this example, it may require an additional offset to keep the final result properly framed.