Cary Knoop
-
Posts
34 -
Joined
-
Last visited
Content Type
Profiles
Case studies - Free
Case studies - Premium
Resources
Insider
Courses
Forums
Store
Everything posted by Cary Knoop
-
Saturation vs. Luminance
Cary Knoop replied to Alex Winker's topic in Editing , Color grading & Finishing
Oh dear! I am sorry, I completely missed that. -
Saturation vs. Luminance
Cary Knoop replied to Alex Winker's topic in Editing , Color grading & Finishing
Bypassing the channels won't help to avoid the luminance mix interference (at least not in Resolve 16 beta). Try it, make a bold change in the curves and now move the luminance mix from 100 to zero, you should not see a difference but it shows a difference. -
Saturation vs. Luminance
Cary Knoop replied to Alex Winker's topic in Editing , Color grading & Finishing
I would make sure that Luminance Mix is set to zero, even when only the G channel is selected in the node. -
There is no limit for upload. Also, Resolve's H.264 is not very good, better to export an intermediate and use ffmpeg with -crf (around crf 16-17 should be ok). That the footage was taken from web exports explains the high occurrence of artifacts. Obviously not an ideal situation for a reel.
-
Very nice! Some small comments: I would definitely increase the bitrate of your upload, 10 Mb/s is rather minimal. But regardless there are quite a few visible compression artifacts in the source. Was the video encoded with a software or hardware based encoder? Even for 10 Mb/s, it seems very artifact-rich. 25:18 - Very strong banding, probably due to the 8-bit destination codec. 31.14 - Too much noise and too dark. It seems to me that the shot was way underexposed in camera, even the brightest part was not very bright, I would take this shot out, it's beyond repair.
-
Right now it does not work for me because I use two-way authentication and two-way authentication does not work in Resolve 16 beta 1. Hopefully, they get that fixed in Resolve 16 production. Two-way authentication is pretty much a must if you want to keep things secure. And it's the same with the direct YouTube connection.
-
Was at NAB this year and spoke quite a bit with Blackmagic representatives. They were all very professional and helpful, some questions that could not be answered were directed real time to other representatives. Two other companies I that want to highlight in terms of the professionalism of their representatives at NAB were AJA and Tektronix,
-
Resolve Gamma 2.4 vs Rec709 (Scene)
Cary Knoop replied to Anton Meleshkevich's topic in DaVinci Resolve
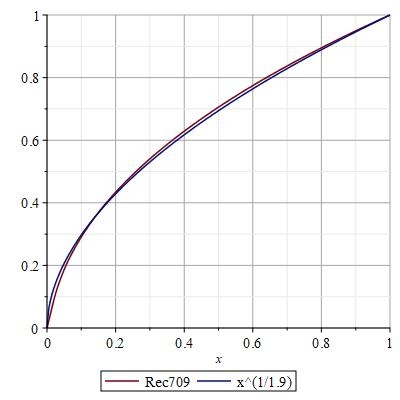
Rec709 has a linear and a gamma part, the gamma is 2.4, taken together (linear + gamma) gives a resulting gamma of approximately 1.9. See the attached mage for a comparison.
-
Color Space Transform OFX 14 vs 15
Cary Knoop replied to Anton Meleshkevich's topic in DaVinci Resolve
Perhaps the tone mapping algorithms have been updated? Just my opinion but I would only use tone (i.e. gamma) mapping for limiting HDR max nit output. For anything else, I would use the controls with the exception of some gamut mapping if I need to compress the gamut. -
Great retro look!
-
There are no rules, it is a personal decision. I think some before and after slides are useful as long as the before is not log footage. Going from log to Rec.709 (or any other deliverable) is simply a technical conversion it's not part of the actual grading.
-
Because you need less bit depth in log with the same fidelity. Most of the bit depth is wasted in the highlights in linear while you need a lot of it in the shadows.
-
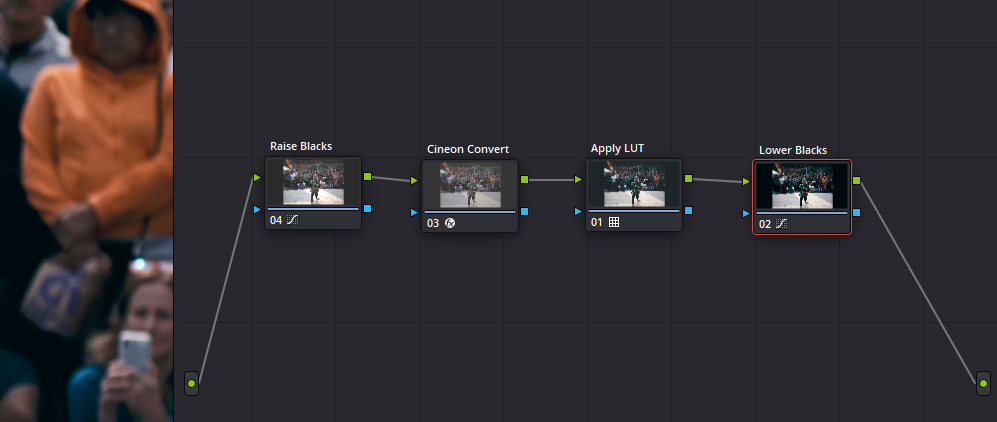
To use the Resolve Rec.709 Kodak 2383 LUTs I would use Cineon Log as a base, but you have to make sure the black values are slightly raised before you apply the LUT and lowered back afterwards because otherwise your blacks might clip. Soft "Video" look Hard "Film" look
- 29 replies
-
- 1
-

-
- 2383
- kodak vision
- (and 2 more)
-
RGB Qualifier
Cary Knoop replied to Anton Meleshkevich's topic in Editing , Color grading & Finishing
One comment, bringing curves down eventually clips the colors, however if you bring instead the complimentary colors up you avoid clipping. -
Did you mean gif or tiff , I never heard of giff.
-
B/W Rgb values in film stocks
Cary Knoop replied to Abby Bader's topic in Editing , Color grading & Finishing
I guess this is a learning moment for me, single layer black and white film records different luminance values for red, green and blue colors? -
Sharpness and resolution
Cary Knoop replied to Anton Meleshkevich's topic in Editing , Color grading & Finishing
Beats me. Uploading a 4K source is much better than uploading a downsampled HD version. -
Reduce edge contrast
Cary Knoop replied to Thomas Singh's topic in Editing , Color grading & Finishing
The easy answer is one cannot, it's technically too complicated. However if you want to spend the time processing your videos there is a http://www.vapoursynth.com/ script that attempts to do that and it could be used to reduce typical DVD edge "enhancement". Be prepared to spend time on finding the appropriate parameters for your video and for a processing speed of multiple seconds per frame. https://github.com/IFeelBloated/Vine -
I would explain to the client that old films happen to have grain and that there is nothing you can do about that. You cannot restore original content by removing grain, because grain effectively has "blocked" film detail. I think it is better to leave the grain as is, often it actually helps to increase perceptual resolution.
-
I think it is better to have a very limited number of before and after views provided the before view shows the result after the technical delog. What is really important for a before and after view is what you do with the image after you have done a delog.
-
Saturation in RGB solely depends on the largest and smallest channel value so it really does not matter what controls you use. Obviously the channel mixer has more flexibility but if you are going for saturation without changing the luminance or hue it should give the same results. I would be careful with L*a*b. While this colors pace is unquestionably superior in modeling the perceived distance between two colors scaling *a and *b can cause hue changes, notably blue becoming purple. At the end it all boils down to creative intent but it is important to be aware of potential gotchas with L*a*b. A simple trick to compare the different methods is to create a layer node use a method for each node and use a Difference Composite Mode in the Layer Mixer to observe the differences.
-
You can set the bit rate in Resolve as well. I think AME and Resolve are of comparable quality, that is both are not super great. One problem I notice is that Resolve does not dither (very well) from 10 to 8 bit. If you have 10 bit or above sources it may be better to encode using ffmpeg.
-
If you save the code in a file with an extension .dctl (make sure there are no spaces in the file name) and then place the file in the folder DCTL (you can find this folder under the LUT folder) and start Resolve it should come up in the DCTL menu.
-
Here is DCTL code to make a gray scale ramp: __DEVICE__ float3 transform(int p_Width, int p_Height, int p_X, int p_Y, float p_R, float p_G, float p_B) { return make_float3( (float) (p_X + 1) / p_Width, (float) (p_X + 1) / p_Width, (float) (p_X + 1) / p_Width); }
-
You could use DCTL for this. Here is an example of a DCTL that splits an image in 4 parts for showing the original and the three individual channels in LAB and RGB colorspace (set the variable 1 for LAB and 0 for RGB): https://github.com/CaryKnoop/DCTL/blob/master/C_Channel_Viewer.dctl