

Jussi Rovanperä
-
Posts
130 -
Joined
-
Last visited
Content Type
Profiles
Case studies - Free
Case studies - Premium
Resources
Insider
Courses
Forums
Store
Posts posted by Jussi Rovanperä
-
-
I haven't seen the keyboard used in real life, but on the demo he kept the trim button pressed down while jogging with the wheel. But I'll check this from some people who are in NAB now.
EDIT: Confirmed that this is how the trims work.
-
6 hours ago, Bruno Mansi said:
As far as my opinion on the new edit keyboard is concerned, I'm still sitting on the fence. During the Blackmagic presentation, Grant seemed to suggest the keyboard opened up the revolutionary ability to use two hands - the left hand using all the shortcut keys, whilst the right hand navigates around the timeline with the jog/shuttle knob. Leaving aside the fact that this keyboard may not work for left-handers, does he not know that this is exactly what most professional editors do anyway with the normal keyboard and mouse? The only thing that this keyboard improves is the navigation with a proper shuttle/jog knob.
The keyboard is very expensive for what it is - a heavy duty keyboard with a jog knob. For about the same price you can buy a grading panel! I know a good slice of the price must be going on the electronic clutch control, which if it's anything like the feel of the knobs on the old Sony linear edit controllers, would be really nice to have. I would be happy to pay less than half the price for a jog knob like this, but not a thousand dollars!
Grant said that there will be a left-handed version also.
The trim buttons in the bmd keyboard work like modifier keys for the jog wheel, and I think that is quite a bit faster and intuitive than first selecting a trim mode, then adjusting the trim, and then switching to another mode
-
Single SSD would be fine for the R3D's, but the bottleneck for the playback is the CPU and GPU power, not the drive speed.
-
 1
1
-
-
If you render out of Resolve with "no ODT", you would bring those shots back as "no IDT".
In Fusion you'd use OCIO only for viewing, but not for rendering.
-
1
-
-
you can create a line with polygon or b-spline, and use that as a mask
-
Same here.
-
- Popular Post
- Popular Post
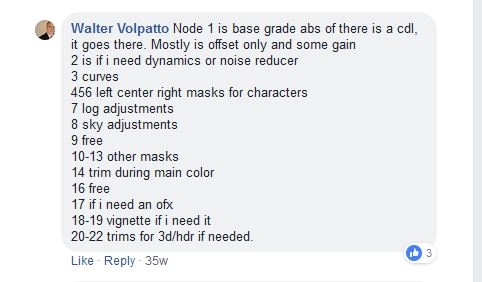
Walter posted an earlier version in facebook, and wrote a little breakdown of the nodes. I saved it because I thought this is an interesting approach.

-
9
-
For projects with hundreds/thousands of cuts, it makes sense to have a fixed structure. I've been using 16 serial nodes, and "Switching clips selects" is set to "same node", so when you change clips, the same node stays active.
For short projects it doesn't really matter.
-
1
-
-
AFAIK you can't.
-
1
-
-
I would transform to redwidegamut/3g10 and then color transform from that to awg/logc.
Going to DG/RG4 or DG2/RLF might clip some values.
-
Single HD speed is in that range, so that's the bottleneck if you're not using ssd's or Raid's.
-
 1
1
-
-
You should check "If it's purple someone's gonna die", here's a link
-
4
-
-
In Resolve, rec709 gamma is bt.1886 formula, srgb is the srgb formula, gamma 2.2 and gamma 2.4 are pure gamma functions, like gamma 2.2 is linear^(1/2.2) and gamma 2.4 is linear^(1/2.4).
gamma 2.2 is very close to srgb formula, but gamma 2.4 is quite different from bt1886.
-
 1
1
-
-
Most of the Aces issues seem to be caused by AP1, it's small compared to camera gamuts like AWG or RWG, so colors that are out of gamut for AP1 end up in strange places.
-
If you set the CST input gamma to 709 and output gamma to cineon, the footage will be linearised between the transforms, and if you do a color space transform in the same node, that is then done in linear - between the gamma transforms.
-
1
-
-
If you delete the clips from the media pool, and bring in the original clip, it should link to the timeline and then you can merge the cuts.
-
1
-
-
2 hours ago, Margus Voll said:
After hands on demo it actually feels more easy to grade in Baselight. Once you get the UI and do not get scared all the color science bits it seems actually easier to use to get your results faster. I think parts of it comes with frequency separation in cases where you do not need to fiddle with keys and such much. One demo shot was exactly that, a guy on the snow with sunset and it could be adjusted in very few steps without any masking involved. Seems extremely powerful.
You're talking about base grade here? I think a important point is that the tone curve is tweaked in Lab, so even if the curve becames quite flat at some areas, it doesn't affect the color. The same curve in RGB would gray out those flat areas.
-
A typical normal exposure would be around 0.4-0.45, darker shots would be 0.2 - 0.3.
But there are a few different methods of how to set the exposures and ranges in a grade.
-
Not a stupid question
Usually I set it where the mid gray is, and keep the same range settings for the whole scene. If the pivot is set to same region, then the contrast control and the log shadows / highlights work together nicely.
-
IMO those resolve default ranges for the log tools are useless, I set both ranges to the same value, so the curve is softer, and only use shadows and highlights. It beats me why they haven't added an adjustable rolloff.
-
key shadows, blur the key and drop the gamma.
-
I have a small delay with PCI Mini Monitor, both with Hdmi and SDI out, maybe 1 or 2 frames.
-
1
-
-
You could think of the R and B channel as white balance, and G channel as tint. With printer points in Resolve you could adjust color balance by pressing (at the same time) 7 and 6 (warmer) or 4 and 9 (cooler), and then separately adjusting G for tint.
-
pink is red, when it comes to hue only
You're better off keying, because to get a good red, you need to drop the density, and the hue vs lum is not so good for doing that.

") Usually I set it where the mid gray is, and keep the same range settings for the whole scene. If the pivot is set to same region, then the contrast control and the log shadows / highlights work together nicely.
Usually I set it where the mid gray is, and keep the same range settings for the whole scene. If the pivot is set to same region, then the contrast control and the log shadows / highlights work together nicely.
Different gamma for different environments
in Editing , Color grading & Finishing
I don't worry about viewers gamma and viewing conditions because those are out of hands anyway.
What is important with many projects is to make sure that the grades work also on smaller devices like phones and tablets, something that looks moody on a big TV might just look really dull on a small screen, so one would need to find a compromise that works on both.