

cameronrad
-
Posts
58 -
Joined
Content Type
Profiles
Case studies - Free
Case studies - Premium
Resources
Insider
Courses
Forums
Store
Posts posted by cameronrad
-
-
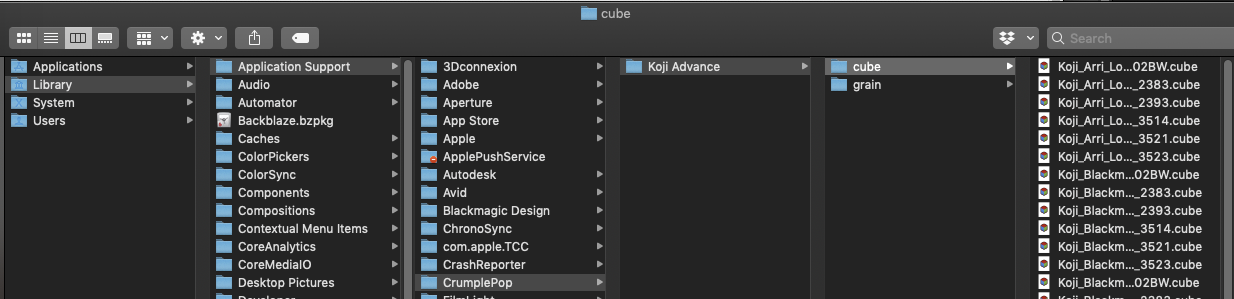
On macOS if you install the plugin, the LUTs can be found in:
/Library/Application Support/CrumplePop/Koji Advance/Cube

-
On 4/12/2019 at 10:08 AM, Cary Knoop said:
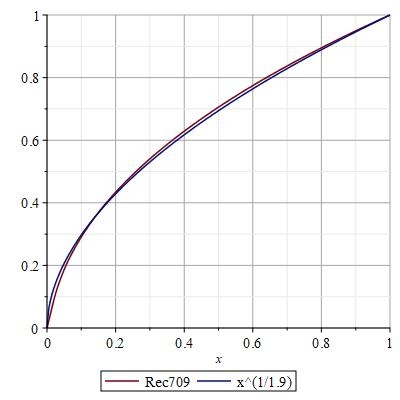
Rec709 has a linear and a gamma part, the gamma is 2.4, taken together (linear + gamma) gives a resulting gamma of approximately 1.9.
See the attached mage for a comparison.
sRGB has the 2.4 gamma part in the middle. Rec.709 is 1/0.45.
In any case this is just the encoding/transfer function. https://www.image-engineering.de/library/technotes/714-color-spaces-rec-709-vs-srgb
Which is different than the decoding/display gamma. (Gamma 2.4). The combination results in an end-to-end system gamma that isn't 1.0 but rather around 1.2 to compensate for viewing environment.
QuoteWhile Rec. 709 does not specify the display referred gamma, display gamma is discussed in EBU Tech 3320 and specified in ITU-R BT.1886 as a gamma of 2.4. This is a higher gamma than the 2.0 the math shown above would indicate, because the television system has been deliberately designed with an end-to-end system gamma of about 1.2, to provide compensation for the ‘dim surround’ effect. Therefore, the monitor gamma is not the inverse of the camera gamma
https://en.wikipedia.org/wiki/Rec._709#Transfer_characteristics
-
55 minutes ago, Marc Wielage said:
Tiffen abandoned their partnership with DFT and allowed DFT to take it over completely. They're the same filters, just without the Tiffen name on them. And the "Light" patterns are part of it.
Yea, you still linked to the wrong product. For video you should be linking people to the DFT suite which includes a light plugin, but for video. Linking to the Light plugin product page takes them to a product that only works with still applications
-
16 hours ago, Marc Wielage said:
The Video/Film tab takes you to a different page, which says:
Gobo library for lighting effects includes 751 gobos categorized into Abstract, Doors, Elements, Foliage, Snowflakes, Textures and Windows groups
and:
The DFT video/film plug-in is licensed on a per host basis. You can choose from: Adobe After Effects/Premiere Pro, Apple Final Cut Pro X/Motion, Avid Editing Systems, OFX hosts or a Multi-Host license which will run all video/film and OFX hosts on the same machine.
That's for DFT. http://www.digitalfilmtools.com/dft/
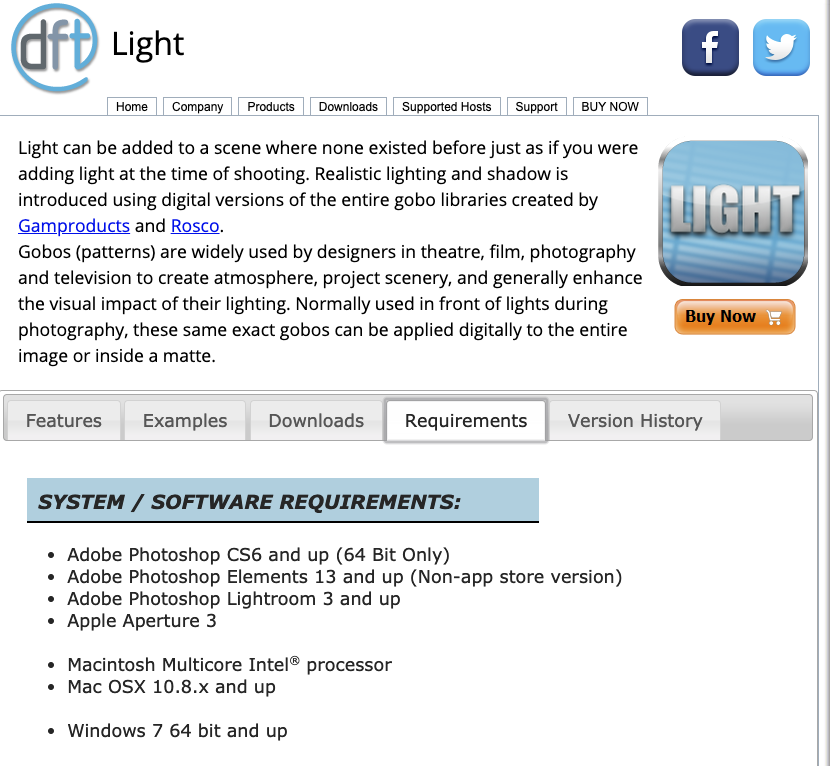
On 12/28/2018 at 9:12 PM, Marc Wielage said:New link for the Tiffen "Light" plug-in, which is now run separately from Tiffen by DFT directly:
You posted a link for Light. http://www.digitalfilmtools.com/light/
Light doesn't work for video/film applications.
These filters do however:
-
-
-
-
Meh.
The only validation I need is knowing that the people paying me like my work. DPs, Editors, Directors, Cinematographers, etc all know what credit to look for and where to look. I don't think it's that big of a deal. The whole process is collaborative and I'd rather focus on gaining respect amongst my peers and industry colleagues, rather than where my name lists in the credits
-
 1
1
-
-
When is Resolve Stills coming out? Haha
I want to stop using Lightroom and Capture One for my still work all together
Resolve is so powerful and I feel like even with 90% of the tools taken out and some better RAW support/adjustments and modified asset management and UI, a version could be sold as Resolve Stills and it would be more successful than any of the current tools in photography, except Photoshop.
-
1
-
-
A LUT isn't a magic solution to color grading
-
Quick video of Printing Density ICC method I was experimenting with. Using the Resolve Rec.709 Kodak 2383 D65 LUT and Adobe's Kodak 5205 Printing Density ICC.
http://cloud.cameronrad.com/sVQ6
-
1
-
 1
1
-
-
43 minutes ago, Marc Wielage said:
Well, you could just avoid the LUT entirely and color correct the image by hand. I never trusted the Kodak LUTs, and I worked for Kodak for 2 years. I think they were vague and specious, and there was a lot of guesswork and trial & error involved. (Same thing with Technicolor, and we went through a whole slew of LUTs there.)
If you're going to use a Color Checker chart, I'd look at the Color Checker video (the big one) and place it where the actors are standing. Be warned that the saturation values are not accurate. The DSC charts are fairly accurate, but they cost a lot more money. In truth, some of this stuff is very subjective, and sometimes the filmmakers' artistic intent overrides accuracy.
I agree about color correcting by hand, I always tend to get the best results when I just do it manually. I'm a color geek though so I just like to experiment with these types of transforms to try and see what happens. The ICC profile experiment was based off this presentation I saw online: http://www.color.org/ICC_Chiba_07-06-19_PM_DMP_Float.pdf No clue if it's even accurate or this technique is even relevant anymore, I haven't heard any updates and I believe Lars Borg from Adobe is currently working on ACES. Interesting technique to try though.
With the Colorchecker chart, I use the SG but my primary use case is a bit different. I deal with still camera RAWs which benefit from having the extra patches and extended gamut of the SG vs. the standard or the CC Video. The biggest issue I have with the SG is lighting it evenly due to the gloss
-
I'm not sure how accurate it is to be honest. I wish I had more first hand experience with this stuff to know for sure. I tried piecing together what I understand from various sites, this one included. Mitch Bogdanowicz's posts help a lot.
I picked up some stuff from Adobe's old white papers and patents also https://patents.google.com/patent/US9443327
-
1
-
-
I've tried using Adobe's Printing Density ICC profiles to emulate printing density data and got this as the result. https://helpx.adobe.com/after-effects/using/color-management.html I used the Kodak 5218 profile.
______
Adobe Camera RAW Default Color Rendering
Adobe Camera RAW (Custom Cineon Log DCP Camera Profile)
After conversion to Kodak 5218 Printing Density ICC Profile + Kodak 2383 LUT. (Exposure bumped slightly to match ACR Default)
-
2
-
-
On 3/14/2018 at 3:02 PM, Aaron Rosapepe said:
I like the VSCO stuff myself but Im not a professional photographer. Ill usually find a look I like then bring it into photoshop and mix it back into the original image until I get the look I desire. It would be nice if you could do this right in Lightroom but it's a nice way to back off on the effect.
Nice work on your site btw.
Thanks man! I need to update it with some new work some time. Haven't updated it in a couple years.
With VSCO and filters I think toning them back and using them in conjunction with Photoshop isn't bad, especially if they look good and get the job done. The issue i have is when people just paste them on and it looks "filtered". A lot of people don't modify the preset and eventually they all look the same.
Also you might dig this free opacity plugin for Lightroom https://www.capturemonkey.com/thefader/
-
1
-
-
It has better, it has Hue/Sat/Luma curves. I wish Photoshop had what Resolve has in that regard.
Also Resolve is floating point based whereas Photoshop is integer based with limited 32 bit functionality.
-
1
-
-
VSCO Presets are no magic at all. They are just some settings in Lightroom. Occasionally bundled with a RAW Camera Profile which just contains a modified tone curve. They are quite heavy handed. Especially in the shadow areas. The 3DLUTs used in film/video are much more accurate "emulations". VSCO is typically just trying to mirror the aesthetic from a Noritsu or Frontier scan (Common in photo labs).
There's other brands making presets as well for Lightroom such as RNI Films, Replichrome, Alien Skin, Mastin Labs, Tribe Archipelago.
I don't typically use any of these. I find it's better to learn the tools themselves rather than relying on preset looks. However that said, when learning it can help to reverse engineer things. I think the issue with presets is that people become reliant on them and don't develop a look of their own or know how to. For instance on instagram you'll see tons of photographers who don't have any style of their own. All their work looks exactly the same because they use the same presets and shoot similar things.
-
1
-
-
-
I want a Davinci Resolve Stills version so I can ditch Capture One and Lightroom and just use Photoshop for cleanup work/compositing.
-
11 minutes ago, Nicolas Hanson said:
Hi Teo, thank you for your inputs! I know how log tools on log data behave and how to transform data from and to different color spaces but I question the accuracy of film emulation LUTs as the input data is different from project to project.
My initial question is, to be more specific - how precise / accurate is this film stock calculation after I have modified the contrast of the clip prior to the LUT. Not much of the film stock preference any longer I guess?
And, how precise / accurate is the film stock calculation as the input data (footage) change based upon the initial exposure levels, different camera sensors etc. How can the film LUT emulation creators claim that the LUT mimic a film stock 100% when the input data varies that much? I guess different exposure levels and camera sensors, modified contrast prior to the LUT etc will make the film stock emulation behave differently from time to time.
They build off standardized code values. Like standardized Cineon values place 18% gray at 10 bit code value 470.
http://dicomp.arri.de/digital/digital_systems/DIcompanion/ch02.html
http://dicomp.arri.de/digital/digital_systems/DIcompanion/ch03.html
-
1
-
1
-
-
Grade the Log footage. There's different flavors of LUTs. Like Arri Wide Gamut/LogC to Kodak 2838 Rec.709
-
1
-
-
4 hours ago, Lowepost said:
The log scene exposure is the negative log (base 10) of the linear lightness of elements in a scene. By convention, the 100% scene white (as 1.00 brightness) is - log(1.0) = 0.0 Log exposure and the 18% gray is -log(0.18) = - (-0.7447) = 0.7447 Log exposure and a 20% gray is -log(0.20) = - (-0.69897) = 0.69897 Log exposure and a 2% black is -log(0.02) = 1.69897 Log exposure.
The gamma of film is nominally 0.60. So the Log exposure needs to be multiplied by 0.60 to obtain Log scan densities. In Cineon terms the 0-1023 CV yields a scan density range of 0.0 - 2.046 where each CV is 0.002 scan density (referred to as printing density). To find the real Log scene exposure range that can be recorded the 2.046 scan density is divided by 0.60 = 3.41 Log scene exposure. Actually since the min. density is set at 95, the range is 95 - 1023 = 928CV = 928 * 0.002 = 1.856 which is then divided by 0.60 = 3.0933 Log scene exposure.
What is meant by "balanced log Cineon CV input" is the CV associated with a scan that has had a R G B constant either added or subtracted to achieve a neutral gray at near LAD (445CV and corresponds to a 16% gray).
LAD is usually 445CV which is is relative to the minimum scan density (0.0) by convention set at 95CV. Thus, (445-95) * 0.002 = 0.70 scan density. Since the scan density excludes any RGB minimum density (the scan density with no exposure), in this case the LAD scan density is 0.70 above the minimum base density.
In Cineon CV a 1 stop increase in exposure (0.30 Log scene exposure) is * 0.60 = 0.18 scan density difference, which if divided by 0.002 yield 90. Cineon CV per stop of original neg exposure. In the older printer lights , 1 printer light = 0.025 scan density or 0.025 / 0.002 = 12.5 Cineon CV, therefore 90CV ~= 1 stop exposure = 90.0 / 12.5 = 7.2 Printer points per stop.
So, to adjust an image in a color corrector that is stored as Cineon CV, for example, +2 PP (Printer Points) Red (brighter Red), -1 PP Blue, adjust image by adding 2*12.5 = 25 CV Red and subtracting -1 * 12.5 = -12.5 CV Blue
I hope this is not too confusing.
Cheers MitchHoly crap, this just cleared up so much confusion for me. Thank you!
Question I have. I've seen multiple Cineon ICC profiles that use the sRGB/Rec.709 color primaries. I know ICC profiles aren't the right tool for describing the complexities of film,, but I was wondering if it was standard convention to encode/assume Rec.709/D65 - Cineon Tone Curve for Cineon files. Or would there be instances for ProphotoRGB - Cineon, P3 - Cineon. etc
-
My personal preference is to use gamma to describe pure exponent functions. Unless talking about "Film Gamma"
So 1.0, 2.2, 2.4, 2.6 etc. Or linear gamma (1.0), Rec.709 Display (2.4), .DCI-P3(2.6)
Then I reserve tone curve for more complex things, like camera curves, transfer functions, etc.
sRGB isn't a pure 2.2 function, so I don't say the gamma of sRGB., but rather the tonal response curve or transfer function of sRGB.
-
1
-
-
7 hours ago, Nicolas Hanson said:
RGB+Y curve maybe. Why is it called a gamma curve when it's possible to adjust lift and gain as well?
Tone curve would likely be best generalized description. There's definitely some confusion around terminology here
Gamma is really broken down into 3 parts.
Input — OS/Correction/Intermediate — Output
There's an applet here where you can visualize it, as well as some better explanation of gamma correction: https://sites.google.com/site/marclevoylectures/applets/gamma-correction
-
1
-


")

ACES otd - REC709 to SRGB (Davinci Resolve)
in Editing , Color grading & Finishing
· Edited by cameronrad
https://www.colour-science.org/posts/srgb-eotf-pure-gamma-22-or-piece-wise-function/