Lee Lanier
-
Posts
124 -
Joined
-
Last visited
Content Type
Profiles
Case studies - Free
Case studies - Premium
Resources
Insider
Courses
Forums
Store
Everything posted by Lee Lanier
-
Yes, it takes some practice - node-based workflows can be confusing at the start. You might want to check out the "Introduction to Visual Effects in DaVinci Resolve Fusion" series at Lowepost. In it, I go over all the major categories of nodes and how to use many of them. Beyond that, the Fusion help manual has a descriptions of each node.
-

Connect Media Out to Source of another clip on the color page
Lee Lanier replied to Emil Öberg's topic in Fusion
This might work for you... Stack two copies of the clip (or two different clips) on the timeline. Mask the MediaIn tool in Fusion - this will use the top clip. In the Color tab, grade the top clip (which is listed as a second clip). The alpha channel is carried through, so the masked, graded top clip is automatically composited on top of the bottom clip. -
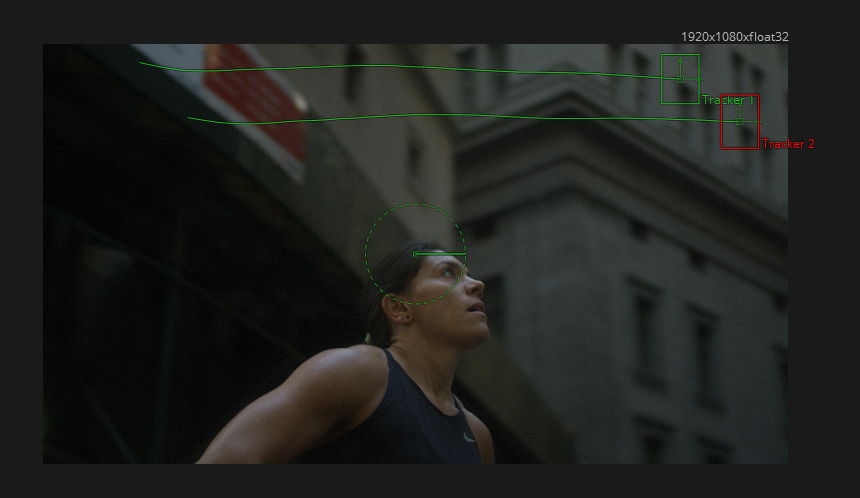
I just did a quick test in Resolve 16, and it seems to work fine. The success of the Tracker is very sensitive to the size and position of the tracking boxes - with small changes sometimes altering the success. Here's what my test track looks like (the search region boxes are vertically elongated too)...

-
I have encountered problems connecting tracking data to mask tools in Fusion; hence, using the extra Transform tool is sometimes useful. There is always more than one way to carry out a task using a node based compositor. It's a matter of finding the most efficient method that works for your project. I have no doubt that Brian and fellow Fusion experts present some excellent workflows that are worth learning. The thing to remember with Steady and Unsteady is how they affect the tool they are applied to. Steady is stabilization (an inverted matchmove) and Unsteady is a matchmove. The Axis variation is designed for the Pivot XY parameter. The Position variation is designed for the Center XY parameter. You can use Offset Position to track an element directly to the motion path (for example, you can track an actor's hand and have an element follow it).
-
With a Loader, you can click the Browse button and navigate to the correct file location.
-
Looks like there was a naming mix-up. My apologies. 11 and 12 are supposed to be using what's currently called Beauty_D. I exported 11 and 12.drp files, just in case, and placed them on my Adobe Cloud storage: https://adobe.ly/2VgIJIv https://adobe.ly/2Y7l2Pw
-
I'm sure there's a way to emulate more standard dodge and burn techniques - the question is: is it efficient and worth the time to set it up? I come from a VFX background, so I tend to think in terms of VFX solutions.
-
I haven't compared Photoshop blending modes directly to Fusion apply modes, but here is information on the math used: Fusion: http://www.designimage.co.uk/merge-tool-maths/ Photoshop: http://www.deepskycolors.com/archive/2010/04/21/formulas-for-Photoshop-blending-modes.html https://www.adobe.com/content/dam/acom/en/devnet/pdf/pdf_reference_archive/blend_modes.pdf If you want to upload an example project, i can take a look when I get some time.
-
Using "Import with Output LUT" when importing a still might give you the chance to convert the still to the correct color space in Resolve. It requires a matching LUT file. I have not had a chance to test this. Although a bit of a workaround, I suppose you could also use a Loader to bring the still into Fusion and apply a Gamut or OCIO Colorspace color transform to it.
-
Thanks for all the positive feedback, everyone.
-
Glad it was a quick-ish fix.
-
Does this occur during playback, or just when rendering? Does this happen without the Crop? I've seen this behavior before - if I remember correctly, I deleted to tool to which the motion tracking data was applied and recreated that section of the network.
-
Thanks for watching. You could apply the tracking data with the Unsteady Position option via the Center XY parameter of an additional Transform tool. Steady Position is an inverted Unsteady Position, where Unsteady Position moves the input as if shot by the original camera. That might be a good approach if you wish to replicate the original camera motion and not generate new motion through keyframing..
-
Introduction to visual effects in DaVinci Resolve Fusion
Lee Lanier commented on Lowepost's course in Introduction
You're welcome -
Introduction to visual effects in DaVinci Resolve Fusion
Lee Lanier commented on Lowepost's course in Introduction
Awesome. I'm happy to hear it. -
You can try using the Clean Plate tool to generate a clean plate with the averaged background color and then use it with the Delta Keyer to key the background. Alternatively, the Difference Keyer is will create a key after comparing a clean plate and the footage with the model. Noise always makes difference keying more difficult. Using the Subtract blending mode may remove too much background color from the foreground to make it viable.
-
-
That is a good question and I don't think there is one answer. One way is to switch to Resolve Color Management (RCM) through the Color Science menu in Project Settings and assign the correct Input Color Space (based on the camera) to the clip in the Media tab. Fusion, buy default, should show you the same interpretation seen by the other tabs with RCM. Make the VFX fixes in Fusion. Last, color grade in Color. You can choose a Timeline Output Color Space and an Output Color Space through the Color Management section if you need to wind up in a different space, like Rec.709. Another approach is not to use RCM, but assign to a LUT to the clip in the Media tab so the log footage is interpreted correctly. Either way, you are adding the VFX to the _ungraded_ version. I would avoid color grading in Fusion, unless you need to match elements to each other (like match a 3D render to a background video). The Alpha channel from Fusion is passed to the other tabs. I haven't roundtripped from standalone Fusion to Resolve. The integrated Fusion is definitely more buggy than the standalone and is missing some features.
-
I'm currently working on a different series, so no immediate plans to expand the beauty series. However, we will keep that in in mind for the future. When warping an actor over a background, you really have to separate the actor via rotoscoping or some form or masking. If you make the actor skinnier or taller, there is the danger that part of the set will be missing; hence, I would say it's only viable with some shots, else it requires a lot of extra work. Dodge and burn would fall into the color correction category. In Fusion, add a Color Correction tool and draw a mask to limit the area where it's operating (connect the mask to the Color Corrector's Effect Mask input). In the Color tab, youcan also mask, although I do most of work in Fusion as I am a VFX guy.
-
Sorry for the delayed reply. I have noticed some bugginess when connecting tracking data. I suggest connecting the data to a Transform tool that is downstream instead.
-
Good point. I will keep that in mind. I will use Underlays in the future also.
-
Warp > Grid Warp and ResolveFX Warp > Warper can create similar results.
-
Glad that worked. Motion tracking can be very sensitive to tracking box sizes and placement. You generally have to experiment to see what works best.
-
You can use the rotoscoped version of her head created in the tutorial. Branch the rotoscoped output to color correction, blur, and/or glow tools. Merge the output of that back on top of the final composite.
-
The Color > Channel Booleans tool offers Add, Minus, and other mathematical formulas for combining two inputs. Not exactly the same, but it might help.