Julien Souloumiac
-
Posts
19 -
Joined
-
Last visited
Recent Profile Visitors
2,011 profile views


-
Hi, And thanks a lot for this very clear and precise explanation ! I now understand better the workflow for rebuilding these FPE lut in RCM, and will give it a try asap. Thanks again for your help ! Best Julien
-
Hello, Could you elaborate please on the color management part of this power grade ? I'm currently mainly working in a RCM workflow, either ipp2 for Red raws, or Arri LogC to DaVinciWideGamut as a timeline color space, and rec709 as Output. Do I need to tweak anything in the Input node with this power grade ? Thanks a lot Best Julien
-
Hello, and thanks for this interesting article. I'm not sure to totally understand your rebuilding strategy in a RCM workflow... Let's assume I'm working in RCM, with LogC files and DaVinciWideGamut as my timeline (ie "working") color space, and Rec709 as Output. And that I want to rebuild the classic Kodak Lut from Resolve. First, to correctly feed my Lut, I would assume to add a CST node, from DVWG to Arri LogC, or Aces transform node, from DVWG to ADX 10, and then my Kodak on a new node. Then I could grab my still and start rebuilding my Lut. Am I correct there, or am I missing something ? Moreover, I don't exactly understand this whole part : " That's why we recommend a slightly different strategy when rebuilding the curves of the PFE LUT for use in a display-referred workflow. Instead of building the Y+RGB curves from a straight line as in the example above, simply start the building process from the color managed tone curve you plan to grade under and tweak this curve to match the curves of the PFE LUT. This delta component can now be saved and combined with other tone curves in the color managed workflow." Could you elaborate please ? Thanks a lot again Best Julien
-
Euphonix MC Color -- compatible with Mac OS Mojave & DaVinci?
Julien Souloumiac replied to BSH's topic in Panels
Hello Bruno, Yes these missing DLL are quite odd, especially considering I downloaded Resolve from BMD website... I let Dwaine knows about that for this reason too... I know hope that with this thread other artist users can troubleshoot some potential issue. Best Julien -
Euphonix MC Color -- compatible with Mac OS Mojave & DaVinci?
Julien Souloumiac replied to BSH's topic in Panels
Hello Bruno Just to let you know that with the precious help of Dwaine Maggart from BMD support (thanks a lot to him), I managed to have my Avid Artist Color working under the last version of Windows 11 Pro ! Actually, for some reason, 2 DLL were missing in my Resolve installation, preventing the EuphonixPanelDaemon to work as expected. Détails are available in this thread https://forum.blackmagicdesign.com/viewtopic.php?f=21&t=105506&p=893132#p893132 Best Julien -
Euphonix MC Color -- compatible with Mac OS Mojave & DaVinci?
Julien Souloumiac replied to BSH's topic in Panels
Hello Bruno Yeah this Lock process etc seemed a bit odd to me too, but as it was mentioned by someone from BMD support, I gave it a try... I agree with you that there might be an issue with Defender, the firewall, or some Security options (I tried a common troubleshoot procedure 2 days ago, switching control panel to none in Resolve pref, and then again Avid Artists color, and notice then that Defender ask me to grant autorisation to DaVinciPanelDaemon). But I checked Defender settings yesterday, tried to disable the firewall, but this didn't seem to solve my problem... :-/ I'll keep searching this way nevertheless, it worth investigating... thanks again -
Euphonix MC Color -- compatible with Mac OS Mojave & DaVinci?
Julien Souloumiac replied to BSH's topic in Panels
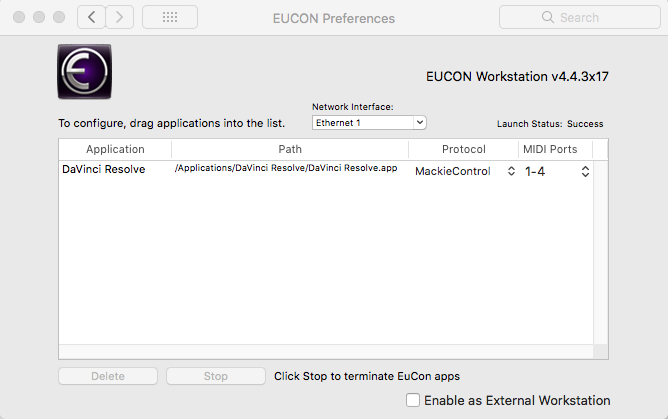
Hi Bruno, Yes I manually set up a static IP on both my panel and workstation, same subnet etc, no issue there (actually, I was already working using DHCP, but as I can't have any connection to Resolve, I tried this too...) The Eucon preferences and Mackie controller are part of my various attempts to find a way to troubleshoot everything. I read on Avid support that, for Windows 10 (and threads from BMD suggests is the same for the newest version of MacOs), you need to lock the panel to Resolve in the Assign tab of EuControl. But, first, when launching Resolve, this lock options are greyed out. Then, it appeared that adding Resolve in EuControl Préférences, and setting up a Mackie controller, let me then lock the panel to Resolve in the exact same Assign Tab... For a few seconds I thought my problem was solved, but unfortunately... Still blank rectangles... Speaking about them, as you mentioned, they seem to imply my panel is controlled by EuControl. For example, at boot I have AVID logo, and a few seconds later, these rectangles. But when launching Resolve, I never had my Contrast/Pivot/Sat etc... Stuck with these blank rectangles... And can't figure out why (I also checked my BMD application folder, all panel daemons, especially the EuphonixPanelDaemon, are there...) So yes, I can try to find a MC trial version for test. Or install a dual boot with Windows 10 to see how it works... But I would prefer to have a working panel under Windows 11... Thanks again for your help, Best Julien -
Euphonix MC Color -- compatible with Mac OS Mojave & DaVinci?
Julien Souloumiac replied to BSH's topic in Panels
Hum, while I was digging again, a new question arose... As mentioned earlier, I set up a Mackie Protocol, following a document found on Avid Website and this suggestion (under MacOs, but équivalent in Windows) from Dwaine from BMD But I'm not sure that's was relevant ... Any thoughts about this ? Thanks again Julien
-
Euphonix MC Color -- compatible with Mac OS Mojave & DaVinci?
Julien Souloumiac replied to BSH's topic in Panels
Hello Bruno, Thanks for your help and answer. Yeah it's the same thread on LGG (although this one is more to the point). My panel has always been connected directly to my computer since I don't have any routeur at home. It worked flawlessly with a static IP on my old Mac Pro running High Sierra (yes, really old Mac Pro...). And under Windows 11, I tried both settings (DHCP, then static IP), and each time was able to have my panel attached in EuControl... By the way, If I understand this well "Both of these methods of obtaining IP addresses can be overridden by supplying a static IP address, which Artist Color uses in all cases when powered on." supplying a static IP override the link-local mode and there should be no issue there... Actually I don't understand why I'm stuck with these blank rectangles when launching Resolve. As far as I know, according to my readings, my installation should be ok. Ie - I installed EuControl - Set up a static IP and have my panel connected and attached to my workstation in EuControl - Added Resolve in EuControl Préférences, and set up a Mackie protocol, since it now seems necessary to be able to lock the panel to Resolve next in the Assign tab of EuControl (otherwise this option is greyed out) - Launched Resolve - Opened EuControl and eventually Lock the panel to Resolve in the Assign Tab (now accessible) But still, only blank rectangles... I agree with you that older version of EuControl seems far more reliable (actually newer one create a new bug with my Logitech mouse and my Wacom tablet...:-/), and if I understand this protocol well, we indeed should not any update from Avid... Really I don't know how to solve this, or understand what can be creating such an issue under Windows 11... Once again thanks a lot for your help, Best Julien -
Euphonix MC Color -- compatible with Mac OS Mojave & DaVinci?
Julien Souloumiac replied to BSH's topic in Panels
Hi, I'm rising this topic from the grave, cause I'm currently struggling to have my Avid Artist Color V2 working on my new Win 11 pro workstation (coming from an old Mac Pro, I'm couldn't try it with Win 10 for now). I read everything I can find on the net about this, but no way for me to have my panel working with Resolve (currently 17.4.6, but I also tried v16 without success...). Tried several EuControl version, from 2.7 to the last one, connection through DHCP or static IP, managed to have my panel locked to Resolve since it now seems compulsory, etc etc, each time, even if my panel is correctly attached and locked to Resolve in EuControl, and seems to we working with Windows (I can map soft keys, the Nav button is ok, etc), I only have blank rectangles (and no control) when launching Resolve... Ah and the panel is set up in Resolve prefs. So my question is quite, does anyone here have a working Avid Artist Color under Windows 11 ? Or should I consider something get broken in Windows 11, and reinstall my station from scratch under Windows 10 ? Thanks a lot for your help or advice Best Julien -
Hi Lee, First of all Hope you're fine in such a complicated period. I'm digging deeper into both Nuke and Fusion and now achieve some interesting results thanks to your lessons. But I still encounter many issues when trying to connect tracking data, as you already said before. Right now I was trying to connect tracking data to a paint node, used to clone a blemish, and encountered this usual and buggy shift when using tracker unsteady position... I managed to find a solution modifying center with an XY Path and then, in the modifier, connecting Center to Tracker Unsteady position... Although quite complicated, this workflow seems, at least, logical, and works on my example... Do you think that can be a relevant option to get rid of this buggy shift when connecting tracking data ? Thanks a lot for your answer, Best Julien Ps: Was just checking, this seems to work when tracking a Paint Node, but when using an ellipse or any other shape, your solution of an intermediate Transform Node seems more efficient... Endless issue maybe...
-
hi Lee, here I come again with a few more questions as I'm know working on the tracking tools. We already saw that a Transform tool is needed to connect a tracker unsteady position to a mask. But I recently encountered a situation where using a BSpline, connected to a Transform tool which center was connected accordingly didn't work (while connecting directly the BSpline center to the tracker path worked fine). Is that a normal behavior for the BSpline tool as opposed to other masks, or is that a bug ? Moreover, I just read this from Brian Ray, who suggests a different approach for tracking mask : "Plug the output of the Ellipse into the Foreground of the Tracker. Leave the Background connected to the footage. Then select the Tracker node and switch to the Operation tab. Set Operation to Match Move; the Merge panel will appear. Set the Merge to FG only. In this mode, the position data from the single tracking point will be applied to the pixels in the Foreground input, and only the Foreground will be sent to the output. Put the Tracker in the Viewer. You will see the white circle move about just like the barrel of the gun. The next step is to use make a Color Corrector (CC) node, attach it to the footage, and put the output of the Tracker into the Mask (blue) input on the CC. Any tool in Fusion can be masked in this fashion, restricting its operation only to the parts of the image where the Mask is white." http://www.bryanray.name/wordpress/blackmagic-fusion-tracking/ Do you have any comments/thoughts about the benefits of these different methods ? And would you clarify the difference between the various connections that can be used (steady, unsteady, steady axis etc) since I assume it might be part of the answer. Thanks a lot again for your help Julien
-
Hi Lee and thanks a lot for your answers. Actually that's exactly my point of view : I'm also quite sure it's possible, but not sure that's the most efficient way to deal with animated source. We have so many VFX and Color tools that this technique might be totally irrelevant or inefficient. Coming from a photo retouching background, I still find it interesting to investigate. My partner (who doesn't have any video background, if I do...) fantasizes an animated DB layer, so... As I can afford some time running tests about this, I find it an interesting way to improve my knowledge of Fusion and take advantage of all your lessons ;-). Even if at the end I may consider that's not an efficient workflow. Nevertheless, I don't want to bother you with irrelevant questions about possible irrelevant techniques, I really appreciate your help and background about this, that's a great help ! (and if I can suggest, this might be a very interesting insight/lesson about your in-depth experience of a professional workflow involving different professionals in a production point of view) Meanwhile I checked the various links you shared about PSP and Fusion Maths, and it's quite difficult to conclude about them. Different sources suggest different formulas, so... As far as I understand, Overlay maths seem the same, Softlight is unclear. I will take some time to run more tests and send you a clean comp, Once again thanks a lot for your help and great work ! Best Julien
-
hi Lee, thanks a lot for your answer and for these documents. I'm gonna have a look at these and send you a clean comp. By the way, do you think this can be a relevant approach for Dordge and Burn work ? Thanks a lot Julien
-
hi Lee, Hope you're well. Thanks again for your work. Following these various courses, I'm now trying to emulate a Dodge And Burn Technique used in Photoshop for some beauty enhancements (I work as a photo retoucher that's why I'm trying these techniques. But you may consider that's not a relevant choice for video stuff. Don't hesitate to correct me if you think I'm looking in the wrong direction 😉 As you may know, in Photoshop, DB is easily achieve with a neutral grey layer set in SOFTLIGHT (that's an important point, as you may see below) blending mode, on which you can paint in white zones you want to lighten, and black where you want to darken. Same results can be achieved with to curves layer, one for dodging, one for burning, but we usually find it faster to use the neutral grey layer (you only have to switch for white to black when working...). Let's go back to Fusion now. I can easily create a grey layer and paint it as I wish, and planar transform it to fit my source. I can also load a neutral grey layer created it PSP and planar transform it. I can then merge this on top of my background which might give the expected result. My problem there is about SoftLight blending mode in my merge node. Actually, Fusion doesn't seem to use the same maths than PSP for SoftLight : In PSP, a neutral grey layer set to softlight doesn't affect the pixels' luminance. Only the painted zones are affected. In Fusion the same softlight neutral grey layer affect the whole image luminance. Overlay Blending seems more consistent with PSP blending modes, but also has stronger effects and need to be seriously reduced... Do you have any hints about this particular issue, or maybe about the maths used in Fusion blend modes ? I may also have another question about creating animated matte in Fusion and using them as external mattes in Resolve color page. On a few tests I successfully created planar transformed masks for some very interesting results, except that I encountered a tilt shift on the 10-15 first frames of my external, that doesn't occur in Fusion... But I need to run some more tests cause it might be an export settings issue... Thanks a lot for your help if you can, best Julien ps : as mentionned previously I work with Fusion Studio standalone, definitely more stable than Resolve... And I can share my various comp attempts if needed