Page Redirection If you are not redirected automatically, follow this link to our homepage.

4 insider articles in this category

  1. The New Arri LUT https://lowepost.com/uploads/monthly_2021_06/arri-rec709-lut_color_grading_11.jpg.7fd79e4aa0a77d169b1e3733fd45124c.jpg Stig Olsen


    ARRI have introduced a new Rec 709 LUT that seems to have gone unnoticed by some colorists because it’s not available inside of DaVinci Resolve. It gives a better representation of reality, and features several improvements over the classic ARRI K1S1 LUT that most colorists are familiar with. We have talked to Senior Colorist @Florian 'Utsi'Martin from ARRI and the designer of ARRI Look Library about the main differences.
     

    The difference

    The most obvious change with the new rendering is increased contrast in the shadows and midtones. Even though the contrast is stronger, the shadows are cleaner with less saturated colors which is more in line with how we perceive colors in reality.


    The main focus with the new LUT was to reproduce the strongest and most vivid colors in a more natural way. These colors are usually too bright and saturated because of the simple matrix often used in video rendering, and the new LUT is definitely superior compared to the classic one. 

    Below we can see how different the concert light, the orange sweater and red strong color on the left side are reproduced with the two different rendering options. The colors are deeper and the color separation is better.


    The changes plays into all colors and it’s especially visible in the greens which sometimes can feel a bit artifical in video. With the new rendering, the greens appear more natural because of the cold desaturated tones that are pushed into it in combination with the decreased brightness levels. This gives the colorist a much nicer image to start working on.


    Skin tones also appears cleaner and more pleasant with the new video rendering. It's a very subtle change and is most noticeable in dark shots.


    Where to get access to the LUT?

    The old ARRI K1S1 LUT is now renamed to ALEXA Classic 709 and the new one is called ARRI 709 inside all ARRI cameras on the market. It can be downloaded here on Lowepost (members) or be generated in ARRIs LUT generator. The new LUT is the default Rec709 choice in all the ARRI cameras available (AMIRA, SXT, Mini, LF and MiniLF) and colorists should have access to it to be able to recreate the exact same image that was displayed on set.

    Unfortunately, BlackMagic Design have not updated their LUT folder inside of Resolve so the LUT needs to be downloaded and placed in the folder manually or extracted from the metadata of a recent recorded clip.


    How to install the new LUT in DaVinci Resolve
     

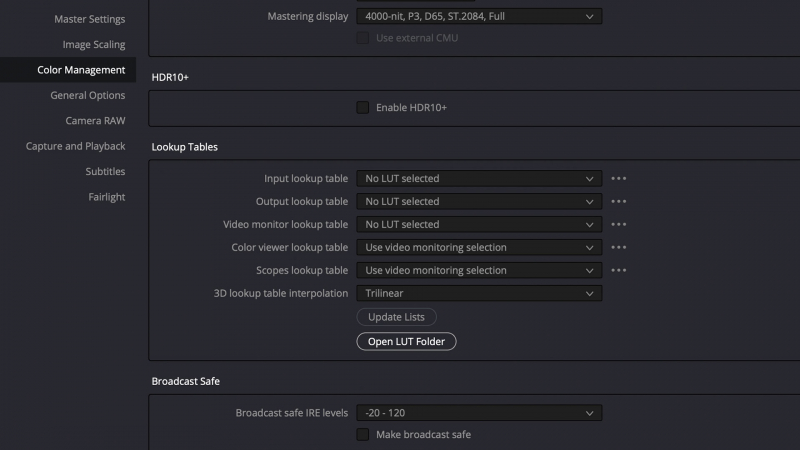
    davinci-resolve-open-lut-folder-update-luts.jpg


    1. Open DaVinci Resolve Project Settings

    2. Click Color Management

    3. Scroll down and click Open LUT Folder

    4. Copy the LUT and click Update Lists


    Become a premium members to download the new LUT from this page, and get access to the Alexa shots used in this post. Please login or subscribe to gain access.


    no no yes Yes None no https://lowepost.com/uploads/monthly_2022_11/arri-rec709-lut_color_grading_11.jpg.a3f6d2f8ab24dffcf9f87e2f56741202.jpg Course Listing order: 0
    • 4 comments
    • 24,539 views
  2. What Is The Difference Between ProRes and DNxHR? https://lowepost.com/uploads/monthly_2022_10/color-grading-article-tutorial-prores-vs-dnxhr-difference-dnxhd-lowepost.jpg.5f30d490d76735a36e489cd55a373e2b.jpg.98ddd7969f47689c7faf70d4440ac71d.jpg By Lowepost

    This content is only available for premium members, please login or subscribe to gain access.

    no no yes No None no https://lowepost.com/uploads/monthly_2022_11/color-grading-article-tutorial-prores-vs-dnxhr-difference-dnxhd-lowepost.jpg.de8b23d2f31d4e6c813ec249b321bea9.jpg Course Listing order: 500000
    • 13 comments
    • 2,761 views
  3. Beginners Guide to Stereoscopic Understanding https://lowepost.com/uploads/monthly_2022_10/lowepost-stereoscopic-3d-john-daro.jpg.2659c49ec780bdd6ca4149ef345087be.jpg.180e12b6e8345280e2ba88c3534fed71.jpg John Daro


    My interest in Stereoscopic imaging started in 2006. One of my close friends, Trevor Enoch, showed me a stereo-graph that was taken of him while out at Burning Man. I was blown away and immediately hooked. I spent the next four years experimenting with techniques to create the best, most comfortable, and immersive 3D I could. In 2007, I worked on Hannah Montana and Miley Cyrus: Best of Both Worlds Concert directed by Bruce Hendricks and shot by cameras provided by Pace. Jim Cameron and Vince Pace were already developing the capture systems for the first “Avatar” film. The challenge was that a software package had yet to be created to post stereo footage. To work around this limitation, Bill Schultz and I slaved two Quantel IQ machines to a Bufbox to control the two color correctors simultaneously. This solution was totally inelegant but it was enough to award us the job from Disney. Later during the production, Quantel came out with stereo support eliminating the need to color each eye on independent machines.

    We did what we had to in those early days. When I look back at that film, there is a lot that I would do differently now. It was truly the wild west of 3D post and we were writing the rules (and the code for the software) as we went. Over the next few pages I’m going to layout some basics of 3D stereo imaging. The goal is to have a working understanding of the process and technical jargon by the end. Hopefully I can help some other post professionals avoid a lot of the pitfalls and mistakes I made as we blazed the trail all those years ago.

    Camera 1, Camera 2

    Stereopsis is the term that describes how we collect depth information from our surroundings using our sight. Most everyone is familiar with stereo sound; when two separate audio tracks are played simultaneously out of two different speakers. We can take that information in using both of our ears (binaural hearing) and create a reasonable approximation from the direction of where that sound is coming from in space. This approximation is calculated by the offset in time of the sound hitting one ear vs the other.

    Stereoscopic vision works much in the same way. Our eyes have a point of interest. When that point of interest is very far away our eyes are parallel to one another. As we focus on objects that are closer to us, our eyes converge. Do this simple experiment right now. Hold up your finger as far away from your face as you can. Now slowly bring that finger towards your nose, noting the angle of your eyes as you get closer to your face. Once your finger is about 3 inches away from your face, alternately close one eye and then the other. Notice the view as you alternate between your eyes, camera 1, camera 2, camera 1, camera 2. Your finger moves position from left to right. You also see “around” your finger more in one eye vs the other. This offset between your two eyes is how your brain makes sense of the 3D world around you. To capture this depth for films we need to recreate this system by utilizing two cameras roughly the same distance as your eyes.

    Camera Rigs

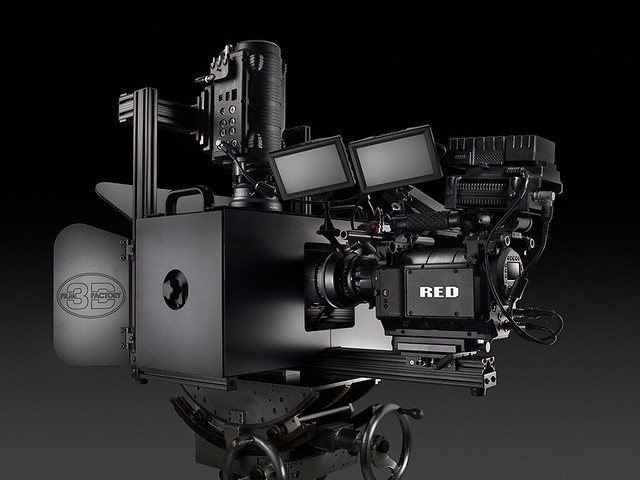
    The average interpupillary distance is 64mm. Since most feature grade cinema cameras are rather large, special rigs for aligning them together need to be employed. Side by side rigs are an option when your cameras are small, but when they are not you need to use a beam splitter configuration.

    beam_splitter.jpg

    Beam splitter rig in an "over" configuration.

    Essentially, a beam splitter rig uses a half silvered mirror to “split” the view into two. This allows the cameras to shoot at a much closer inter-axial distance than they would otherwise be able to using a parallel side by side rig. Both of these capture systems are for the practical shooting of 3D films.

    Get access

    This was a short excerpt, become a premium member to access the full article.

    Become a Premium Member


    no no yes Yes None no https://lowepost.com/uploads/monthly_2022_11/lowepost-stereoscopic-3d-john-daro.jpg.94a248bfc6cc73faa4cf3eea7cf271d3.jpg Course Listing order: 0
    • 1 comment
    • 1,600 views
  4. Creating dailies in DaVinci Resolve and Avid Media Composer round-tripping https://lowepost.com/uploads/monthly_2022_11/avidmediacomposer-avid-roundtripping-lowepost-header.jpg.0d8ac5bdf89907e56ec17e514f9540f0.jpg Kevin P. McAuliffe


    Creating dailies inside of DaVinci Resolve, editing in Avid Media Composer and sending the timeline back to DaVinci Resolve for finishing has become pretty much a way of life for many editors.

    Editing everything inside of Avid Media Composer in high-resolution is just not practical when dealing with hours of footage, and creating dailies inside of it is too slow. The time it takes to transcode can sometimes be 2-4 times real-time, and when you’re dealing with an extensive amount of footage, your system could be running for 24 hours for multiple days in a row, which means it’s not doing anything else other than that.

    That is why many editors have switched to using DaVinci Resolve for all their dailies work. Not only is it lightning fast, but it can also transcode all your super high resolution footage down to Avid friendly MXF OP1-Atom files - the same type that is read by the Avid Media Composer databases.

    Resolve needs help

    However, that doesn’t mean everything will be smooth sailing inside of DaVinci Resolve either. You'll need to give DaVinci Resolve a little push in the right direction when, not only creating the dailies, but also when sending your final AAF from Avid Media Composer back to DaVinci Resolve to do your online.

    In this tutorial, you’ll be walked through things you should consider and do before creating your dailies and the full database round-tripping-process from Dailies Creation in DaVinci Resolve to editing in Avid Media Composer and back again for finishing.

    Enjoy the video!


    By Kevin P. McAuliffe


    Get access to the video

    Become a premium member to access the full video tutorial.

    Become a Premium Member


    no yes xNDCYOjb yes Yes None no https://lowepost.com/uploads/monthly_2022_11/davinci-resolve-avid-mediacomposer-roundtripping-dailies-creation-lowepost-editing-film.jpg.14a2c466d85e2138253034f0c9e16d62.jpg Course Listing order: 0
    • 1 comment
    • 3,114 views