

Bruno Mansi
-
Posts
360 -
Joined
-
Last visited
Content Type
Profiles
Case studies - Free
Case studies - Premium
Resources
Insider
Courses
Forums
Store
Posts posted by Bruno Mansi
-
-
3 hours ago, bob said:
I have also not deleted any of the media just organised it in folder
Are you saying you organised the media into folders after you'd added your clips into the media pool?
If that is the case, then you've moved the file locations so Resolve doesn't know where they are.
You need to either return the files to their original location or re-link the files. You can do this by selecting all your clips in the media tool, right-clicking on the clips and selecting 'Relink Selected Clips...' You can then navigate to the media's new location.
-
 1
1
-
-
No pricing yet from Panasonic, but this is going to be a premium priced product.
The only thing I've been able to find which might shed some light as to a possible price comes from 'Which' (a popular UK consumer magazine and website) which states...
"The EZ1002 is the follow up to the CZ950. Panasonic’s previous flagship costs a whopping £2,500 (approx 2900 Euros) and that’s a year after release. The EZ1002 is likely to cost a similar amount, if not more, so Panasonic will need to pull out all the stops to justify the price."
I think the price quoted must be a typing error, as I've seen this model retailing at about 10,000 Euros, which seems more like the price you'd expect.
-
Panasonic are making a lot of noise about this TV and are claiming that it will give the best quality images yet seen on a domestic model.
They're also claiming improved black level performance, with superior shadow detail and black tone accuracy - something that Colorists have complained about on some other top-end consumer OLEDs. Other highlights are as follows:
800 nit peak brightness
The ability to load a custom 3D LUT
Support for HDR10, & HLG (no Dolby)
Full DCI colourspace
Not expected to ship before May of this year (in Europe). No detailed reviews as of yet, but some info from the links below.
http://www.trustedreviews.com/panasonic-tx-65z1002-oled-tv-first-look-review
http://www.whathifi.com/news/ces-2017-panasonic-unveils-flagship-ez1002-oled-tv
-
1
-
-
Maybe we should think about starting a poem for videotape, as it will no doubt need preserving in the not-to-distant future.
I'll start with the first line.
THE VIDEOTAPE PRAYER
I am mylar, not steel; O god of the machine, have mercy. I front great dangers whenever I travel across the flying heads of the helical scan mechanism.
-
3
-
-
Adobe support pages on the subject...
https://helpx.adobe.com/premiere-pro/using/exporting-projects-applications.html
-
An image showing what Timothy was describing...

-
4
-
-
Xeon vs i7
in Mac/PC
9 hours ago, Margus Voll said:I'm leaning strongly now towards i7 as it seems xeons will throttle in some occasions to 2,5 ghz only, my friend tested with setup i'm thinking of and it choked like a ton. I have felt similar thing with clients 36 cored xeon (win machine also)
It's important to set your OS power plans to the highest performance available, otherwise a certain amount of throttling will happen. It seems there's also more going on under the hood with managing CPU than I realised. Things like CPU parking and frequency scaling can effect performance, and these (hidden) parameters are often set too conservatively.
I recommend you take a look at this web site...
https://bitsum.com/parkcontrol/
To quote part of the page...
"Create a power plan that auto-optimizes your hardware for max performance far beyond the system default ‘High Performance’ power plan."
-
1 hour ago, Frank Wylie said:
You need to add some small amount of base color to the grade for it to be realistic to me.
When I was a technician in a School of Photography (back in the late 1970s) I remember some of the lectures talking about the chemistry behind the deterioration of film. One of the things I learned was that as the cellulose acetate base starts to break down, it releases acetic acid. This in turn attacks the anti-halation coating, causing it to turn pink or blue.
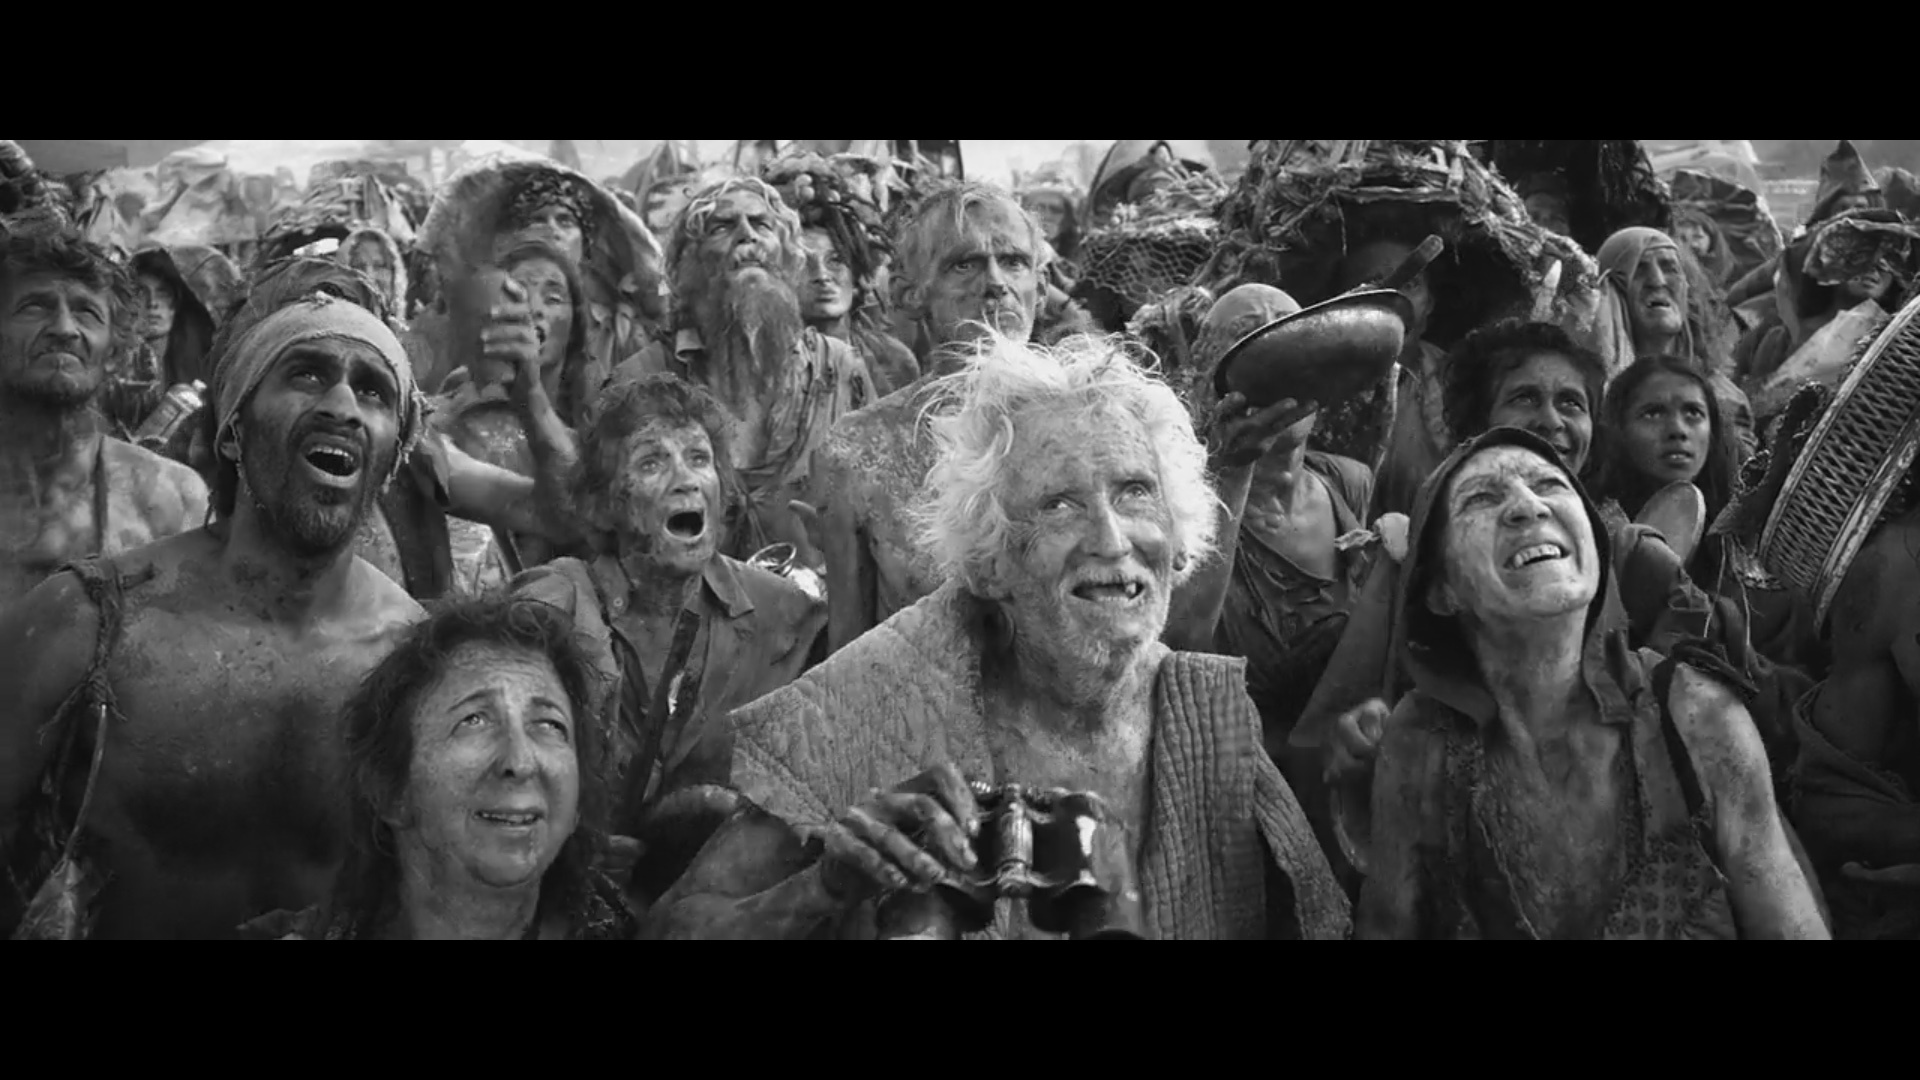
In any case, apart from the night scenes, the rest of the chrome edition seems to be pure B/W. I grabbed some stills from various scenes and Photoshop confirms that the R, G and B levels are identical. I'm guessing this was a conscious decision by the director and colourist.
-
4
-
-
15 hours ago, Thomas Singh said:
but my personal opinion is that it would have worked better if the scenes were staged and lightened for that.
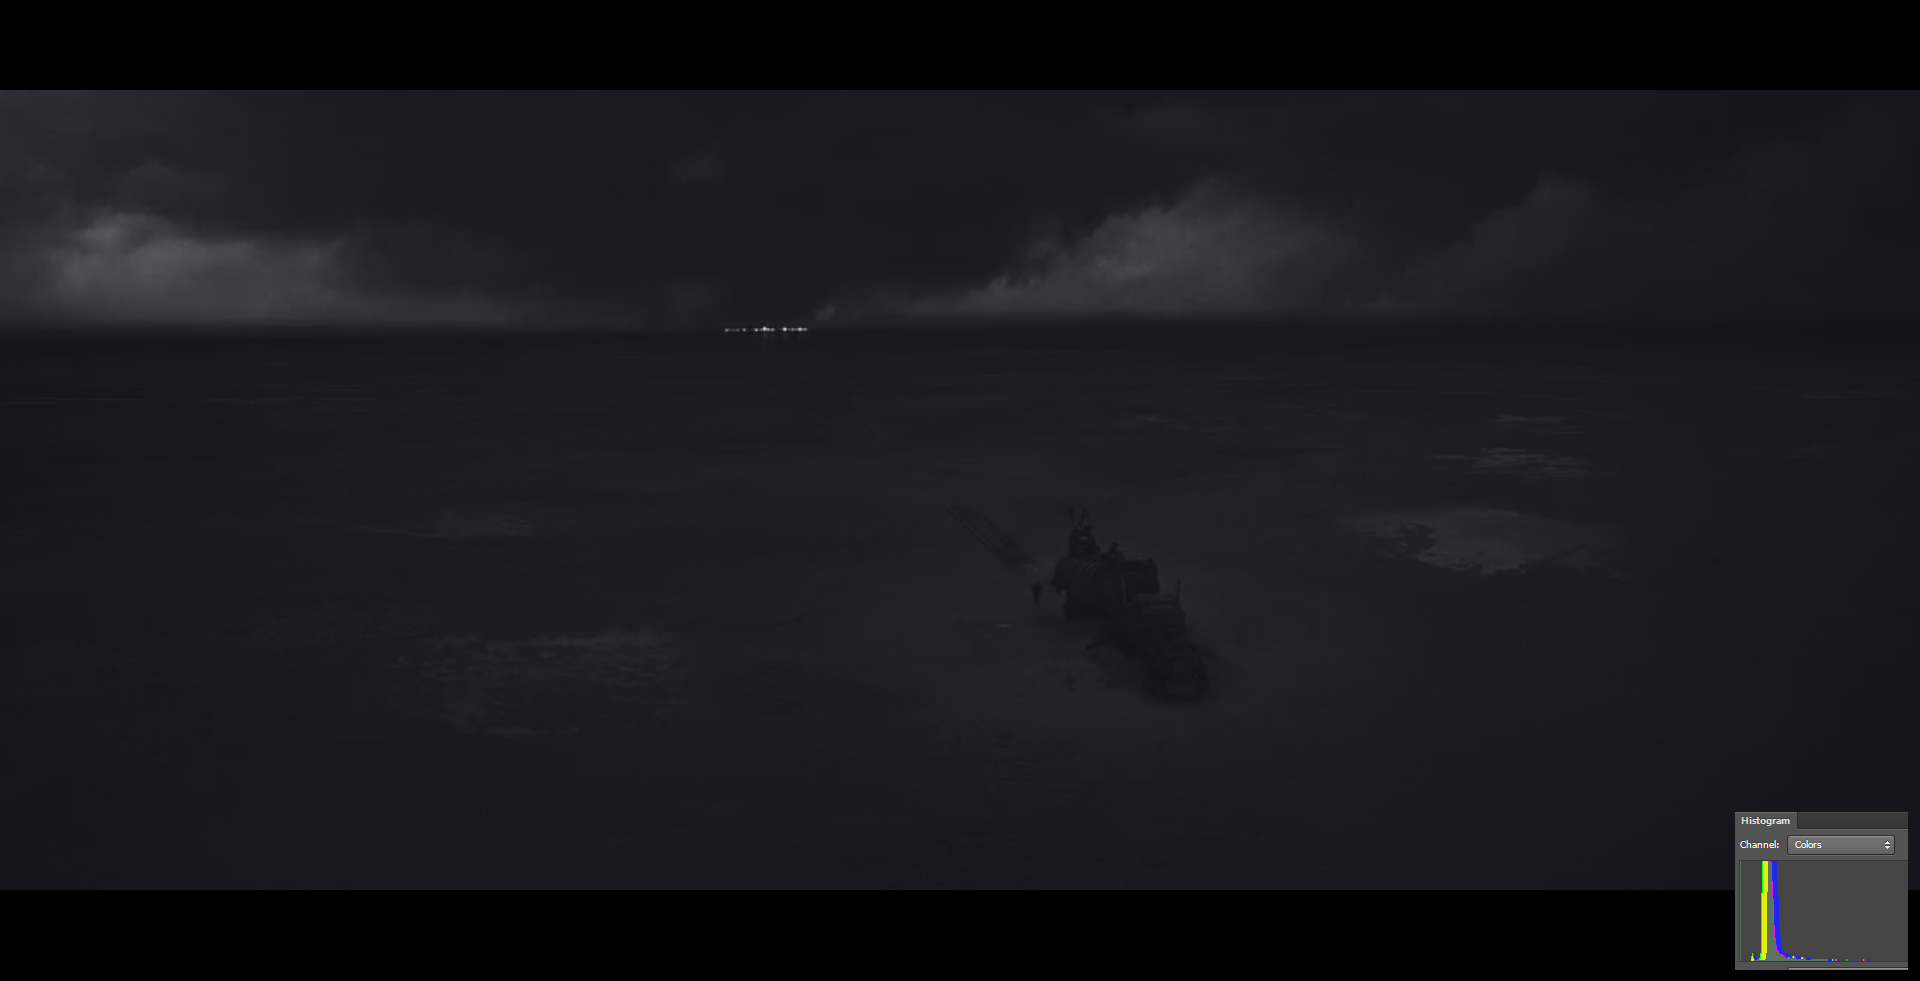
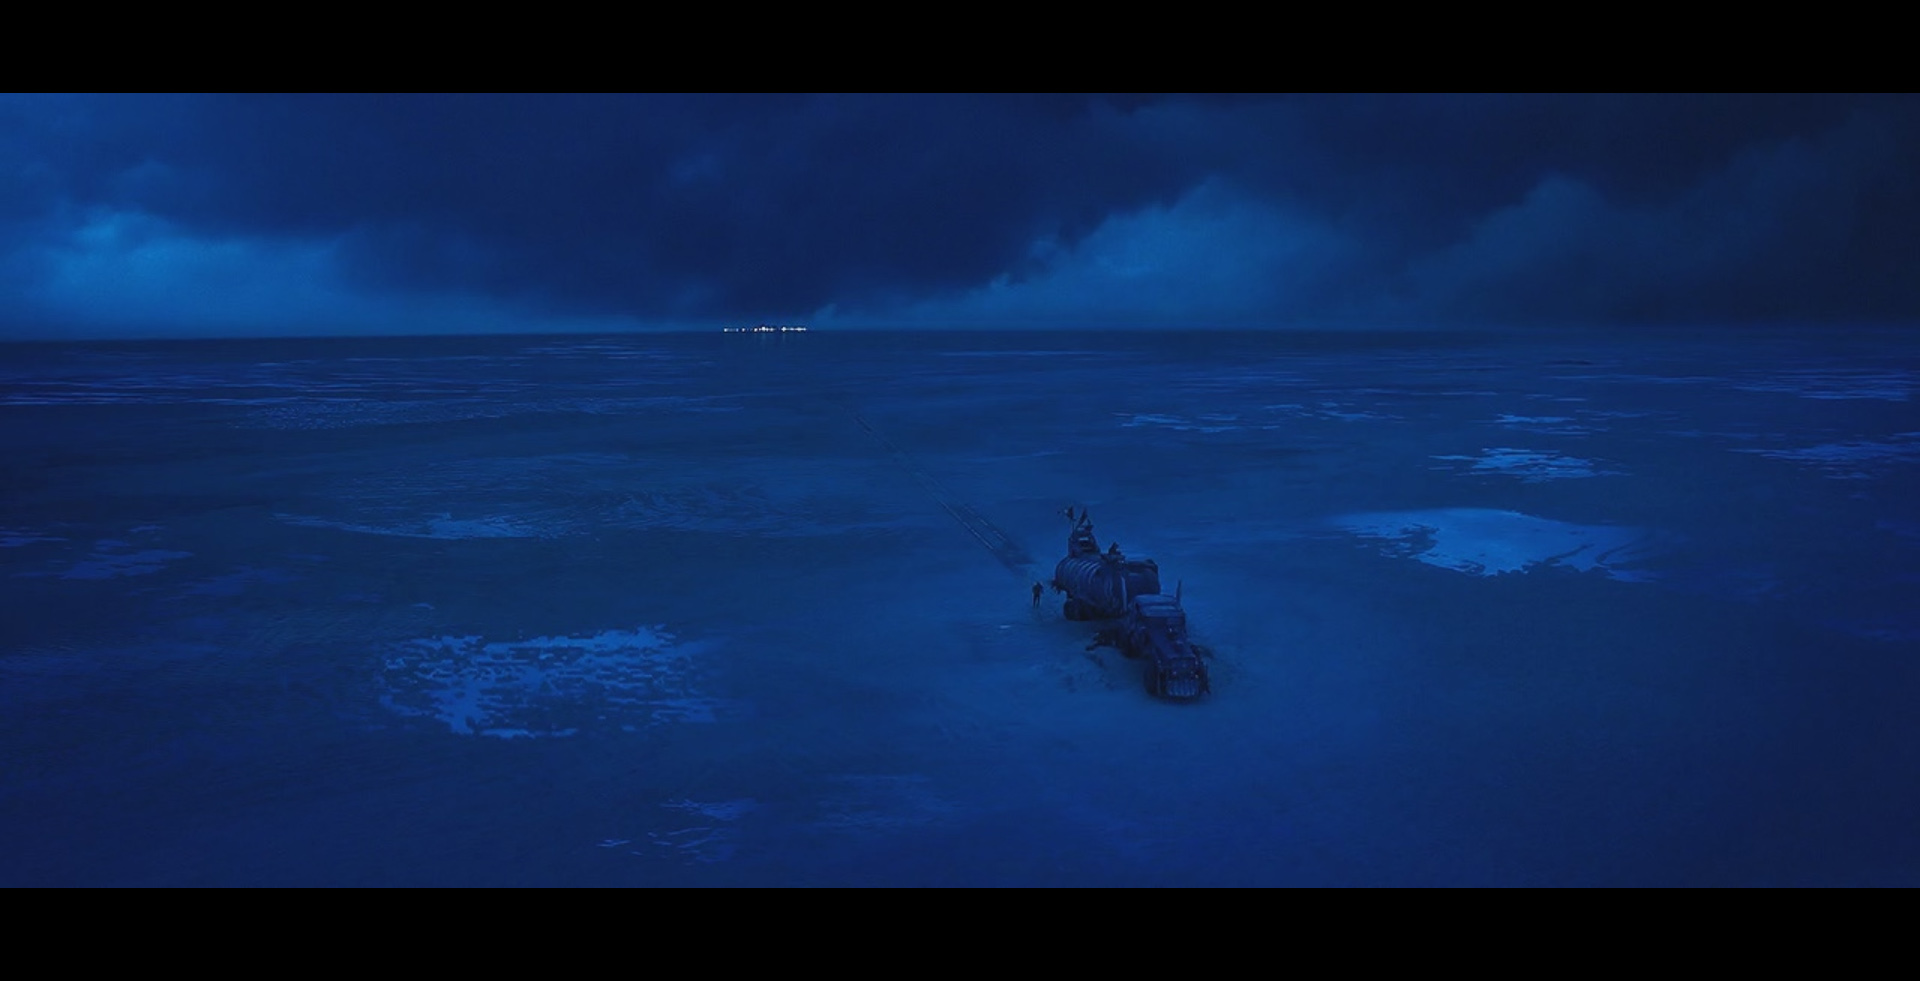
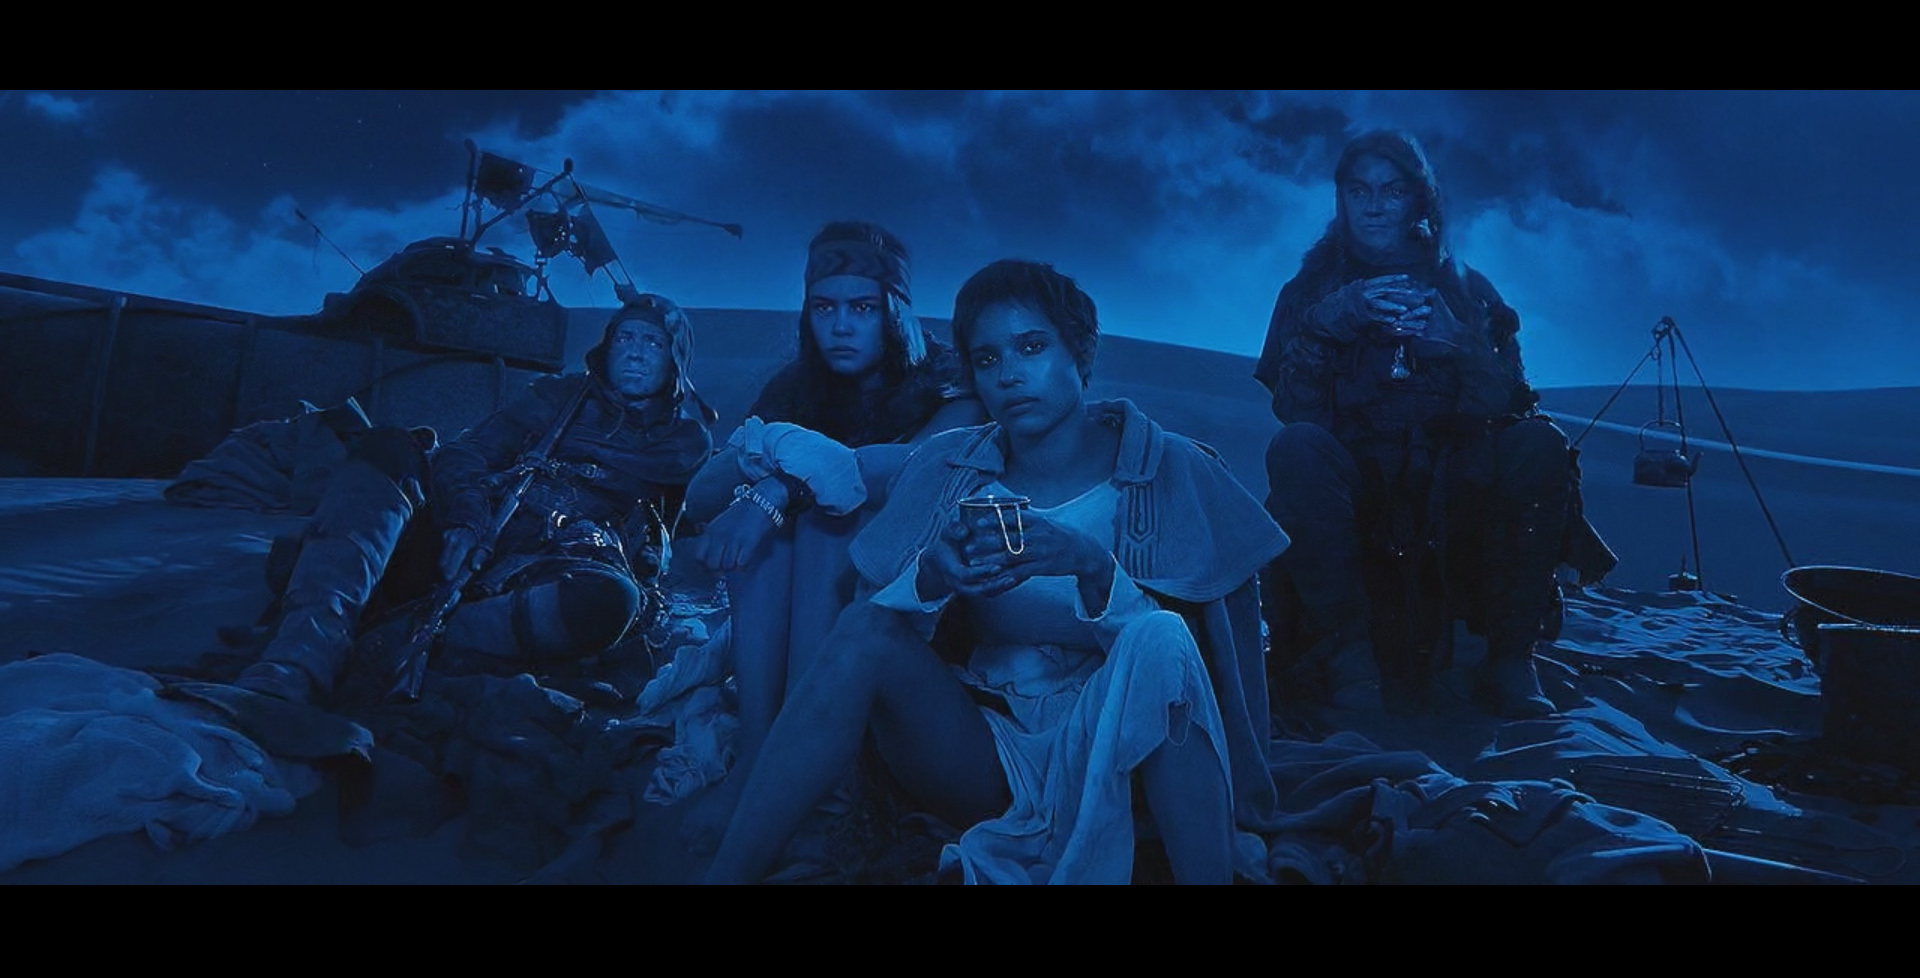
If I'm being really picky, I would say the night scenes worked less well for me. Interestingly, these scenes were not pure black-and-white, but had a magenterish-blue hue to them. I've attached some screen grabs with histograms to illustrate the point. I did a check on some daylight scenes and they all showed identical RGB values.
Does anyone know if Eric Whipp worked on the chrome edition? There's no mention of it in the case studies article.
-
2
-
-
I just managed to get to see the Black and Chrome edition of Mad Max Fury Road, which was supposedly director George Miller's preferred version.
Normally, when I see these director's cut/alternative versions, I never make it through the whole film, but I did myself watching through to the end of this movie. I guess this was partly to see how the various locations translated in B/W, but also because I did feel I was watching the story with a different sense of emotion. Having grown up in the 1960's, where I had my own home B/W processing equipment, I find old monochrome films evoke emotions very difficult to replicate in modern movies.
I think the Mad Max team did a great job of creating the genuine look of B/W film, especially in the highlight areas, where I was convinced I was seeing real film halation.
I've managed to grab a few stills from both versions of the movie for comparison.
-
5
-
-
Today, we tend to think of bleach bypass as one particular look, but in regard to the actual chemical process that was omitted during the developing of photographic film, I read an interesting bit of information on Kodak's site.
To quote...
"Different results are achieved according to which step the skip-bleach technique is applied. When applied to an original negative, the effect seen on a print made from the negative results in lighter and possibly blown-out highlights, higher contrast and perhaps higher graininess. When applied to the print, the effects are mainly seen in the shadows, which will be darker, richer, with higher contrast, less detail (possibly blocked-in) and with desaturated, muted colors. These effects can be very scene-dependent."
-
5
-
-
There's a thread on the Blackmagic forum that talks about the problems other users have encountered with the Media Management tool, that might be of interest.
-
You can already do this within Resolve without any external software using the Media Management menu (File/Media Management). This allows you to copy/move all the media in your project or just the media used in one (or all) of the timelines in your project to an archive directory/disk.
Does 'Resolve Collect' have any additional features?
-
2
-
-
Interesting comments about the problems in the shadow areas. I wonder why this wasn't picked up in the reviewer's (supposedly) in-depth testing. Maybe a bad batch? I would have thought LG would be able to fix this problem.
Looking into this a bit further, I did discover that there are black issues that manufacturers have to address in OLED displays, because they they do go down to almost pure back. One of these is macro-blocking in the near-black regions of the picture. One of the ways of masking this problem is to use dithering, which might account for the noise that's been seen. One review mentioned that LG purposely set their factory default brightness setting to slightly crush the blacks, in an attempt to hide this problem. Once they'd set it to the correct levels, the dithering became evident.
On 25/11/2016 at 11:45 AM, Szilárd Tőtszegi said:The LG Oled's internal calibration is terrible, and buggy, if you want to have an accurate and calibration result, you are going to need a LUT box, and there is a lot of noise in the shadow areas.
At the end of the day, these sorts of issues are going to explain why the Sony BVM X300 is around six times the price of the LG offering, and even the Sony has it's critics!
22 hours ago, Alex Prohorushkin said:What kind of LUT-box are you talking about?
At the low end there's the eeColor box, further up the price range we have the AJA LUT box, the Fuji IS Mini and the Flanders BoxIO. They're all able to connect to, or accept LUTs generated from calibration software such as Spectracal's Calman or Light Illusion's Lightspace.
-
3
-
-
You can buy them new from Light illusion for less than 300 pounds sterling. If you don't need to pay UK VAT then it's less than £250
See...
-
2
-
-
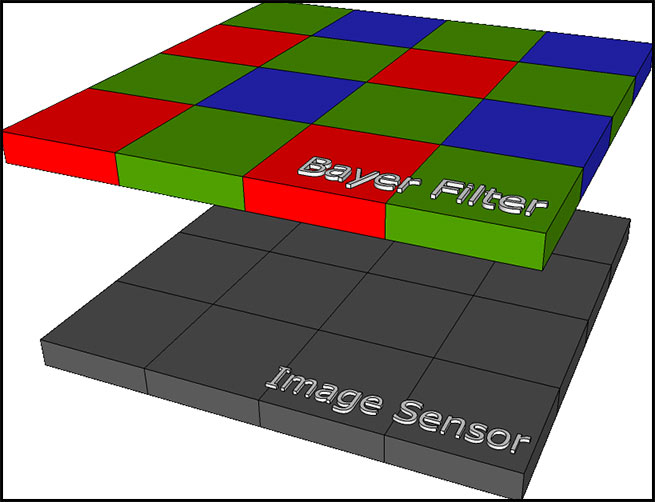
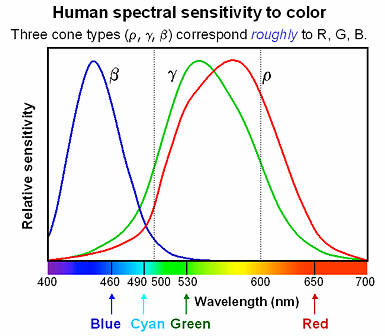
When you look at the nonlinear response and overlaps of the three types of cones in 'normal' colour vision, it's a wonder that we are able to distinguish such a large range of colours (see image). It just shows how much processing our brain does!
One reason we might be poorer at distinguishing hues of green is that the rods in our eyes (which are responsible for the eye's acuity) are mostly sensitive in the green part of the spectrum. Could the signal from the rods be polluting that from the green cones? These curves are known to peak at slightly different wavelengths across the human population, and one type of red-green blindness is caused by the red and green curves virtually overlapping.
If you want to have a go at a fun test of your colour acuity, try the X-rite colour challenge at...
-
1
-
-
Resolve has a number of tools for backing up your project. You can use the media management tool to copy the entire project media to a new location or drive, or you can just copy the media used in one (or all) of your timelines, adding any handles you may require.
You can then backup your project using File/Export Project, which will give you options about saving stills, LUTs etc used in your project.
-
2
-
-
One of the big differences is that Baselight is a layer based system, so if you're used to working with nodes, you may need time to get accustomed to the this way of working. I personally prefer Davinci nodes and general screen layout, but Baselight has very good renderless workflows with Avid software as well as with their range of on-set applications, like Flip and Daylight.
I also have heard from other colourists that Baselight support is much better than what Blackmagic offer.
-
1
-
-
Xeon vs i7
in Mac/PC
This is a beast of a motherboard and will probably need the Supermicro chassis to house it. One of the reasons for it's size is that there are five PCIe x16 slots which are two slots away from each other. This means you can happily have multiple large graphics cards installed without them obscuring the adjacent slots. With 2 processors installed you get the full 80 PCIe 3.0 lanes available for your cards, and you can install up to 2 TB memory. There's also support (via an add-in card) for thunderbolt and 10 SATA 6gbps ports. All this adds up to a really powerful (and expensive) system which should tear through the data with something like Resolve. For those of us wanting to experience guaranteed real-time grading performance at UHD/4K, this is the sort of system you need.
-
2
-
-
Xeon vs i7
in Mac/PC
Xeon processors really come into their own when you go dual processor. Each xeon has it's own PCIE controller, which means in dual chip setups you'll get access to more PCIE channels and potentially better performance from any PCIE cards you may have installed. Cheaper processor/motherboard combinations often have two or more PCIE slots sharing a channel.This can be an issue if you have RAID cards, graphics cards and host adapter cards (feeding external equipment) which really need their own bus to perform to the maximum potential. Dual xeon motherboards can also have memory interleaving, which helps in memory-intensive applications.
Workstations like the HP Z840 exploit these techniques to push data around at the best possible speeds.
As with all things, it's all about data throughput, as your system can only run as fast as the weakest link.
-
1
-
-
7 minutes ago, Nicolas Hanson said:
Thank you Bruno for helping me understand this. It looks like a great solution for one-man-show boutiques and indie stores. I was hoping Adobe found a way to eliminate all time used on transcode / ingest. In most professionals environments you would never let the editor suites handle these tasks and work on high resolution footage would be treated in other software packages like color correctors and online tools.
Yes, that's true. In modern post facilities, shared storage is the order of the day and offline editors would always hand-off to online editors, colourists etc to complete the project. It's one of the main reasons that Avid still rules in these sorts of environments. There are companies now offering shared storage solutions and project management for Adobe products. Have a look at ...
These sorts of solutions are going to cost thousands of dollars, but I think it won't be long before we start seeing total Adobe post houses spring up, who will need this sort of infrastructure.
-
1
-
-
As I understand it, Premiere actually hands off the task to Media Encoder, so any codec you have installed should be available to you. On Windows machines, this would mean that ProRes wouldn't be an available encoding option, but you should be OK with all flavours of Avid DNX, assuming you either have Media Composer installed or you've downloaded the Avid codec pack.
As far as time is concerned, the time it's going to take will be dependent on many things (CPU cores, disk speeds etc.) but shouldn't be much different to any other way of transcoding. Plus, as Media Encoder is copying/encoding, you can carry on using Premiere. There's a progress window you can bring up to see how the encoding is going, and as soon as a clip's done, it's available for editing, so you can leave Media Encoder running in the background whilst you edit. I'm guessing you can start editing with the full rez files to begin with, switching over to the proxies as they become available.
Remember, if you manually create low resolution files outside of Premiere, you're going to have to create the workflow to re-link back to the high quality media once the edit's complete. Having Premiere create the proxies, means it's just a click-of-the-button away. This method also gives you the ability to work on the high quality files if (say) you're creating an effect that requires you to have the best quality available (eg. green-screening) and then switch back to proxy mode to give you the real-time playback.
I also read that if you use Adobe's creative cloud to store your project and proxies, you can effectively create your proxy files on one machine, whilst editing on another. I don't know much about this, or whether you can create a 'cloud' on an internal server or NAS, which would mean not having to send/access files over the internet.
-
 1
1
-
-
I would honestly use the proxy workflow built in to Premiere, rather than manually transcoding yourself. There should be tutorials available on the web that explain this in detail, but the basic principle is that you use the new 'ingest' tab to copy the source media off your cards/portable hard drives to a convenient location on your media drives. At the same time, you instruct Premiere to make proxy versions of the media to a separate location on your media drive. Once ingested, your clips will appear as normal, and can be edited onto a timeline, but you can choose the full quality or proxy versions by simply hitting the 'proxy' switch. This means that you can seamlessly switch between full resolution and proxy at will, whilst you edit. Premiere handles all the linking between the versions for you, and when you want to output the final sequence, Premiere will use the full rez media unless you tell it otherwise. There's also the added benefit that you could potentially take the project and proxy files onto a laptop and continue editing, knowing that when you bring the project back to your main workstation, Premiere will be able to link back to the full rez media.
As with all new things, I would test the workflow out before you commit to using this technique with a client!
As to the proxy format you choose, it's going to depend on the power of your workstation and how complex your project is going to be, to guarantee full speed playback. Something like a lower bit rate ProRes or Avid MXF should do the trick.
-
1
-
-
The native format in Avid is MXF OP-Atom to be exact. This is the variant where each video and audio track are separate files. The good news is that Premiere Pro reads it happily.
If you export an AAF from Avid with linked media it will import into Premiere without problems. Premiere will handle both video and audio, although Avid effects won't be translated. Audio rubber-banding does come through, although if you've set any clip gain beyond +6db, it will get clipped back to +6, which tends to upset your sound mix.
As far as as other formats are concerned, Premiere Pro users generally expect to just be able to link to their files, and I know that Adobe supports a lot of formats. The reason Avid users traditionally imported/transcoded their media to OP Atom was to do with playback performance, as Media Composer struggled with lots of AMA (linked) clips. Things have improved somewhat with today's modern, multi-core processors, however Premiere uses the graphics card CUDA technology to give you real-time playback of your clips. Mac users might also be interested to know that the latest versions of Premiere now have Apple Metal GPU support. Premiere is likely to struggle to playback in real-time on older computers, or where there's formats that require lots of 'muscle' to decode (4K or highly compressed long-GOP), so recent versions of Premiere have included proxy workflows, where you're transcoding to a more friendly format.
-
1
-


What is the best color grading software?
in Editing , Color grading & Finishing
I particularly like the render-less round-tripping between Avid and the full Baselight system.