Anton Meleshkevich
-
Posts
169 -
Joined
-
Last visited
Content Type
Profiles
Case studies - Free
Case studies - Premium
Resources
Insider
Courses
Forums
Store
Everything posted by Anton Meleshkevich
-
Luma contrast (log grading)
Anton Meleshkevich posted a topic in Editing , Color grading & Finishing
Hey, everyone! I'm grading a music video on Davinci Resolve right now. I have prores log footage. Typical workflow: offset, contrast before log-to-rec lut. Nothing special. I can increase contrast by decreasing offset and increasing YRGB gain. Which is typical. But I can also increase contrast by decreasing offset and increasing just Y (luma) gain. The result is less saturated obviously. So my question is what is more, so called "scene referred". I know, that it sn't ACES. But I tested and found offset control is the closest to real exposure. So what about contrast? Do luma contrast (without s-curve of course) more natural and mathematically closer to real world than (y)RGB contrast? Let's imagine that contrast control even exist in real world. -
Yes, I know it. And I talk about it since my first post in this thread. My question is why do many colorists just ignore gamut. They just make RGB curve to normalize image. But ignore gamut correction.
-
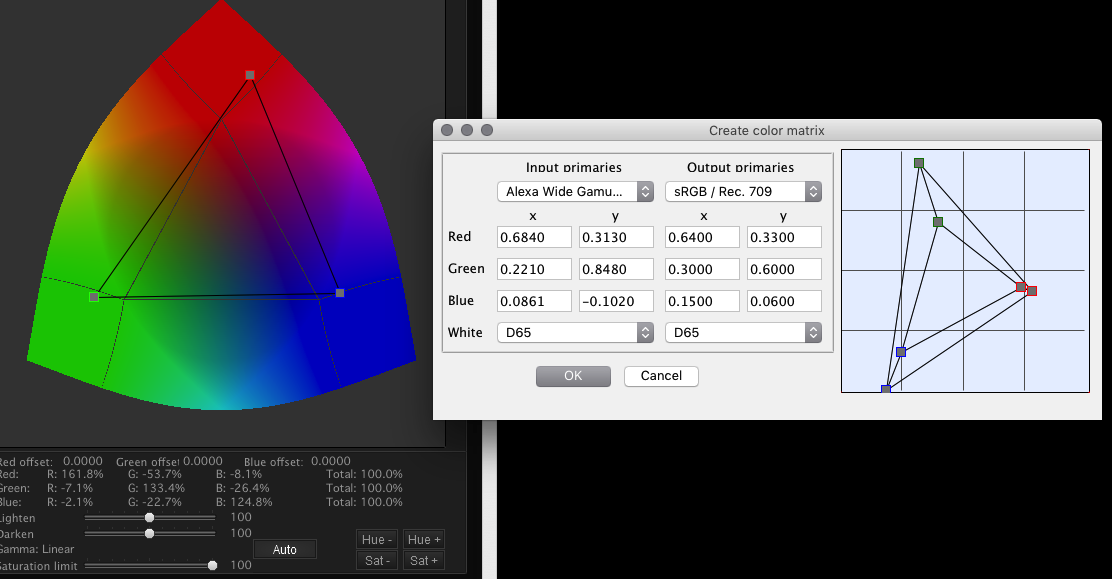
I'm talking about gamut. Not gamma. For example, here is gamut conversion from AlexaWideGamut to Rec709 gamut. It affects only colors. LUTs, I'm talking about, contain just an RGB matrix in linear space.

-
I often hear and read here that nobody transforms LogC (or Red, or whatever) colorspace gamut to destination gamut. For example from AlexaWideGamut to Rec709 gamut. Everybody just makes a contrast curve, then some LGG, and that's all. Even If I go this way, I still use a gamut conversion LUT after normalization curves. Or I use gamut (colorspace) conversion plugin after the curves if I'm on Resolve. Why do many colorists skip this step?
-
Dodge and burn on video?
Anton Meleshkevich replied to Tom Evans's topic in Editing , Color grading & Finishing
I think, hardest part would be pinning your correction to a face. I found Davinci Resolve tracker not so good as Scratch tracker for that kind of purpose. Or you just want to find a way to create exactly the same effect on pixels' values? -
To make OFX version of 3D LUT Creator app C++ coder needed. If you can make OFX plugins for money, please let me know. I'll send you a technical assignment. It will be just a wrapper for 3D LUT Creator. So there is no need to be incredibly good in C++ or to know everything about making color grading apps. Also if you can make FCPX, Premiere Pro plugins, still let me know
-
LUT creation
Anton Meleshkevich replied to Nicolas Hanson's topic in Editing , Color grading & Finishing
@Abby Bader, what color model do you use in 3D LUT Creator? May be usual HSP, HSPne, HSPe or more strange MXY, LXY, SXY? What do you use it's 2DCurves for, if you use them? -
Thank you! I'll try it. I hope something similar to davinci resolve lightbox with it's various filters for showing clips is on the to-do list too
-
Could you recommend a workflow to get similar way of working please? May be to copy and paste layer, which contains group grading, or sort of linking one layer's controls to another layer controls. I need to grade a music video which has a lot of shots in different locations. I have 10-12 locations with different camera angles in each location. Typical situation. In Davinci I always create a look and some similar corrections for all the shots of the scene using group nodes. While I use windows in clip nodes. If I need to correct look, I don't have to do it for all the shots. Is there any way to get similar workflow in Scratch now? May be it is possible to save just one layer to memory slots instead of the whole grade?
-
Hi everyone! Is there some sort of grading groups (similar to davinci resolve groups) in Scratch?
-
Beauty retouching
Anton Meleshkevich replied to Thomas Singh's topic in Editing , Color grading & Finishing
I made a frequency separation tree in Davinci. Here is a .drx with the node tree (and some how-to-use pics) https://drive.google.com/open?id=1lp2FQFX4NaPFv9NHtD-dOwLdqzbVmcxZ - Select Skintone on MASK node (mask is inverted) - Adjust Blur on DETAIL node to keep detail (More blur to keep more high freq detail) - Adjust Blur or MD (works better than Blur) on LOW node to adjust low freq.
- 33 replies
-
- 10
-

-
I don't use AVID, but what about a .png picture with alpha?
-
LUT creation
Anton Meleshkevich replied to Nicolas Hanson's topic in Editing , Color grading & Finishing
I forgot about Lutify LUTs. They are made using 3D LUT Creator too. -
LUT creation
Anton Meleshkevich replied to Nicolas Hanson's topic in Editing , Color grading & Finishing
Lightwave and IWLTBAP use 3D LUT Creator. -
Color Matrix/Davinci Channel mixer
Anton Meleshkevich replied to Orash Rahnema's topic in Editing , Color grading & Finishing
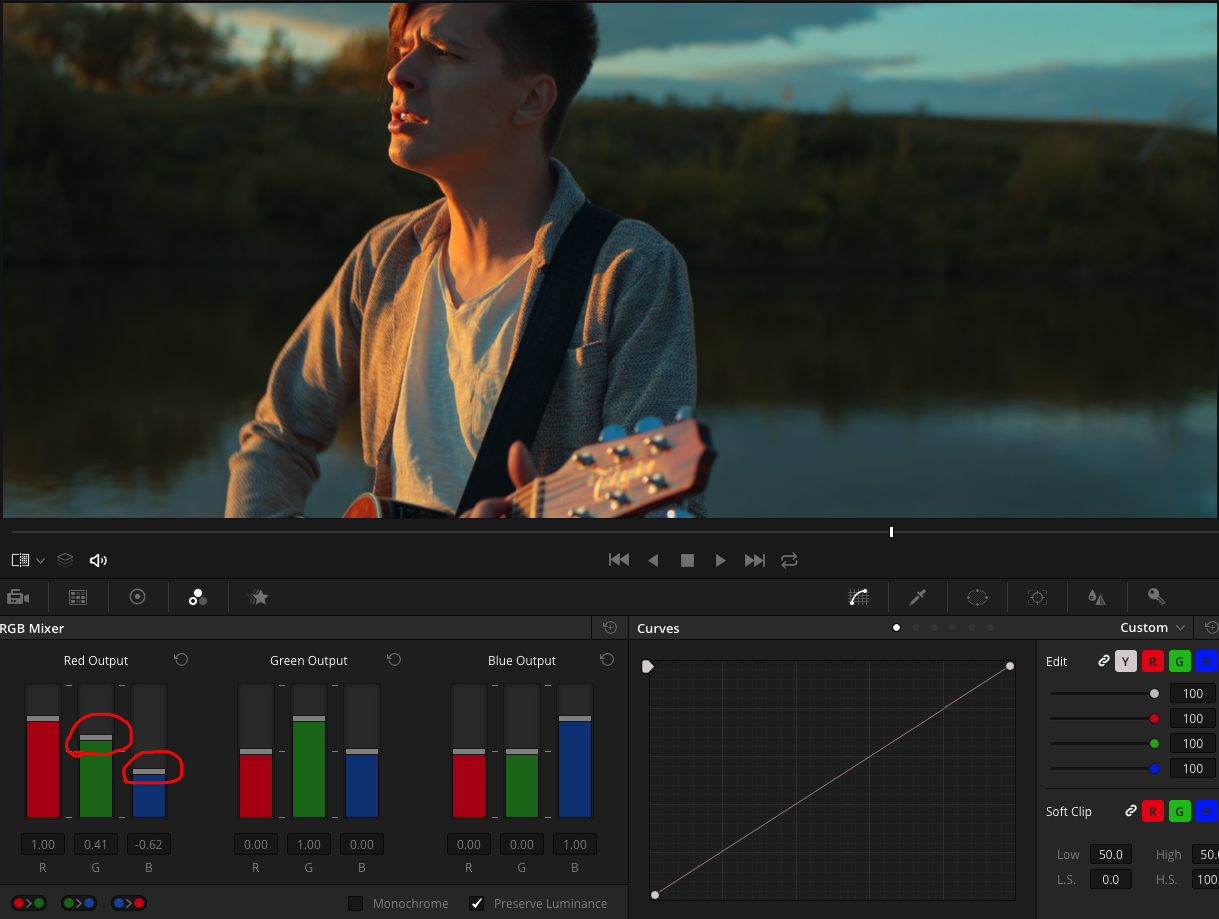
You can make sort of teal-orange using G and B controls on R channel. I didn't touch anything except RGB mixer.