Anton Meleshkevich
-
Posts
169 -
Joined
-
Last visited
Content Type
Profiles
Case studies - Free
Case studies - Premium
Resources
Insider
Courses
Forums
Store
Everything posted by Anton Meleshkevich
-
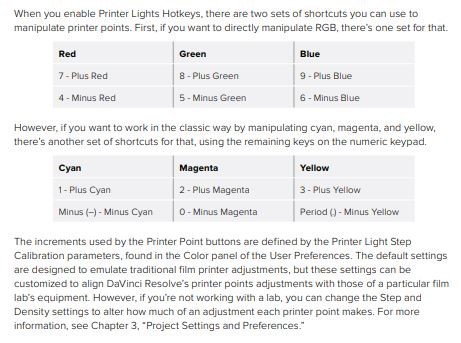
 @Emil Öberg If you like some kind of old school grading, you can use Printer lights (offset) to adjust WB and Exposure. Printer lights controls should be used only for log footage before a log-to-rec709(or something) LUT. Adjusting RGB simultaneously (Enter and Plus keys on numpad) is exposure. Not identical to adjusting exposure by changing ISO on camera or adding more light at shooting stage, but still very often used for that. For contrast use contrast parameter. Some colorists prefer to uncheck S-curve for contrast in settings. So it will work like lift and gain wheels while adjusting black and white points. Like levels in photoshop. Also you can use shadow wheel to make blacks more black without increasing contrast in midtones. For WB again use offset wheel (I prefer RGB addition and subtraction hotkeys). In addition to it sometimes you can find useful to correct WB in shadows using shadow colorwheel. But you should to know that it isn't the most mathematically correct way to adjust WB. For similar to RAW WB you shoud use Gain operation in Linear or 2.2 / 2.4 / 2.6 gamma (not rec709 scene gamma). I mean, you should to convert your log to linear (1 / 2.2 / 2.4 / 2.6). Then to make Gain operation for WB. Then to convert it back to log. This all can be done in one node, using node gamma and resolve CMS. However this is similar to RAW WB only for the gray scale. You need one of the LMS color spaces for the colors (most of the time you can ignore that).
- 17 replies
-
- 1
-

-
- workflow
- white balance
- (and 1 more)
-
Print or Print Film Emulation
Anton Meleshkevich replied to Nicolas Hanson's topic in Editing , Color grading & Finishing

-
This bug wad fixed on 12.5.3. But it seems like it appears on 14.3. 12.5.3 Release Notes: Addressed an issue where the Lift, Gamma and Gain control on the Resolve interface do not maintain Color Balance. You can know more about this here: https://mixinglight.com/color-tutorial/panel-vs-mouse-color-correction-math-davinci-resolve/ I generated the similar gradient. Can you please test it on your systems?
-
LUT's rec709 input
Anton Meleshkevich replied to Nicolas Hanson's topic in Editing , Color grading & Finishing
It seems like I didn't understand correctly your first post. Most creative grading LUTs, as far as I know, created in Rec709. But then they have Log to Rec709 LUT before that. And then this all is baked into one LUT. However this is how I did in my own LUTs pack. Also I used some luminosity and saturation remapping. So, the is no any drawbacks of using the Rec709 look LUTs on rec709 footage. -
LUT's rec709 input
Anton Meleshkevich replied to Nicolas Hanson's topic in Editing , Color grading & Finishing
You mean, to apply Rec709 LUT to Log footage to get graded image, but still stay in Log? Unfortunately it won't work as expected in most situations. -
LUT emulation input data
Anton Meleshkevich replied to Nicolas Hanson's topic in Editing , Color grading & Finishing
Talking about input contrast, I think the only way to try to preserve sort of natural film contrast is do not modify it at all. Just use printer lights before a "your-camera-log - to - some-film-stock" LUT for exposure adjustments. May be you could find a good place for adjusting contrast between a film stock LUT and a print film LUT. -
Supression LUT
Anton Meleshkevich replied to Thomas Singh's topic in Editing , Color grading & Finishing
Some kind of 3D LUT Creator AB grid? I mean, more saturated colors are desaturated, but less saturated colors are untouched or desaturated less. Or something like this? -
Green color on Kodak 5219
Anton Meleshkevich replied to Anton Meleshkevich's topic in Editing , Color grading & Finishing
As far as I know 5219 doesn't come with Resolve. Do you mean 2383? -
Print emulation LUT withour color
Anton Meleshkevich replied to Nicolas Hanson's topic in Editing , Color grading & Finishing
I tested it. You will have to reset RGB curves inside 3d lut creator or reset them in photoshop. -
Arri 3D Lut
Anton Meleshkevich replied to Marcelo Cosme's topic in Editing , Color grading & Finishing
I guess, I don't know. Why don't you like "RGB curve"? It describes it's way of affecting colors. It can be used for contrast, for gamma conversion, for inverting colors, for creating false color effect, etc. So it isn't just a contrast curve, or a gamma curve. -
Why are all 5219 emulation LUTs on the market shift green to yellow? Real 5219 film stock can reproduce green colors good, almost without any shifting its's hue. Am I missing something?
-
Koji vs other film LUTs
Anton Meleshkevich replied to Tom Evans's topic in Editing , Color grading & Finishing
As far as I know, most of the 2383 emulation LUTs use the same data provided by lightillusion. That's why they all are look similar: dark blues, dark desaturated reds, greens shifted towards yellow. All the differences are the RGB curves (creative contrast and toning). I can be wrong. -
Arri 3D Lut
Anton Meleshkevich replied to Marcelo Cosme's topic in Editing , Color grading & Finishing
I mean the same: RGB curve that converts log to Rec709 gamma. I should edit my post, I think. -
Print emulation LUT withour color
Anton Meleshkevich replied to Nicolas Hanson's topic in Editing , Color grading & Finishing
Download 3D LUT Creator Demo. Extract 3D curves from LUT. Then Press "M to RGB" button. Then turn off RGB curves, but leave master curve turned on. Now, I GUESS, even in demo mode you can export curves in .acv format. As far as i know, it can be imported into photoshop curves. Then use HALD to grab photoshop curves and create a LUT. Or just apply print film emulation LUT to a linear grayscale gradient picture. Then desaturate. Then grab a still. Then reset all correction. Then use horizontal wipe comparison and waveform monitor to see both gradients simultaneously and manually create a similar tonal curve. -
Arri 3D Lut
Anton Meleshkevich replied to Marcelo Cosme's topic in Editing , Color grading & Finishing
Don't forget about colorspace. RGB curve - isn't the only thing what Log to Rec709 LUTs do. You still have to use RGB matrix (not an RGB mixer in resolve) to "remap" primaries (Alexa Wide Gamut for example) from one colorspace to another. Davinci Resolve 14 has OFX plugin for that. -
Default settings are ok for exposure adjustments. But for WB I'd like to have more precise control.
-
In the past I always used printer lights (offset) on non-RAW material. At first I adjusted exposure of all the clips. Then I adjusted WB. I used printer light hot keys with modified step calibration settings for exposure and WB corrections. It allows me to make adjustments very quickly (approx. 10 seconds per shot). Then sometimes I fixed blacks' WB using shadows wheel on some shots Now I use Resolve CMS, setting timeline color space to gamma 2.4 and output color space to gamma 2.2 with IPP2 mapping most of the time.
- 17 replies
-
- 1
-

-
- workflow
- white balance
- (and 1 more)
-
Dodge and burn on video?
Anton Meleshkevich replied to Tom Evans's topic in Editing , Color grading & Finishing
You can try dodge and burn blending modes in a layer node. -
Teal and Orange
Anton Meleshkevich replied to Tom Evans's topic in Editing , Color grading & Finishing
I think it's harder to dive in and believe the story if there everything is teal and orange. -
Luma adjustment without increasing saturation?
Anton Meleshkevich replied to Nicolas Hanson's topic in DaVinci Resolve
I used luminosity blending mode on a layer mixer node for this task on my last project. -
If I set hue/saturation effect's blending mode to Hue or Color in photoshop. I get results, similar (or very close) to Davinci Resolve. I could use HALD to capture photoshop hue control and create a LUT, but I don't want to clip a signal.
-
Offset just adds some value to R,G or B channels. Hue control changes H channel in HSL. Now I'm trying different controls in node with colorspace set to HSL.
-
I found photoshop hue control (hue/saturation) affects image differently compared to Davinci one. How can I get similar to photoshop hue control results using Davinci Resolve hue control?