

Lowepost
-
Posts
776 -
Joined
-
Last visited
Content Type
Profiles
Case studies - Free
Case studies - Premium
Resources
Insider
Courses
Forums
Store
Everything posted by Lowepost
-
With offices all over the globe, MPC is one of the world's leading visual effects (VFX) studios, creating award winning, high-end VFX for the advertising industries. We are constantly looking for the best talent in the world, enthusiastic people that come in everyday to be a part of some of the best work in the industry. Our team in Los Angeles, and throughout our global network of studios, produce creative, visually stunning and technically challenging VFX and digital projects of the highest quality, and we are looking for candidates with a desire to be involved in the success of these projects. The Color Producer will assist the Executive Color Producer in NY to provide superior client service, increase profitability for MPC and provide additional support to the Sr. Colorists and Baselight Assistants. Primary Responsibilities: CETA Project Management (includes working independently and collaboratively with scheduling, bid creation, actuals and costing). Data Management (wrangling producer requests, obtaining prep for sessions, managing client deliverables), Knowledge of offline editorial process also an advantage. Client Communications (managing confirmations & challenges directly with Clients, handling session supervision, managing post-session follow up & invoicing), Coordinating Remote Viewings & T-Vips Facilitation, and Organising Reels Customization for specific projects. Liaison with global MPC Color departments - (coordinate shared or remote projects with other MPC sites, ensure most recent reels available to all sites) Experience and Skills: Solid understand of Baselight workflows Desire to continue to develop knowledge of processes and technology for Color and how it relates to the larger VFX pipelines. 2-4 years experience in a Producer role required. Excellent communication, people skills, and team working skills. Capacity to manage a busy workload with high productivity. If you are interested, please email your resume and reel to newyork-jobs@moving-picture.com
-
Mark Todd Osborne got his start at Company 3 two months after it first opened, and quickly became Stefan Sonnenfeld’s protege. He stayed there for 11 years and is now working from several post facilities in Los Angeles, doing high-end work for U.S. & international clients. In this article, Mark shares details of his color grading work with the movie It Follows.
-
What's new in DaVinci Resolve 12.5.2? New Features • Added support for new URSA mini camera metadata in RAW files • Added support for Color Space tags on QuickTime export • Added support for Fusion Connect on Linux • Added ability to filter timeline on Color Page based on clips that have OFX applied • Added support for up to 24 audio channels on the Edit and Deliver Page • Added support for manually enabling and disabling GPUs in Preferences • Added support for Display Name on ALE export • Added support for Apply Grade and Append Node Graph in the main menu • Added the ability to clear tracking data for the current Power Window • Added support for OpenCL on NVIDIA cards on Microsoft Windows • Added ability to copy local grades to remote • Added additional utility functions in DCTLs • Added support for Date Created and Data Modified for timelines when using Smart Bins General Improvements • Improved 3D LUT generation to ignore any spatial and temporal corrections like Power Windows and OFX etc. • Improved accuracy for color conversion when outputting with ST.2084 gamma • Improved accuracy of rendering Rec.2020 to ProRes/DNxHR • Improved highlight control in ACES and HDR workflows • Improved performance of ResolveFX Scanlines • Improved reliability when loading projects with audio plugins • Improved deliver preset switching to preserve the render location • Opacity is now retained when converting a circular window to a Power Curve • Addressed an issue with the 3D keyer on OS X 10.11.6 • Addressed an issue with Resolve displaying GPU Memory Full messages on AMD card on Microsoft Windows • Addressed an issue incorrect UI indication for ProRes render cache, optimised media and remote rendering on Microsoft Windows • Addressed an issue where importing a project into Resolve could cause a crash if there were unsaved render jobs • Addressed an issue with applying stills and memories on a stereo timeline • Addressed an issue with decoding some MXF XDCAM MPEG2 clips • Addressed an issue with Favourite transitions not being remembered • Addressed an issue where printer lights keyboard shortcut did not work on Linux • Addressed a file permissions issue when rendering EXR files • General performance and stability improvements
-
Deluxe has a new opening for a Jr Resolve Engineer at its Efilm facility. With foundational experience and knowledge in Resolve deployment/maintenance Linux networking or any programming knowledge for automation). Howard.Lin@bydeluxe.com
-
Deluxe has a new opening for a Color Assist at its Efilm facility. Howard.Lin@bydeluxe.com
-
Lowepost have teamed up with Assimilate Inc to offer our premium members a special 20% discount on annual SCRATCH and SCRATCH VR Suite. That's a great deal, isn't it? Support the community by becoming a premium member and help us continue to make great deals and create good content.
-
Simona Cristea has colored hundreds of major international campaigns and works as Head of Creative Color in Deluxe's Rushes. She is hugely talented and shares some of her experience and insight in this article.
-
Rageboard is the world’s first chassis for Tangent’s Element panels and now you can get a 100 Euro discount. For more information, read about the impressive Rageboard here. In addition, the company behind Rageboard offer a 100 Euro discount on a full set of Element panels (EU only). This special offer is valid until the end of the month. The products can be bought here.
-
The director, Sean Thompson, wanted a warm sensual look for the spot, with a sense of gold permeating throughout. The colour reference that Sean had in mind for this was the desert fight scene from Kingdom of Heaven, directed by Ridley Scott. The challenge was to get all of the footage looking as though it was during the ‘magic hour’, when for example the opening of the commercial was shot at midday. Also, even though we went for a heavy golden look, I had to make sure it looked clean and sleek at the same time. LUTs The spot was shot on Alexa with anamorphic lenses, and graded on DaVinci Resolve. I sometimes use LUTs in my grade because that gives the picture more depth and make it look more cinematic, less digital. If utilising LUTs, I like to blend them through, so that I’m left with maybe only 5 or 10 percent of the intensity of the LUT. READ: Mitch Bogdanowicz about LUTs I find that with all the digital cameras nowadays everything is very flat, especially the skin tones, so I'm using certain LUTs that help the skin tone (giving it more colour and volume). Set your levels right One of the first rules when you train as a colourist is to set your levels right. When I first started grading, about 14 years ago when obviously we were working predominantly on film, the first step in a grade was 'Neg matching'. Meaning you would bring your neg's RGB levels to a correct point in the whites and blacks (with no crushing and no clipping). That would allow you to start with a balanced picture. An exception being when certain coloured filters or lights were used. The same still applies today, only that when working with a digital picture rather than film, it can be trickier because sometimes the footage that we get is not straight from the camera and it might have been already compressed into a QT prores, therefore not having all the range to work with. This is why it is always important to provide your colourist with RAW files, allowing the maximum range within which to work. When working on the RED or RAW files, etc, I sometimes use the camera settings option in Resolve to change the exposure or get more info in the blacks or highlights. Then, I use the primary colour corrector to set the levels right. And yes, it's very important to start the grade with a good balanced picture because it is the only way you can get the most out of the picture (and know what your limitations are as well). The golden look After I set my picture balance right, I start working on the look that the director and the DOP aim for. With this particular film ‘Legacy’, it was all about the golden sunset look. I like to work on the overall picture, and I find that this way the look is more natural, not so 'Instagram'. Having said that, on the Legacy film I selected the highlights and added a touch of warmth in them, as I was trying to recreate the warm late afternoon summer sun. I also used few subtle vignettes throughout, to make the picture look a bit more cosy and ad more depth. I kept a good healthy contrast that complements the lovely anamorphic flares from the camera. To help enhance the cinematic look I also added a touch of grain in the picture. I find that it's always great to add some texture into the clean digital images. In general, I use the vectors and qualifiers a lot, also lots of windows, the contrast and the amazing midtone detail both in the DaVinci Resolve primaries. Skin tones I like to start working towards a look in small steps, as I find it very important to keep good skin tones in my grades. With a golden look this can be a bit tricky, as in order to create it you need to find a fine balance of yellows and reds. I find that with a lot of digital cameras, skin can often look really grey and flat, so I like to add colour and some depth into the skin. I think that one of the most important things is to always having good skin tones and ensuring that they work with the rest of the picture. Basically if the picture is lit with a blue light, I think its fine to have cool skin tones, it looks natural. The briefs are different for different brands and types of films, from the translucid skins of high fashion models to the nice peachy skins of pampers babies. One colour that always creeps into the skin tones is green and I find that it is a very delicate balance of removing that and not making it look too magenta. Colour influences perception, sometimes in an obvious manner and sometimes in far subtler and unexpected ways. Fundamentally, what we’re always contending with are levels of hue, saturation, lift, gamma and gain. The balance of these and their effect can on a subjective level be quite finite but there are some accepted and proven conventions to the psychology of colour, that as individuals all of us generally adhere to, in so much as eliciting similar emotional responses; bright & warm equals happy, cold equals sad. Colour can be used to associate a positive or negative tone, make us hungry, encourage feelings of calmness or energy, etc. Clever advertising and marketing executives are of course aware of this. When you’re an established colourist and working at a certain level, it’s all about the fine details. Nowadays with a plethora of apps and software available it’s not too tricky to add a funky look to a picture but in my opinion if a grade looks as though it was done on an app, there’s not much value to it. I always try to stay true to what the cinematographer had in mind when he shot the film, and go from there. I would also say that it is very important to be interested in cinematography and photography in general. To continue to learn and be inspired. The technical side is a large part of the craft, it is important to have a thorough understanding of the pipeline, which will give you confidence in handling any job. Social and communication skills are also very important. Simona Cristea All images and clips copyright © 2016 Cake Group / Dark Energy
-
I was introduced to Oblivion at the marketing stage, and I worked on the movie trailer with director Joseph Kosinski and the DP, Claudio Miranda. It was the perfect scenario because a trailer is a mini version of the movie. It saved us a lot of time that we were mostly able to set and agree on these looks before we got to the movie. Creating a look is mostly about listening to the creative ideas the film-makers bring into a session. Most of the time they have an idea of what they want but I often do look development to give them different versions. For Oblivion, Joe and Claudio had a pretty good idea of what they wanted. The overall look for the film was somewhat dictated by the environment where it takes place. We consciously left the contrast soft and the color at a more normal saturation level in hopes the viewer would relate to it as if it were closer to real life. Working with EXR The film was shot on the Sony F65 and finished in EXR. I color corrected on a Lustre using a Float Conversion LUT. Learning and working with the EXR file was a technical challenge, as the EXR file utilizes a wider code value than the Lustre could work with without a Float LUT. The Float LUT brought the outside code value back into range so I could color correct it. This was not very well communicated so there was a bit of trial and error. In addition to the Float LUT, I color corrected using a viewing LUT designed by the Technicolor Color Science team. The viewing LUT gives some density to the image as a starting point for grading so the color corrector doesn't have to work so hard to create a basic picture. This LUT is also called a "Show LUT". READ: Mitch Bogdanowicz about Float Conversion LUT and Viewing LUT I used Linear Architecture mode that gave me the subtle tools of Ped, Gamma, Gain and broke down the image within each of those perimeters. This allowed me the ability to color correct areas in the picture without having to define the area by keying it. There was a very high emphasis on preserving the subtle low and high light detail so I needed tools that allowed me to make subtle adjustments. The log architecture color corrector doesn't define the picture area with as many perimeters, and I find this a little limiting and time consuming when I am trying to do something very detailed. Colorists whose roots go back to film timing are probably more comfortable using the Log tools because it more closely resembles film timing using points of light. Faces and fleshtones In general, I color correct a scene for faces and fleshtone first. I create what feels right and then evaluate the rest of the image. If I make a pleasant fleshtone but the surrounding white walls are now too warm, then I might try making the walls white and then see if the flesh feels appropriate. Color correcting a scene from the raw image is all about trial and error within the layers of luminance and color. Adding color into one area but then needing to take the same color out of another area so the balance is right. The movie has a lot of close up 50mm lens shots in it. There were many occasions where I applied a bit of softening to faces to ease back the detail in the flesh. I also applied some sharpening to the eyes. The emphasis on the shots was directly on the eyes. Integrating the CGI The Technicolor Color Science team developed a workflow within the different VFX houses, and Integrating the CGI with the organic photography actually started well before I started the movie. The viewing environment the VFX artist was working in matched the projected image I was looking at so closely that when I received the VFX for grading there was usually no noticeable difference between the two. For some of the composited images I had mattes created for the different layers in the shot, and this allowed me the ability to color correct a specific object in the frame separate from the rest of the shot. Favorite scenes One of my favorite scenes is when Tom is tied to the chair and Morgan Freeman is sitting in the dark. There's subtle detail in the dark on Morgan's side that is just awesome. The image of Tom in Morgan's glasses is in the photography and is so compelling. Shooting on the Sony F65 and finishing with EXR really enhanced the ability to reproduce detail in the low and high lights. Another scene that stands out in my mind is dinner by candle-light scene. Again, the detail achieved inside a scene with real true black is perfect. The beauty of the soft candle light on the faces was achieved with very little effort. We really worked to retain the soft contrast in the light and have true blacks. One last scene I spent some time on was when Tom and Julia fly the Bubbleship into the radiation zone. A perfect example of using color and density to manipulate the viewers' emotion in the scene. We created a very warm and bright look to manipulate the viewer into believing this environment was indeed a hostile one. If we had left the scene looking like the natural environment with the white sand and comfortable sunlight, the feeling of the hostile environment wouldn't have been achieved and the viewer may not have believed the area to be as dangerous as it was supposed to have been. I think we achieved that but still managed to make it fit into the overall look of the movie. Mike Sowa All images and clips copyright © 2016 United International Pictures
-
DI Colorist Walter Volpatto at FotoKem shares insight about his color work with The master. Walter is the go-to colorist for leading directors such as Quentin Tarantino and Christopher Nolan, and his credits include The Hateful Eight, Interstellar, San Andreas, CBGB, Chronicle and Hustle & Flow, to name a few. Read the article here
-
This opening presents a rewarding opportunity for a dailies colorist with a leading post facility located in Burbank, California. Market facet for this division is Television, a desirable candidate must have a television background, with at least three (3) years of relative experience working at a known post production facility. The applicant must be able to work closely and efficiently with Final Colorist and Cinematographers in today’s television in order to create and maintain their aspects. Must be highly organized, a team player and extremely effective with their communication. Keep Me Posted (KMP), a Foto-Kem Company, provides a benefit package along with competitive compensation. Requirements: Knowledge of PIX or DAC for Uploading DNX36 Creation for Offline production Television background Please submit resume to jobs@fotokem.com.7 Full-Time Location: Burbank, California, United States Salary: DOE
-
Keep Me Posted, a Foto-Kem company is accepting application for a Digitizer. The applicant should have experience with MAC platform and working knowledge of file based workflow. Responsibilities will include, but not limited to: Import of camera media, sound sync, color application via standard LUT and transcoding for offline delivery. Person should also have some working knowledge of AVID, FCP and tape ingest and layoff. File and tape based I/O and Clipster and/or Baselight a plus. Person should be able to follow directions with little supervision, be organized, communicate well and maintain focus on work and completion in a timely fashion. Please submit resume to jobs@fotokem.com. Full-Time Location: Burbank, California, United States Salary: DOE
-
We are seeking an experienced DI Producer for our DFS feature film/trailer division. Individuals who apply must have at a minimum of 7 years customer service experience. Only applicants who have an understanding of the DI process including but not limited to, conform, color correction, titling, delivery, VFX, film recording/scanning and final delivery. This is a swing shift position Monday through Friday. The position will have responsibility to work closely with multiple day shift producers to support and follow work through the facility. Strong communication skills, written and verbal are a must as you will be responsible for updating the day shift with detailed notes. The position requires someone who is a proactive leader and has the knowledge to troubleshoot with limited support and have experience working in a facility, a must. Please submit resume to jobs@fotokem.com. Full-Time Location: Burbank, California, United States Salary: DOE
-
We are seeking candidates to support our growing DI department. Ideal candidates must have a minimum of 5 years of DI experience and an in depth understanding of multiple DI platforms. Da Vinci Resolve is the main system used in FotoKem Creative Services. Applicants must be able to support senior colorists with tracking, color correction, stereo grade tracing, and general follow through with color specific requests. The ability to conform and support conform is also required. This is not an entry level position and only serious candidates need apply. We offer competitive wages and excellent benefits packages. Please submit resume to jobs@fotokem.com. NO Phone Calls, Principals Only Full-Time Location: Burbank, California, United States Salary: DOE
-
Welcome to the Lowepost Colorist Community! Our goal with this website is to provide our visitors insight into the high-end world of color grading. All of the content is created in close relationship with senior colorists, color timers and scientists from studios like FotoKem, Technicolor, Company 3, Goldcrest, Molinare and The Mill, to name just a few, as well as top freelancers, software developers and other industry professionals. The Lowepost website contains case studies, color theory, an event calendar, a chat room, digital assets and a discussion forum for colorists. We have also teamed up with Cinegrain to bring you The Lowepost Collection with discount on real film scan grain and 72 color presets. We are constantly working hard to make sure the site contains valuable content. Every week for the next eight weeks, we are going to make one new article available to our readers. The premium content will be available instantly for those who support us and join our subscription program. We will update the site with new content every once in a while. We hope that you’ll enjoy the new website and that you’ll find it interesting and pleasant to use. For any questions, suggestions, feedback or comments, please don’t hesitate to e-mail us at cm@lowepost.com Thank You! The Lowepost staff
-
I was first involved with this project when the cinematographer, Dick Pope, was doing some camera tests. He was trying out lenses, aspect ratios and a LUT for dailies. Being a Mike Leigh film, it hadn't even been written at that point. On this film I was more involved with Dick than with Mike although Mike did attend. The idea was to evoke Turner's paintings without going into pastiche. The "Turner palette" Our inspiration was Turner's paintings themselves. In particular his use of colour and light, which is one of the most remarkable things about them. It was about finding a Turner "feel" and learning from his work. Pete Marsden, the DIT, had some very interesting work with sampling the colours from various Turner paintings and used them to create a "Turner palette" which we referred to. DOWNLOAD: Turner colour palette, created by Pete Marsden We also took a look at some of Turner's original colour tests in the Tate too. It's all browns and yellows, but always with some blue to balance the image. So those kind of things informed everything in the look development process, from production design through photography and into the grade. Having said that, the blue/yellow thing is just a stylistic thing Turner used. I don't do any of that highlights yellow/shadows blue thing and neither did Turner really, it's more areas of the frame, especially skies. Turner's most famous painting "The Fighting Temeraire" is a prime example. There's a contemporary cartoon of Turner with a big bucket of yellow paint, and there's a lot of yellow in both the paintings and the film, but it's not ALL yellow. There's nothing wrong with "all yellow" of course, I did it quite a bit in "Hellboy 2", grades are all about what's most appropriate for the film in hand. Grading technique Mr Turner was graded in Log-C and Baselight's film grade tool is my standard grade tool for this kind of work. It's simple, precise, and natural. All the other firepower is to get you out of trouble. Printer lights do the work, as they have done since the dawn of cinema. I grade for the skintones first, that's almost always the subject of the image. I grade the skintones to look right for the specific lighting environment. Then everything just falls in line. Our eyes and brains are most adjusted to recognising skintone. We can tell instantly if skintone is wrong, but not so much the colour of the walls. Generally, I approach grades as if they're photochemical grades as if you had nothing else except printer lights. No windows, no keys, just exposure. Windows are just a tool, that those work on a shot by shot basis, where necessary. I only use a key or window if I can't get there with the overall grade, and even then it's just to complement the primary grade. Ideally, I wouldn't use any windows at all. Grade it like that and you're halfway there. Keeping a period feel The biggest challenge grading the film was probably keeping a period feel. Although Dick did a lot of great work with lenses and light, it's still shot on the Alexa and exhibited digitally which inherently feels a little "modern". So we had to be careful nothing felt too pristine or polished yet still had impact and beauty. This was about watching contrast and the general feel of the images. Contrast and perceived sharpness are very closely linked. A grading system like Baselight can also do simple comps, that can be immensely powerful. In the scene where our people are experimenting with a prism, we had a great flare from the sunlight on one angle, but it wasn't so pronounced in another. We stole the flare from the flarey shot, tracked and comped it over the non-flarey shot and added a little light shaft cutting through the air. We did quite a lot with soft keys on highlights which run alongside the lenses and smoke Dick used. This is just printer lights, no blurring or softening. The "defuse" tool in Baselight does a similar thing and can be very useful. "This doesn't look like our movie" I feel that speed is absolutely crucial to a grade in a feature film like this. I did try to get a first run at the movie done in the first couple of days, like an assembly edit, and then let the film evolve from there. Colour adaptivity is both your enemy and your friend, but you can only truly see what its effects are when you play the film back and see it as a whole and feel how everything flows together. There needs to be some kind of continuity throughout the piece, but you can mix it up if it's appropriate for the story. I often use the phrase "this doesn't look like our movie" Adam Inglis All images and clips copyright © 2016 Thin Man Films Ltd / SF Norge AS
-
I was introduced to The Man From U.N.C.L.E during pre-shoot tests by long time collaborator DP and friend, John Mathieson BSC. He was put in control of creating the MFU look. We analyzed each scene with the overall style and the atmosphere his funky lenses created in mind. We worked together to come up with something we both liked for each scene.The look of the movie was inspired by the Sixties colourful Kodachrome feel: saturated colours but never 'digital', and natural, healthy skin tones. Guy Ritchie commented and approved during the final grade process. Film print emulation look Both John and myself prefer the film print emulation look as a base, so we took the Alexa 3k RAW Log file and applied a bespoke LUT. I had tweaked and developed this LUT over the course of the last few years to emulate in tone and curve exactly what an original negative print would achieve. It creates a healthy starting point to work with the images. When using an LUT it's important not to be afraid of the harsh contrast that can occur in some scenes. It’s perfectly natural! First pass From that starting point, I concentrate on the overall look and matching up each scene. I mainly use just printer light controls to maintain consistency and to avoid betraying the film look too early. Everything then has a numerical value so you know if you are moving away from the natural filmic look. The LUT is specifically designed to match an original neg print in terms of the relationship between shadows, mids and highs. If I adjust the gamma, for example, I am breaking this natural relationship. If I do, I set myself limits so that I lose that natural film look. The Resolve will display a value to every control so you can see how much each end of the curve has been adjusted. I also tend to keep a little yellow in highlights and maintain a film white at the top end of the curve. This reduces any digital look immensely. On shows shot digitally, I simply grab or key the very top end of the highlights and bend them down to remove the very bright top end that appears when using a film LUT. Film naturally has a nicer, gentler curve at the very top end. It not only helps on an aesthetic level but also helps retain a tiny bit of dynamic range detail that otherwise would have been lost. Second pass After the initial first matching pass, we review and compare how well the film is working in different areas. We get into more secondary colour correction on scenes that need a little extra help. With each review, the changes should get smaller and less frequent. We also pick out relatively minor parts of the image to give it that final polish. I prefer to keep things as simple as possible for as long as I can, so I stick to various window shapes rather than keying if possible. Keying on the big screen has to be perfect or it can cause technical issues such as boiling or noisy images which is a big no-no for me. I don't want to compromise the quality of the image in any way. I tend to stick to printer lights, curves and windows for the most part. This gives the closest result I can find to the photochemical image we have loved for generations. Skin tones are the key to my grading. They are often the only real reference we have when looking at a scene for the first time. In one of the evening interior scenes, we decided to lose the nicely saturated colours. We went for a more tobacco/sepia feel which seemed to make sense in that particular environment. I initially matched this scene up using normal saturation and colours, but then I changed the feel by reducing saturation overall and playing with the balance. I tried to keep the scene naturally lit and not overtly graded in appearance. The night boat scene was a tricky sequence. It had a mix of day for night, real night, underwater footage, multiple camera formats, VFX, split screens, the lot! Getting that whole scene to match and be believable was tough. At the end, we did apply a low level of film grain on top of the image throughout. The start of the movie has some shots filmed on a Super 8mm camera. We had to match in the shots around them by adding saturation in primary colours and turning up the grain level. After the first scene, we reduced the grain accordingly and (hopefully) invisibly. Paul Ensby All images and clips copyright © 2016 SF Norge AS
-
I was introduced to the job midway through the post phase. It was at the point where all the plates had been shot, the edit had been locked and the VFX teams at The Mill had spent a few weeks working on the droplets. The main groundwork had been laid and it was getting to a good point. It was really nice for me to be introduced at this stage as I could come in with fresh eyes and see it as a blank canvas. I could come in and offer some new ideas on how the grade should look. Johnny Green is a wonderful director who has worked on so many great projects. He knows what he wants. I was grading with the agency Brothers & Sisters in London and he was viewing my output in NY, using our remote grading connection. The main thing Johnny wanted was a feeling of awe and magic: a grade that could compliment the visuals. Golden Hour look At the start we weren’t sure whether to go for a warm look or cool but as the VFX evolved it was clear that a warmer grade would be best suited to this piece. It looked higher caliber, more magical and premium. A cooler look actually worked better with Sky’s brand (clean whites) but we decided it played down the film and chose a nice Golden Hour look. There are some stand-out images when I think of Golden Hour. In particular I love William Egglestone’s shot of girl stirring a cocktail drink on the plane. There’s a light that’s coming in from the window shining on the orange drink. It creates an orange light that spills down on the passenger tray. I think it’s a beautiful golden orange hue, one I always think of for a warm palette. The colour compliments so well against the glasses monochromatic grey shadow. For me, colour is about a feeling of something that triggers a memory. Something I always try to do when I work. Once we went for that golden look it was starting to work. When you hit that sweet spot everything falls into place. The base layer The first balance is incredibly important. In the Baselight we call it the layer 1. For me, if the contrast and colour balance are nailed in this layer all other layers after should enhance the image instead of correcting the mistakes that were made in your first layer. Keep it simple, something that I was always taught and would recommend to any aspiring colourist. Sometimes less is more. Nothing beats a clean precise well-balanced image. There are so many tools out there on different grading platforms. It can be quite discouraging because there is always the danger of overdoing an approach when it can be done in a simpler way. Crushing the blacks too much or clipping the whites should not be done in the base layer. Keep your image clean. It’s the foundation of colour grading, something I always see in the greatest colourist. From an organized standpoint, it puts the colourist in a much better stead for the rest of the session. It makes applying grades to other shots much more manageable. It’s a cleaner layout and much more relaxing when you’re with clients and can provide quick results. In this commercial, the base layer had the main look but we did as much as we could to enhance every shot in the next layers. I love to use power windows to enhance/contract specific areas and draw you in to what is important in the shot. Tracking has been a revelation to the modern colourist. The ability to enhance moving objects with ease has been a game changer. I love to key specific parts of the image. Whether that being the shadows and highlight or specific hues. A hue shift can change the look of a shot without adjusting the contrast. I love to blend in grain stocks into my image if the clients are feeling it. I think it can add some extra texture to a digital image. The most important thing in the shot I saw this really interesting video when I was first getting into colour. They managed to track eye movements and recorded what part of the image people were looking at. What struck me was there were many of objects with minimal meaning that people would be drawn to. People were missing the parts of the shot they should be looking at. I remember one scene where a guy walks into a dark room. For the most part, people were looking at his face. However as soon as he passes a lamp people’s eye movement looked at the lamp! Instead of the intense look on his face. Ever since then I wanted to use all the tools I could to help over-look the things that are less interesting and draw you to the things that are most important in the shot. Every shot in this sequence has a golden nugget and that was something I wanted to enhance as much as possible: the highlight glint on the racing drivers eye, the shine reflected on the book, and the waves of droplets exploding up the stairs. I used power windows to draw the viewers eyes to specific areas, key certain hues of the droplets and shifting the colour a few percent, add depth to the shadows and highlights to define separation. If I can fulfill the director’s vision, enhance the what DoP shot and add something to the droplets my job is complete. Develop your own aesthetic style I love collecting photography/film stills and other colourists’ grades that I can always study. I have no shame in looking at other people’s images and seeing what they do. It’s the best way to learn and help develop your own aesthetic style. I always want to inspire my clients and transform their picture into something stunning. I think if a client can see you really care and want to give them the very best possible it’s a great attribute to have. As a colourist it's important to study the visual aesthetic of what makes a great image. You need to have passion in what you do, and love looking at images. Challenge yourself. It’s important to always treat yourself as a student, always be willing to experiment and try new things. Find a great mentor. Someone who can help teach you the fundamentals. Keep practicing. Practice is incredibly important if you want to be a successful colourist. It just won’t happen overnight. So, saying that, you need patience. With patience and practice come experience and nothing can beat experience. I think enthusiasm and confidence in your own ability is a great quality as well. Politeness will go a long way. Matt Osborne All images and clips copyright © 2016 Biscuit/Brothers & Sisters
-
I came on board with the production in early 2014, and I met with George Miller, the director, and talked about what the look could be like. It was amazing to get such an open brief which was essentially "it should be saturated and graphic, and the night scenes should be blue". The main reason for this is quite interesting. George has been watching 30 years of other post-apocalyptic films and noticed that they all use the same bleached and de-saturated look. We knew we didn't want to make yet another film like that, so we had to find a way to make it saturated and rich. The other aspect was to keep each frame as graphic as possible. When it came to the night scenes, we experimented with silvery looks and photo-realistic looks but found that the graphic rich blue night look was the best option for the film. Grit in the image I watched all the original films again before starting just to get some grounding of the series. The one thing I was very conscious of was to make sure there was some sort of "grit" to the image. We didn't want to make an overly plastic or fake looking saturated image, there needed to be some sort of rawness in the look as well. In general, one of the aspects of the look was to apply a lot of sharpness. We liked how it made the image look sharp and how it often brought out some grit in the image. Each shot was sharpened independently and often we sharpened just certain parts of the frame more than others to help draw attention to specific areas. Because the film mostly takes place out on the desert road, we knew it could get visually boring very quickly. Which is again the reason for going with a rich colourful palette. Watching 2 hours of de-saturated desert tones would be dull. Once there was a rough cut of the film, we looked at the scenes and worked out how we could break up the visuals to create some variety in looks and also how to differentiate the landscapes and story points. Every time I worked on a shot, I kept saying to myself "make it look like a graphic novel". The basic balance The film was shot on the Arri Alexa in Raw. We used an LUT to convert the C-Log into P3 colour space, which also had a bit of a film emulation baked into it. We had someone from Deluxe provide several options for LUTs which we chose after testing. The Alexa camera has such great dynamic range which was amazing for a film like this, as I was very rarely struggling to find detail in a shot. With most of the shots we did a basic balance using printer lights first, then we jumped into video-style grading tools after that. I always worked under the LUT, but used traditional video tools such as lift, gamma, and gain. I also used some soft keys to add contrast to certain parts of the image which helped retain detail in extremes. READ: Mitch Bogdanowicz about LUTs Eye scan Every shot in the film has been worked quite hard in the grade. George is big on what he's phrased "eye-scan". The audience should not have to search the frame to know what's important in the image. We would shape each shot so your eye knew where to look and you saw the important story points in any given frame. We used standard techniques like vignettes or shading parts of the frame down to draw your eye to what's important. The overall experience should be smooth and even though levels may be changing across cuts, the idea is that you shouldn't notice it. For each look in the film, I made sure there was a connection between them. Whether it was a contrast level or a saturation level, the scenes needed to flow. Whenever I'd work on a scene, I'd always go back and watch the scenes with audio to make sure I wasn't missing anything important and that it flowed across the cut. The looks and expressions of the actors Like with any film, the main objective is to match the skin tones of the characters across the cuts. On a few occasions, we would help out an actor who might have had a pimple or something on that shoot day. The film was shot over 6 months, so it's quite normal to see blemishes appear across the cut. We simply tracked their face and smoothed out the skin to remove the acne. We also spent a lot of time on the eyes of the characters. There's very little dialogue in the film, and a lot of the performances come from the looks and expressions of the actors. The human brain focuses about 80% attention on a character's eyes, so we wanted to make sure they were clear and vivid in every shot. I essentially rotoscoped every eyeball in the film and added contrast and sharpness to them. This made the eyes vivid and helped draw your attention to their performances. The night scenes are 95% completely blue, so it obviously affects the skin tones as well. I kept 5% of the original colour in the scenes and occasionally we pushed a colour for story reasons such as some blood or a green plant. Day-For-Night One of the toughest parts of Fury Road for me was working out the right look for the Day-For-Night. The incredible Cinematographer, John Seale and VFX Supervisor, Andrew Jackson had worked out a technique of shooting 2 stops over-exposed on the day shoot. The theory behind this is quite simple. With an over-exposed image (without clipping highlights), we can expose the shot back down in the colour suite, grade the image to create the Night Blue look. Then we can selectively bring out any detail from the shadows that we wish, with virtually no noise. This enabled me to create very graphic contrasty images with detail exactly where I wanted it, and a fall off into shadows where I didn't want it. Almost every D4N shot was basically roto'd and had the sky replaced to create the look. It took a few months of fiddly work, but I think the look is different and graphic. Challenge with the interior driving shots One of the other trickier elements of the film was grading the interior driving shots. As you can imagine, shooting in the bright desert sun, if you expose for the dark interior of the car, then the background outside the window is severely over-exposed. We wanted to always retain detail and saturation both inside the car and outside the car. This meant a lot of keying and detailed shape work to keep both sides of the exposure looking rich and saturated. For the most part, I approached shapes in 2 ways. The first was to use very soft shapes as a way to shade and shape the image. The second was to do very precise shapes which usually required a lot of tracking and roto'ing, such as eyeballs. The redemption scene There's a scene in the film called "redemption". It's a scene where Max comes up with a plan and presents it to the other characters. They all discuss the plan and decide to go ahead with it. However, it's a dangerous plan, and they don't know if it will work or not. For this scene, we wanted to break away from the standard blue skies that we had seen in the other action scenes previously. Instead, we changed all the skies in the colour suite to a slightly stormy looking sky. The characters are lit in full sunlight, but there's a stormy environment behind them. The idea behind this was to create a mood where you're not sure if it's going to be a nice day or a bad weather day. Helping to create an emotion with the audience that compliments the story of whether the plan will work or not. This meant that for every shot in the scene, we needed to replace the sky with a new stormy sky, one for each angle the camera faces. The ability to replace skies in Baselight is amazing. It's fast and interactive, so George is able to see instantly and can frame it how ever he wants, or switch it out at the drop of a hat. On a technical level, it meant that every sky needed to be tracked to the background of the shot and put behind the characters which required a lot of detail work, but it was worth it in the end. VFX If there's a tool on the Baselight, then chances are I used it on this film. Everything from keying, curves, printer lights, shapes, sharpening, lens flares, blurs etc. The grading stacks are quite large on this film. I also like to keep every change in its own layer so I can control it separately and disable it if necessary. I also worked very closely with VFX on this film. There are actually a lot of VFX shots in the movie, from basic wire rig removal to CG backgrounds and of course the Toxic Storm. We were able to get mattes with every VFX shot so I was able to control specific areas of the image that were comped. For example, if there's a green screen shot of Max and the background is comped it, then it is hugely beneficial to have the matte for Max so I can adjust him independently to the background. It saves a lot of time. Eric Whipp All images and clips copyright © 2016 Warner Bros. Pictures
-
I started working on the film during previews. Previews can often be a quick process where you don’t have a lot of time to grade and you're using dailies as the starting point. And in that, you can get a good sense of what the filmmakers have been looking at for a few months in editorial. You can also get a feel for how the edit drives the grade and what special sequence treatments may be needed with respect to flashbacks or point-of-view moments (McCall vision in the case of Equalizer). As a finishing colorist, doing the previews lets you see the film’s evolution and gives you a head start on thinking through your approach when the time comes for finishing. Inspiration The film was photographed by Mauro Fiore, so of course, it was captured beautifully. Much of the “look” of the film was really inspired by wardrobe, set design, lighting, and narrative tone. To be honest, I believe that looks for films should really be derivative of those things rather than an overlayed idea of a colorist. That being said, I believe my role or contribution is to assimilate all of those things into a point of view that drives the grade and enhances the photography. The film was shot on the Alexa, with some selected bits on the Phantom. All footage was unified to Log-C in the Baselight and I graded thru a modified print emulation LUT. READ: Mitch Bogdanowicz about LUTs Grading technique When working with features I’ll typically start out with Log controls, doing overall printer-light type color and exposure work for the first touch. Then I’ll get into LGG when pushing contrast. More subtle grading happens with Log controls. I’ll leave keys as the last resort for most situations - I don’t like to use them if I don’t really need to. I’ll mostly use targeted curve grading to swing hues or tweak saturation. That being said, there are of course times when I do qualify with keys, either via HSV or 3D keys. Sometimes, I’ll also use luma keys to help slow down energetic windows for example, maybe g-matted to protect what else is in the frame. I’ll generally find a grade setup methodology that’s appropriate for a film and use that throughout. That could be a base grade correction followed by subtle Log corrections. Another film setup could be that plus a highlight desat and a more aggressive LGG grade, for example. These setups, for me at least, are contingent on the viewing LUT and if I’m constraining primaries or not, and they can vary wildly from style to style. Skin tones in mixed-lighting scenarios Managing skin tones in mixed-lighting scenarios is often tricky, and it is really where feel comes into play as a colorist. Literal matches from shot to shot may not be the appropriate thing to do based on the color temperature environment of the scene. My approach is to match the environment and the frame as a whole, and then see if the skin tone is complimentary and matching the world around it. If not, then a quick window or hue shift is available to clean things up if necessary. Color correcting dark scenes At the end of the film, there’s a scene in the big-box hardware store. Once McCall turns off the main lights, the hunt is on and Teddy and his men are picked one by one. From the moment the lights went off, I transitioned into a grade style which rode the bottom end of shadow detail but maintained pings of light to avoid muddying up the image. We wanted to see the action - the violence and expressions but maintain near blackness. I relied on exposure controls to set up the base pass, then added some mid-crush to keep things down but maintain the highlights. Also, I utilized the shadows control to nuance the tone of the image where it was visibly black but still feeling the environment. After those overall manipulations, I added windows to knock back areas of the frame we wanted to de-emphasize and to also bring out key details in faces or hands - adding shape to the frame and to ensure readability of the subtle expressions of Denzel. VFX I had worked closely with the VFX guys during VFX reviews and notes, and have done a few films with them so I had a very good relationship with the company. For a few sequences which were shot day-int blue screen for night interior, I had set FG/BG exposure ratios via alpha channels to then go back to VFX for the compositors as a grade reference for the sequences. Then, during finish, I had alpha channels in the event we needed to massage comps a bit for continuity or further garbage-matte isolation. I have a background in VFX, and so have a good understanding and respect for their work. That said, the last thing I want is to rely on alpha-channel grading to swing color around and potentially break excellent compositing. It’s best to communicate grade intent early on and use the alphas in finish for subtle polishing. I’d have to say the biggest technical challenge with this film was integrating the Phantom high-speed footage into the hero Alexa footage. The Phantom was used with great effect for super-slow motion shots of explosions and such. And so integrating the lower-dynamic range footage of the explosions into the other footage took a little tweaking. Douglas Delaney All images and clips copyright © 2016 United International Pictures
-
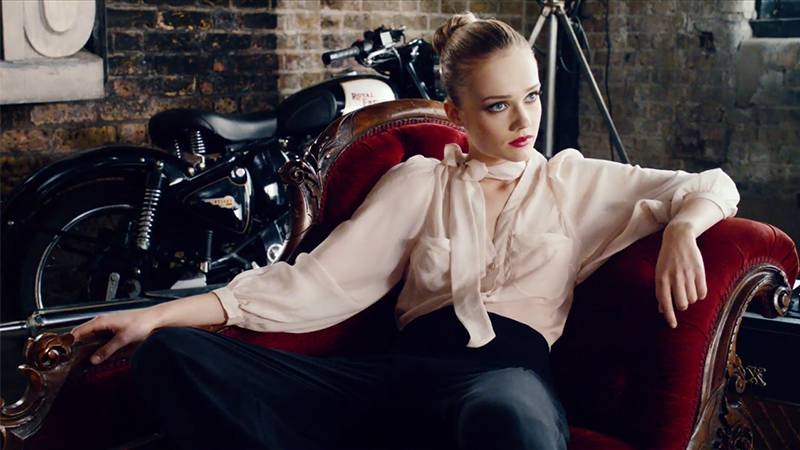 I was introduced to the spot after it had been edited together and the multiple instances of Florrie had been composited into the first scene. Christian Larson, the director, wanted to give it a bold look whilst still keeping clean skin tones and showing the clothing at its best. He also shot the stills campaign for HOSS and we used these as inspiration to base the look of the film on. The spot was shot on a Red camera with a few Canon shots and I was supplied an HD DPX sequence. Rich bold look in a clean way There are many ways to making a rich bold look, but I often like to add a lot of contrast into the midst and roll off the black and white points with a curve. If you want to make a rich bold look in a clean way you need to make sure you feed your grade with a cleanly exposed and balanced image. Anyone can slap some LUTs on and crush an image, but to do it in a clean way without compromising the quality of the image is a skill. After some initial balancing, I like to select a range of the various setups/shots across the spot and start to set the look mainly using primaries and some secondaries like luma keys. I then apply this throughout the spot and start watching through and adding to it. My approach is a bit like painting. I start with broad brush strokes (contrast, exposure, saturation, lift, gamma, gain) and then work into the image with finer strokes picking out more detail to create the look. Offsetting the tones I love adding shape and depth to an image by offsetting the tones. In this spot, Florrie is the focus so I cooled off the overall room whilst keeping warmth in Florrie. I isolated the chaiselong and gave it a rich red by bringing down the luminance and adding some saturation. Playing up key elements like this helped her to pop out of the background. In this shot, a very feathered vignette was used to bring Florrie up and let the side fall away ever so slightly. I also added a gradient on the right side to bring up the frame to match the feel of previous shots where you see the light spill from the windows. I added blue into the blacks and clipped them. I then used another key to lift the blacks back up, and I created a softer black with more weight without it being too harsh. I cooled the highlights off to give a cleaner white, with a touch of saturation pulled out, and some softening. I isolated the windows in some shots and added shapes to occlude Florrie. I also lifted the window light to give a bright backdrop to the room which added impact to the overall feel. I worked into the lipstick colors on the different instances of Florrie to really make them pop. Generally, when working with skin tones, it’s always "less is more" for me and using subtlety. Managing the color room For me, the artistic side of being a colorist is something people always discuss but one of the biggest aspects is working with the clients and managing the color room. Being able to understand and translate their thoughts and vision and apply it in the grade is an important skill to master. Luke Morrison All images and clips copyright © 2016 Black Dog UK
 -
The DP, Mike Bove reached out to me initially. We had collaborated on commercial work earlier and have been friends for years now and this was his first feature. He sent over a few scenes to see if I would be interested and I was on board right away, both intrigued by the visuals he’d captured but also the performances. Those familiar with the movie will remember the brief conversation between John and Danny when John pulls alongside Danny’s car. Simple shot reverse shot and the performances draw you in. I was hooked just from watching that scene. Two distinct looks Steven, the director really wanted this movie to be two different story lines that collide at the end, so we worked to create two complimentary looks that both worked within the same world. Each look was unique but didn’t feel disjointed and they have a shared softness. Mike provided some initial frames but we really built up these looks together over the course of a few ‘set looks’ sessions. Trying a few things and settling on the right amount of separation between the two looks. Chicago look The Chicago, rom-com story-line is cool and clean, really taking a nod from the urban environments and textures. I put some slight color in the low-low shadows, but true black for the most part stayed black. Anywhere that had blue tones I shifted toward cyan. A little bit of cyan in the darks helps to separate out brick, skin, dirt etc., and this is very obvious in these Chicago Office scenes. The Wisconsin look The Wisconsin, murder mystery, has a sandy and dusty, softer quality but is still contrasty, playing off the look of the surroundings. Cyan in the shadows is also present in this scene on the steering wheel and dashboard. Going a little cyan helps the frame from going too completely warm-washed which I wanted to avoid . In some of the Wisconsin shots, I keyed the skin tones and used the Resolve's mid-tone detail to help separate the actors from their environments and make them pop. Because of that, the actors were prone to get a little grungy with this look, a little smoothing of the skin in some close-ups also went a long way. Matching footage The movie was primarily shot on Alexa in 2K with Cook mini-S4 lenses, but they also used some Canon C300's for car mounts and smaller spaces. Typically, Alexa and C300 shots tend to play well together because their gamma curves are related, but many of the C300 shots were done on different days and with drastically different weather than the Alexa shots. The main challenge was to turn the gray, overcast days in Chicago that was shot on C300 into sunnier days to match the 1st Unit principal work that was shot on Alexa. These are examples of bright, sunny, and nice skies shot on Alexa. This next shot was a pick-up shot that was done on C300. I needed to correct the curve to match the Alexa but I also needed to create the appearance of a sunny day because it was shot on a cloudy day. It was a lot of work in bringing the low mids and the mids up substantially while keep the high mids and highlights at the same level so that everything opened up without just blowing out the background. It’s a fine line for this sort of thing but it worked really well. Contrast ratios are key Similarly, many of the car mount shots of the road were shot on different days with the C300 camera. It was important to bend the curves and put contrast and exposure in a place consistent with what it’s cut with regardless of when or how it was shot. Contrast ratios are key, and we can do a great deal in color with changing contrast and exposure but it’s still paramount that the DP gets their ratios relatively where they want them. We can compensate for specifics like eye lights and fill with windows and keys but the closer they are naturally, the exponentially faster it is to get it exactly where they want it. Log grading When the cameras were all matched, the shots were balanced, and the contrast was placed, I moved on to secondary manipulation and Log Grading for finesse mostly in the shadows. Log Grading in Resolve or Film Grading in Baselight has a finer curve of where lows/mids/highs are affecting so it allows us greater precision. Affecting lows in video or primaries will affect 0 IRE 100% and 100 IRE 0% so it’s affecting all the way from the darkest point of the image on up to the brightest and slowly feathering how much it’s affecting. By contrast, affecting lows in Log or Film Grade will affect 0 IRE 100% and roughly 50 IRE 0% so it feathers off much faster allowing for more precise control of the lows. By working in Log Grade for shadow finesse I can push subtle tones into the shadows and just the shadows without it spilling too far into the mids and up. I also put a good amount of work with keying and shaping the sky, particularly as the time of day plays an important role in moving the story along. I shaped the skies using vignettes and I burned down portions of the sky to draw the eye and created some more interesting patterns that weren’t so open and flat. Sharpening the grain layer I worked under a custom LUT based on a Fuji stock and added and overlaid a 400T Kodak Cinegrain stock. Actually, I sharpened the grain and not the image itself to dial in the texture I wanted. Sharpening the image sharpens everything whereas sharpening the grain, helped pronounce the grain a bit more without just making the grain larger. Alternatively, choosing a different grain stock resulted in a more or less “chunky” grain so this kept the grain structure while dialing in how noticeable it was. Tyler Roth
-
Ok, so this is not possible?
-
This works: Host: ftp.lowepost.com Port: 21 user: lowepoqw Pass: gY27cHgHv6-9

