Anton Meleshkevich
-
Posts
169 -
Joined
-
Last visited
Content Type
Profiles
Case studies - Free
Case studies - Premium
Resources
Insider
Courses
Forums
Store
Everything posted by Anton Meleshkevich
-
I mean, it's not just a soft roll-off curve like highlight wheel or soft clip slider. It actually uses qualifying with some percent of blur or something like that. I'm not trying to say anything bad about your technique. Just want to add some useful info about this tool.
-
As far as I know Highlights (HL) tool does highlights qualifying by itself.
-

A couple of quick how-to videos from me
Anton Meleshkevich replied to Anton Meleshkevich's topic in DaVinci Resolve
I've just recorded one more video and changed a title of the thread. This time about white balancing with a gray card (or whatever neutral) with a clear visual control of neutral colors. Hope, someone will find it useful. -
Just want to share a technique I like to use if I want to make more saturated colors darker without a qualifier. I recorded a short video showing it. This is not a 'look' tutorial. Just a technique. I'm sure many of you already use this in some way. But maybe someone will find it useful. I exaggerated the effect to make it more visible. Of course blending with the original is your friend.
-
Still no groups? I mean like grading groups in Resolve
-
Let's imagine I just finished color grading of feature film. I worked at calibrated 2.4 gamma 100 nit monitor in environment with around 5-10 nit environment lighting. Then I want to make a trailer for youtube. I've read a lot that I should to add a transform node after all the corrections and set input gamma 2.4 and output gamma 2.2. This will make an image darker to compensate gamma 2.2 screens of iPhones (they aren't sRGB gamma). So the image will look the same on monitors with different gamma. But why should I compensate it? Different screens gamma are different because of different environments they typically used in. So why should I compensate it? Same thing with cinema projection. They have 2.6 gamma because of dark environment. So why should I compensate it by transforming my image to gamma 2.6 and making it brighter? Won't it too bright for cinema theater? I thought, image should be the same. And different gamma of different screens will adopt my image to the environment. But if I transform gamma, this transformation cancels gamma of a screen. So it doesn't fit its environment anymore.
-
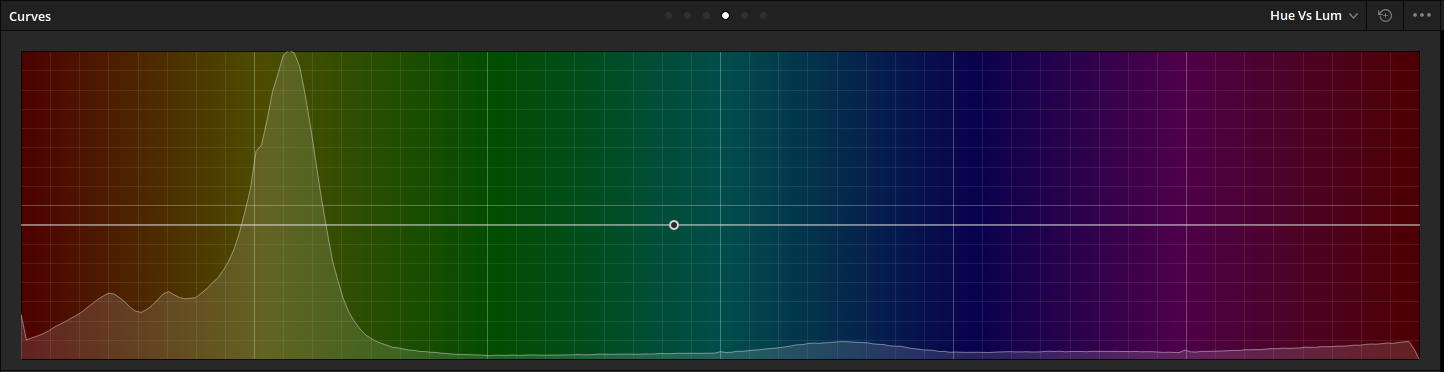
Saturation vs. Luminance
Anton Meleshkevich replied to Alex Winker's topic in Editing , Color grading & Finishing
I meant HUE vs LUM curve of course.
-
Saturation vs. Luminance
Anton Meleshkevich replied to Alex Winker's topic in Editing , Color grading & Finishing
@Alex Winker Another interesting thing you can try is to add just one point to HUE vs LUM curve and drag it down a little. So the whole curve (a straight line) just move down. This won't make what you mentioned but it has interesting effect about sat/luma things. It will make saturated pixels darker. I like how it looks on skin. 'Make awesome' magic button as for my eyes. But unfortunately increase noise. So it can't be applied every time. This time node color space shouldn't be HSL or HSV of course. No node color space and node gamma settings needed if your material is kind of gamma 2.4 and some rgb colorspace -
Saturation vs. Luminance
Anton Meleshkevich replied to Alex Winker's topic in Editing , Color grading & Finishing
I know That's why I wrote about setting Luma Mix to 0 in my post. I wrote about exactly the same thing you are talking -
Saturation vs. Luminance
Anton Meleshkevich replied to Alex Winker's topic in Editing , Color grading & Finishing
@Cary Knoop As I mentioned it Or you talking about something different? -
Saturation vs. Luminance
Anton Meleshkevich replied to Alex Winker's topic in Editing , Color grading & Finishing
@Alex Winker You can try to set node color space to HSL or to HSV. Then bypass channels 1 and 3 in that node and set Luma Mix to 0. Now you can adjust saturation using Custom Curve. Add default points to fix Custom Curve position in lower level (at lower saturation level since color space is HSL (HSV). And then set the curve to something like highlights soft roll-off. This will compress highly saturated colors, because custom curve now act like SAT vs SAT curve. Now you can switch HSL and HSV color spaces and see that one makes saturation compressed color brighter. while another makes it darker. I don't remember, which color space exactly you should to use, so try both. -
Resolve Gamma 2.4 vs Rec709 (Scene)
Anton Meleshkevich replied to Anton Meleshkevich's topic in DaVinci Resolve
Just want to add some useful info from wiki. -
Thank you! How to add a glow (like a backlight) to woman's face? She is standing against a light source (sky). So I'd like to add some inner glow.
-
Awesome lessons! I have a question How to fix the shadows? I'm talking about 21:02 timing in the lesson about masks. I understand, why is it happening, but is there any quick way to fix this? I mean, I want the shadows not to disappear when I make them soft.
-
From RED to Alexa color transform
Anton Meleshkevich replied to Tom Evans's topic in DaVinci Resolve
Seems like things, I described in this post earlier, were fixed for almost all R3D footage with color charts, I have access to. May be something was fixed in debayering. I don't know. Anyway, I decided to edit this post and erase, what I was writing here, as it makes no sense at this moment. -
Real contrast of your monitor
Anton Meleshkevich replied to Anton Meleshkevich's topic in Editing , Color grading & Finishing
My fault. I mentioned ANSI contrast to exclude measurements of many TV panels where is impossible to turn off auto dimming even in service menu. ON OFF contrast can be about 3000:1 there because of auto dimming full screen black patch. I was talking about usual contact probes. So neighbor white squares can't affect that much to black squares as it happens with non-contact colourimeters. So I meant just a usual contrast ratio measurement. Saying about ANSI was just to make sure, we are not talking about auto dimming. -
I think, you should try to grade some real project. When you have to grade over 100 shots in a day, your color grading approach changes a lot. When you learn color grading at one shot, you have time to create a lot of masks, roto, finetune everything. But when you can't spend more then a minute on a shot, you start to look at the whole image balance and how is it interacting with neighbor shots. So, you just choose a couple of shots of a scene. Fix their WB and exposure problems. Then create a look at this scene's group using these shots. And then just go through all the shots, quickly adjusting their WB and exposure. And when you did it to all the scenes and shots, if you still have enough time, you can spend it on masks, fine tuning, tracking, etc. Also full screen and color grading panel changes a lot of things too. Of course this is just a one way of grading approach, and may be too obvious for you, but hope someone will find this useful.
-
Are everybody ok with grading using a monitor with 700-800:1 ANSI contrast? This is pretty usual contrast ratio (when set to 100 nit) on so called grading monitors like NEC, BenQ, etc. I mean, for grading you should have at least 2000:1 ratio. Black at 0,05 nit or lower. But I found, for some reason I'm more accurate in blacks when I work at monitors with 700-800 contrast ratio compared to 1150-1350:1. I know about angles, ips, OLED, environment lighting standards, etc. Just curious what you think about working with not 2000:1 ANSI contrast ratio displays. I'm talking about measured data. Not about data taken from specs of course.
-
Survey for Colourists - Dissertation Help
Anton Meleshkevich replied to Caitlin Garvey's topic in General Discussions
I think, there are only two ways for this. I mean, how to skip hiring a colorist. 1. All shooting on planet is in log. Everything is standardized. NLE apps work in linear gamma and some LMS colorspace, for example, the same as each particular camera do. NLE shares just basic controls like Temp, Tint, Exposure, Saturation, Contrast, Highlights Roll-off, etc. Everything is in linear gamma and LMS colorspace, so it's close to RAW settings. An editor just needs to apply some look LUT and then quickly adjust exposure and WB of all clips before the LUT or look preset. Since everything works mathematically correct, it's harder to ruin the footage colors. And no, Lumetri Color not even close to this. Placing Tint and Temp controls AFTER the 'log-to-rec + highlights roll-off LUTs' section - can someone to find a worse order of operations? 2. Neural Networks. ''Select all squares with street signs with cinematic film look. If there are none, click skip.'' 😃 But both options would be the best. AI decides how to adjust those basic parameters, I've mentioned above. A human colorist is still needed to create look presets for the AI. -
Technical correct LUT
Anton Meleshkevich replied to Thomas Singh's topic in Editing , Color grading & Finishing
It is close to impossible to replicate film LUTs' nonlinear transforms in Resolve. For example, more saturated blue becomes darker cyan. While less saturated blue becomes lighter magenta. Also brighter saturated colors become less saturated but brighter colors. Low saturated red becomes low saturated orange (closer to skintone), but only if it was brighter than 15 % luminance. More saturated darker reds become magenta. These are just completely random examples. This isn't what film LUTs do. This can be done in 3D LUT Creator using AB and CL grids or similar instruments. I mean nonlinear transforms. Not precise film emulation (those LUTs are created from real world film process measurements data) In resolve you can use node colorspaces and rgb mixer. I prefer AB grid or other tools of third party software for that. But often you don't need true film emulation. You can create a 'film look' using just Resolve controls. And it will be much more forgiving compared to film emulation LUTs. I mean, noise or similar problems with your footage. -
Resolve Gamma 2.4 vs Rec709 (Scene)
Anton Meleshkevich replied to Anton Meleshkevich's topic in DaVinci Resolve
I know that 2.4 monitor gamma for dark environment broadcast, 2.2 for lighter room, etc. I know what bt 1886 is. My question is about WHY default resolve colorspace gamma is 2.4, while all rec709 LUTs have 1.90 gamma. Which is darker than 2.4 and 2.2. And this is not strange, because this isn't monitor gamma (which would be brighter) but colorspace gamma. So it is darker. Resolve has rec709 (Scene) gamma in RCM settings. Which is similar to, for example, ARRI rec709 LUT or all BMD rec709 LUTs. As far as I know these LUTs are 1.90. Not 2.2 or 2.4. And of course not bt1886 which is only for screens. It's gamma depends from black level. It's 2.4 only if black level of a screen is 0.00000000 nits. Otherwise it has lower (brighter) gamma in shadows. -
Talking about levels, you definitely should make some tests. For example when I rendered out MXF OP1A DNxHR 12 bit and VIDEO levels from Resolve, Premiere Pro incorrectly interpreted this so I got washed out picture. When I did the same thing but 10 bit and again set levels to VIDEO, Premiere Pro now interpreted levels correctly.
-
I guess, density is a printer lights (offset) control applied to log footage. Not a mathematically correct way to change an exposure. But still close to be similar to changing exposure in RAW settings. While more correct way is to adjust gain in linear gamma (I mean really 'linear', not 'video', which sometimes incorrectly called 'linear' also), but the offset control is the way many colorists prefer for historical reasons.
-
Release of DaVinci Resolve 15.2.1
Anton Meleshkevich replied to Peter Chamberlain's topic in Announcements
Awesome! -
Still didn't finished any project in ACES. It looks noisy. Dark saturated colors get clipped. And I would also like to know if it is only Resolve thing.