Anton Meleshkevich
-
Posts
169 -
Joined
-
Last visited
Content Type
Profiles
Case studies - Free
Case studies - Premium
Resources
Insider
Courses
Forums
Store
Everything posted by Anton Meleshkevich
-

Color space transform vs Conversation LUT
Anton Meleshkevich replied to Shylesh Kumar's topic in DaVinci Resolve
3D LUT often contains not a precise math for color space transform but more artistic changes like s-curve, highlights compression and soft clipping, saturation remapping and sometimes more. And usually it clips highlights above 100 IRE (actually not IRE of course, I mean above 1024 on Resolve waveform monitor). But color space transform ofx also can do some of these things. I prefer to use color space transform for from log to another log conversions. And I often use new arri log to rec709 LUT from their website for from log to rec709 conversions. But I use color space transform with luminance and saturation (sometimes) mapping as well. It all depends on footage and desired look.- 2 replies
-
- 2
-

-
- colorist
- colorspace
- (and 1 more)
-
Skintone adjustments separately from the look
Anton Meleshkevich replied to Alexander Volkov's topic in DaVinci Resolve
Same thing. Toning curves + print film LUT. I never select skintone using qualifier in Resolve for that kind of purpose. I either use resolve or light illusion or my own LUTs, or just create a LUT for the project in 3D LUT Creator. Usually it's just a "make blue to be more cyan, make yellow to be more orange, make these saturated colors darker" and so on. Rarely I use skin selection in 3D LUT Creator. Usually it's just a AB-grid instead or a color matrix. And then, if I need to get a cold day, I just set WB or color balance of the clip cooler. Before the LUT of course. This skin separation, you're talking about, goes from a more simple color palette you get by using a look LUT. If you really want to get more saturated skin, while keeping background cold, make the whole image cooler, then just increase saturation. As a bonus (or as an unpleasant effect) you'll get two things: more color variations in the skintone and more saturated cold colors. Separation goes from pushing colors away from each other using new (cold) white point, you've set by making the shot cooler, as a pivot. But you also get more color variations. This can be fixed by hue-vs-hue, rgb-mixer, whatever. Hardest thing here is to not make it look weird. Even subtle changes can ruin everything. So you have to be careful. What you see in hollywood movies is a good lighting, precise work with contrast using lights. Reflectors, negative fills. When it is a good shot, you can just add some blue to the shadows, shift blue to teal a little bit using hue curves and hit render. That's not the answer you want to get at post production forum, but shit in - shit out unfortunately. -
Skintone adjustments separately from the look
Anton Meleshkevich replied to Alexander Volkov's topic in DaVinci Resolve
Usually color separation is made on set by location design or by cold lighting for a background and warm lighting for an actor. Then it's just slightly increased by print film LUTs or a color matrix (RGB mixer for example), and RGB toning curves at master level before the LUT or individually for each shot (CDL or shadows/highlights or whatever). Trying to separate skin from a beige wall usually isn't a good idea. -
My favorite 'Steve Shaw VS sRGB' thread here also now! Final argument for me, that sRGB displays should have (and as I've noticed they have) just pure gamma, was "sRGB was created to display images on CRT pure gamma ~2.2". Many thanks to Steve Shaw! Not sure what your signal path was, but keep in mind that ACEScc(t) is not linear. It has log gamma curve. If I understand you right, you want to add pure gamma adjustment AFTER ODT, but since the only place where you can do that is before ODT. So you should go from timeline ACEScc(t) gamma to pure gamma, then do you gamma transform, then go back from pure gamma to ACEScc(t). Also it's better to manually set all the gamma settings instead of just leaving it 'use timeline', because resolve ignores timeline colorspace when color science set to ACES and make all the transformations like if timeline color space is rec709 gamma 2.4. It's a bug. I tired to report it with no luck. Well, actually this bug only appears when you use node colorspace settings. As far as I remember, it works as it should with plugins set to 'use timeline'. But ACES still have a lot of bugs in Resolve. So it's more safe to manually set colorspace settings in plugins when using ACES. And I've just noticed how old the thread is 🙂 I've started learning 3d (blender) just a couple of months ago. Just as a hobby. Always wanted to make robots with lots of pistons. But what I've already done - I edited OCIO config file to make it possible to select rec709 as a preview colorspace instead of sRGB. Of course now I have to do the same for matte painting textures input colorspace. This may be wrong. But this lets me get more predictable shadows, when I export animation in linear gamma EXR, then transform it to LogC and add Alexa LUT or to Cineon and add 2383 LUT. As a colorist, when I instruct VFX guys how to use preview LUTs the get from me, I always recommend them to switch preview gamma in nuke from sRGB to Rec709. So, the path (for nuke) is: compositing in linear => from linear to some log, logC for example. This is done in the same node where the lut loaded in => preview lut from me => transform from rec709 to linear. This is also done in the same node where the lut loaded in => transform from linear to rec709 for preview (using rec709 setting above the preview window). Again, I'm not talking this is a correct way. But this is how I work. If something wrong with this workflow, I hope, more experienced colorists will correct me here.
-
Skin separation in color and deblobing.
Anton Meleshkevich replied to Margus Voll's topic in Baselight
I know, you don't want to use qualifier, but this can be done one time and saved as a preset for later use. Select perfect skintone color (skintone line color for example) using only HUE in qualifier. Then make the selection soft (I mean, soft selection depending on hue, not blurring). Then change color balance (using wheels or whatever RGBcurves-like) to make selection extremely orange (actually lying on skintone line). Then decrease saturation to match saturation of the original. Now you killed hue variations in the selected hue range. Skin looks plastic now. Then change Key Output Gain to 0. Now you can decrease hue variations in the selected range by slightly adding Key Output Gain. Just saw, you're not on Resolve -
You should work in linear gamma for compositing. In Resolve in camera raw tab of r3d files set color science to IPP2, gamma curve to REDlog3G10, color space to REDWideGamutRGB. Then export dpx sequence / prores / dnxhr. Then, in compositing app, you should to transform these files from REDlog3G10 to Linear gamma. Then you do your compositing, looking at it through 'linear gamma to redlog3g10 transform + IPP2 LUT + rec709 gamma to linear gamma transform'*. When you finished, turn off transformations and a LUT, you've used for preview, add linear gamma to redlog3g10 transform and export it back to resolve. Don't forget to do all the necessary transforms for any additional footage. For example , if you import srgb image, you should transform it from rec709 gamma (if you choose srgb gamma instead, you often get darker shadows) to linear gamma AND from srgb primaries to redwidegamutRGB primaries. *Not sure how it works in AE. But it works this way in nuke. Compositing app adds automatic transform from linear gamma to rec709 gamma (usually to srgb, but never use srgb gamma for video at all). So we need to transform our rec709-ish image after the LUT from rec709 gamma to linear, to compensate this.
-
Less CPU / storage bandwidth intensive and no need to switch between color and edit rooms for transition timing adjustments. Also it can be useful to keep the same edit list from begining to finish for edit or vfx roundtrips. Actually I'm talking about long clips with exposure / color balance changes. If I would have to grade 15 min one-take film, I'd definitely use crossfades as well as keyframes.
-
Scene Referred or Display Referred Grading?
Anton Meleshkevich replied to Virgil Edward's topic in DaVinci Resolve
When (or 'if') blackmagic finally fix a bug with node colorspace and node gamma in ACES, this will be possible to do just using one node and node colorspace/gamma settings. -
I prefer to use keyframes instead of crossfades.
-
Cache location change does not save or remembered.
Anton Meleshkevich replied to Margus Voll's topic in DaVinci Resolve
I have the same thing. Resolve 16.1 -
LG OLED for reference monitor
Anton Meleshkevich replied to Chinmoy Roy Tutul's topic in Monitors/Projectors
Isn't infinite contrast of OLED (compared to 700-1200:1 for ips) better than more uniform panel? I'm not saying it is, I just want to understand, why uniform ips with low contrast ratio is better than not so uniform OLED with infinite contrast. -
gamut compression in Resolve
Anton Meleshkevich replied to Anne-Sophie Queneuille's topic in DaVinci Resolve
In addition to Marc advice you can also slightly desaturate highlights. Or apply gamut mapping only to highlights using qualifier.- 6 replies
-
- 1
-

-
- gamut
- compression
- (and 2 more)
-
I found changing viewing position helps a lot. For example sit on client sofa, turn off interface and grading monitors and watch from there, playing your program on the client TV.
-
Create a camera LUT inside DaVinci Resolve
Anton Meleshkevich replied to Tom Evans's topic in DaVinci Resolve
Usually you create a LUT for a monitor, not for a camera. LUT should be a 'log-to-video + grade' size17 LUT. Basically you don't want to bake any cdl to a LUT, but your DP may want you to do that. So you probably should tell your DP to adjust temperature AND TINT in a creative way instead of just set and forget 5600 for daylight and 3200 for tungsten. Or you will have to bake cdl-like corrections (or more accurate color balance in linear gamma) to LUTs for each scene to make LUTs work properly (especially extreme teal-orange LUTs). Of course you can create cdl on-set. But I like to avoid this as much as possible. Just my personal preference. Also test your LUT with all kinds of neon lighting. -
Need advice for new color suite setup.
Anton Meleshkevich replied to Sergey Macarescu's topic in Mac/PC
As far as I know, RED debayering goes only on CPU. But my knowledge can be outdated. -
Changing timeline color space has no influence on how tools work until you change node color space (or gamma). So node color space and gamma will be converted from timeline color space to selected, then all the tools of the selected node, then back from selected node color space to timeline color space. I use this all the time. Go from log(C) to node linear for exposure, go to node rec709 gamma for saturation, go to node color space HSV for different saturation and so on. When you add saturation in linear gamma, you get colors darker. When you add saturation in log gamma, you get colors brighter. When you change RGB gain in linear gamma, you can change exposure in a natural way. As well as color balance (not as natural as in some kind of LMS color space though). Don't forget to set lum mix to 0.
-
Are blacks crushed in source footage? If they are, you can try to add a little bit of lifting blacks. Maybe blacks softclip slider. Just to match black level to other shots. Or just leave it as is. Also you can try to slightly desaturate or softclip highlights to fix this strange color on his nose and fingers
-
Masterclass/training for color grading recommendations?
Anton Meleshkevich replied to Clay Adams's topic in DaVinci Resolve
Thank you for your answer and for the link, Marc! Going to listen it tomorrow while rotoscoping direct sun light on trees to get rid of it and match shots time of the day I never listen to music while grading. Either original sound of a project or some podcasts. -
Masterclass/training for color grading recommendations?
Anton Meleshkevich replied to Clay Adams's topic in DaVinci Resolve
@Marc Wielage Actually I'd really like to know how deep you (or other colorists) go into problem solving with total rotoscoping and relighting. I may be wrong, but I always thought more experienced colorists do less. For example I can't get a great look only using wheels (actually I doubt I can get it at all). But more talented guys can. I think this is also because of different quality level of footage. I mean clients, who just start to shoot films, can't afford to color grade at CO3. But they can afford to hire me. So A list colorists work mainly with A list cinematograghers. But if I'm wrong, please tell me -
Masterclass/training for color grading recommendations?
Anton Meleshkevich replied to Clay Adams's topic in DaVinci Resolve
@Marc Wielage I meant exactly the same. There are no secret LUTs. Just great colorists working with great footage. -
Masterclass/training for color grading recommendations?
Anton Meleshkevich replied to Clay Adams's topic in DaVinci Resolve
I agree with @Nico Wieseneder . The most useful information about color grading I've ever seen is here: https://lowepost.com/color-grading/case-studies/ But before reading all these awesome articles you should read about printer lights and all other basic color grading things. As well as reading all posts on color grading forums from colorists like @Walter Volpatto, @Tom Poole @Marc Wielage and many many others. This LUT is called "Great DP and art direction" 😎 -
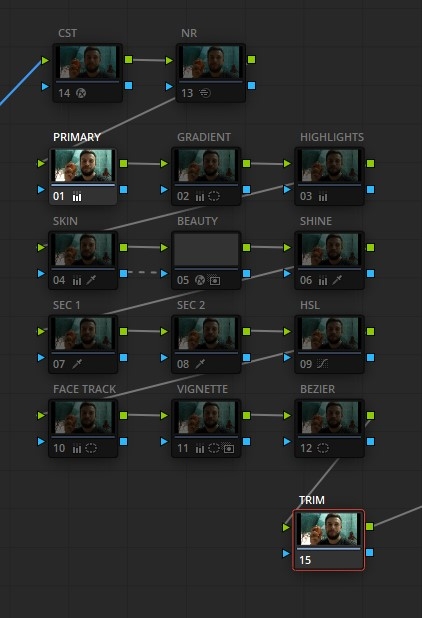
Here is one of my node trees. This one is for documentary films shot in rec709.

-
Pre / Post Clip Noise Reduction
Anton Meleshkevich replied to Jaemie Manners's topic in DaVinci Resolve
I prefer NR in a clip node. -
Also it's probably a good idea to speak English at English speaking forum 😉
-
Hi! AWG is ALEXA Wide Gamut. I either work using the LUT or just use HSL curves to emulate 2383 colors. Especially when I create LUTs for another colorists who's pipeline is often based on ACES in Baselight. To change brightness of high saturated colors I use this technique (video related) It works differently compared to 2383 LUT. But if it looks good who cares. Last time I created LUTs for TV series I've used RGB mixer to emulate 2383 colors. I understand that I don't get nonlinear color shifts this LUT have, but simple RGB matrix work way better in terms of noise and artifacts. I'm a big fan of RGB mixer (or matrix) as a tool for creating looks. And I actually just replicate this greenery shift in portions I need. I don't fight with it.
- 29 replies
-
- 1
-
-
- 2383
- kodak vision
- (and 2 more)