

Craig Harris
-
Posts
39 -
Joined
-
Last visited
Content Type
Profiles
Case studies - Free
Case studies - Premium
Resources
Insider
Courses
Forums
Store
Posts posted by Craig Harris
-
-
I’m looking for a NAS storage solution for a small company consisting of an editor, colour assistant, and colourist.
Has anyone worked with a Synology unit like the Disk Station 3617? It claims 3500 Mbps read and 2500Mbps write when using 10Gig E.
Any recommendations appreciated.
-
12 hours ago, Az Kola said:
Hi All
I am trying to decide what to get for my Workstation HP Z840, specifically to work with 4K VFX/GFX on Fusion Page.
I have been advised that RTX3080 is not compatible with HP Z840 PC and that I should instead use Quadro RTX 5000
Is GTX2080 compatible with HP Z840 and better use then RTX 5000
Appreciate any advice and thanks in advance
Az
Hi, Az.
I’ve been specking out a system with a company called Z Workstations. Send a message to them and Jonathan should be able to answer your question.
-
1 hour ago, Cristian Baitg said:
Thank you very much!!! . I would like to remove the little spots inside the bokeh lights (not the bokeh lights) but the principle you applied in your example is very interesting. What is the "timespeed to 0" achieving? I can paint one group of spots inside one bokeh light track it and it is ok.
But I have two big doubts:
1- If I do a general track (as the movement direction is all the same for the bokeh lights) would it apply to all the bokeh lights?
2- The lights move behind the lamp (or the ones inside the lamp) At the point they encounter the light the clone does not work anymore as they clone part of the light and everything is a mess. How would you do it. The only way I could imagine would be keyframe when it is about to touch the lamp to for example size to 0 or opacity to 0 and once it passes the lamp again put the initial value (opacity to 100 again). This still leaves me with the problem that I cannot make it work for all the lights as if I put opacity to 0 at that particular point all the other cloning will disappear (also for the lights that don't touch the lamp).
So I could make a general track for all the lights that dont get occluded and then a single one for every light that gets occluded? That seems the only way that comes to my mind. But I think there must a more simple way to achieve it or....... may be not .... Ohhh man VFX is so complicated 😄
In any case thank you very much for your help. I will try to see if I can learn on a tutorial what that timespeed function is used for.
Cheers.
1. It might. You'd want to use a planar tracker to track the plane that the bokeh is on. If that doesn't work you may have to do it manually. With that being said, it might be best to reach out to a VFX artist that you could hire to do the shot or teach you.
2. Trial and error. You'll have to see what works and if this method doesn't, then look for another approach.
A note on the TimeSpeed. It allows you to create a freeze frame (set to 0) which is similar to how Mocha creates and uses plates.
Hope that helps.
-
 1
1
-
-
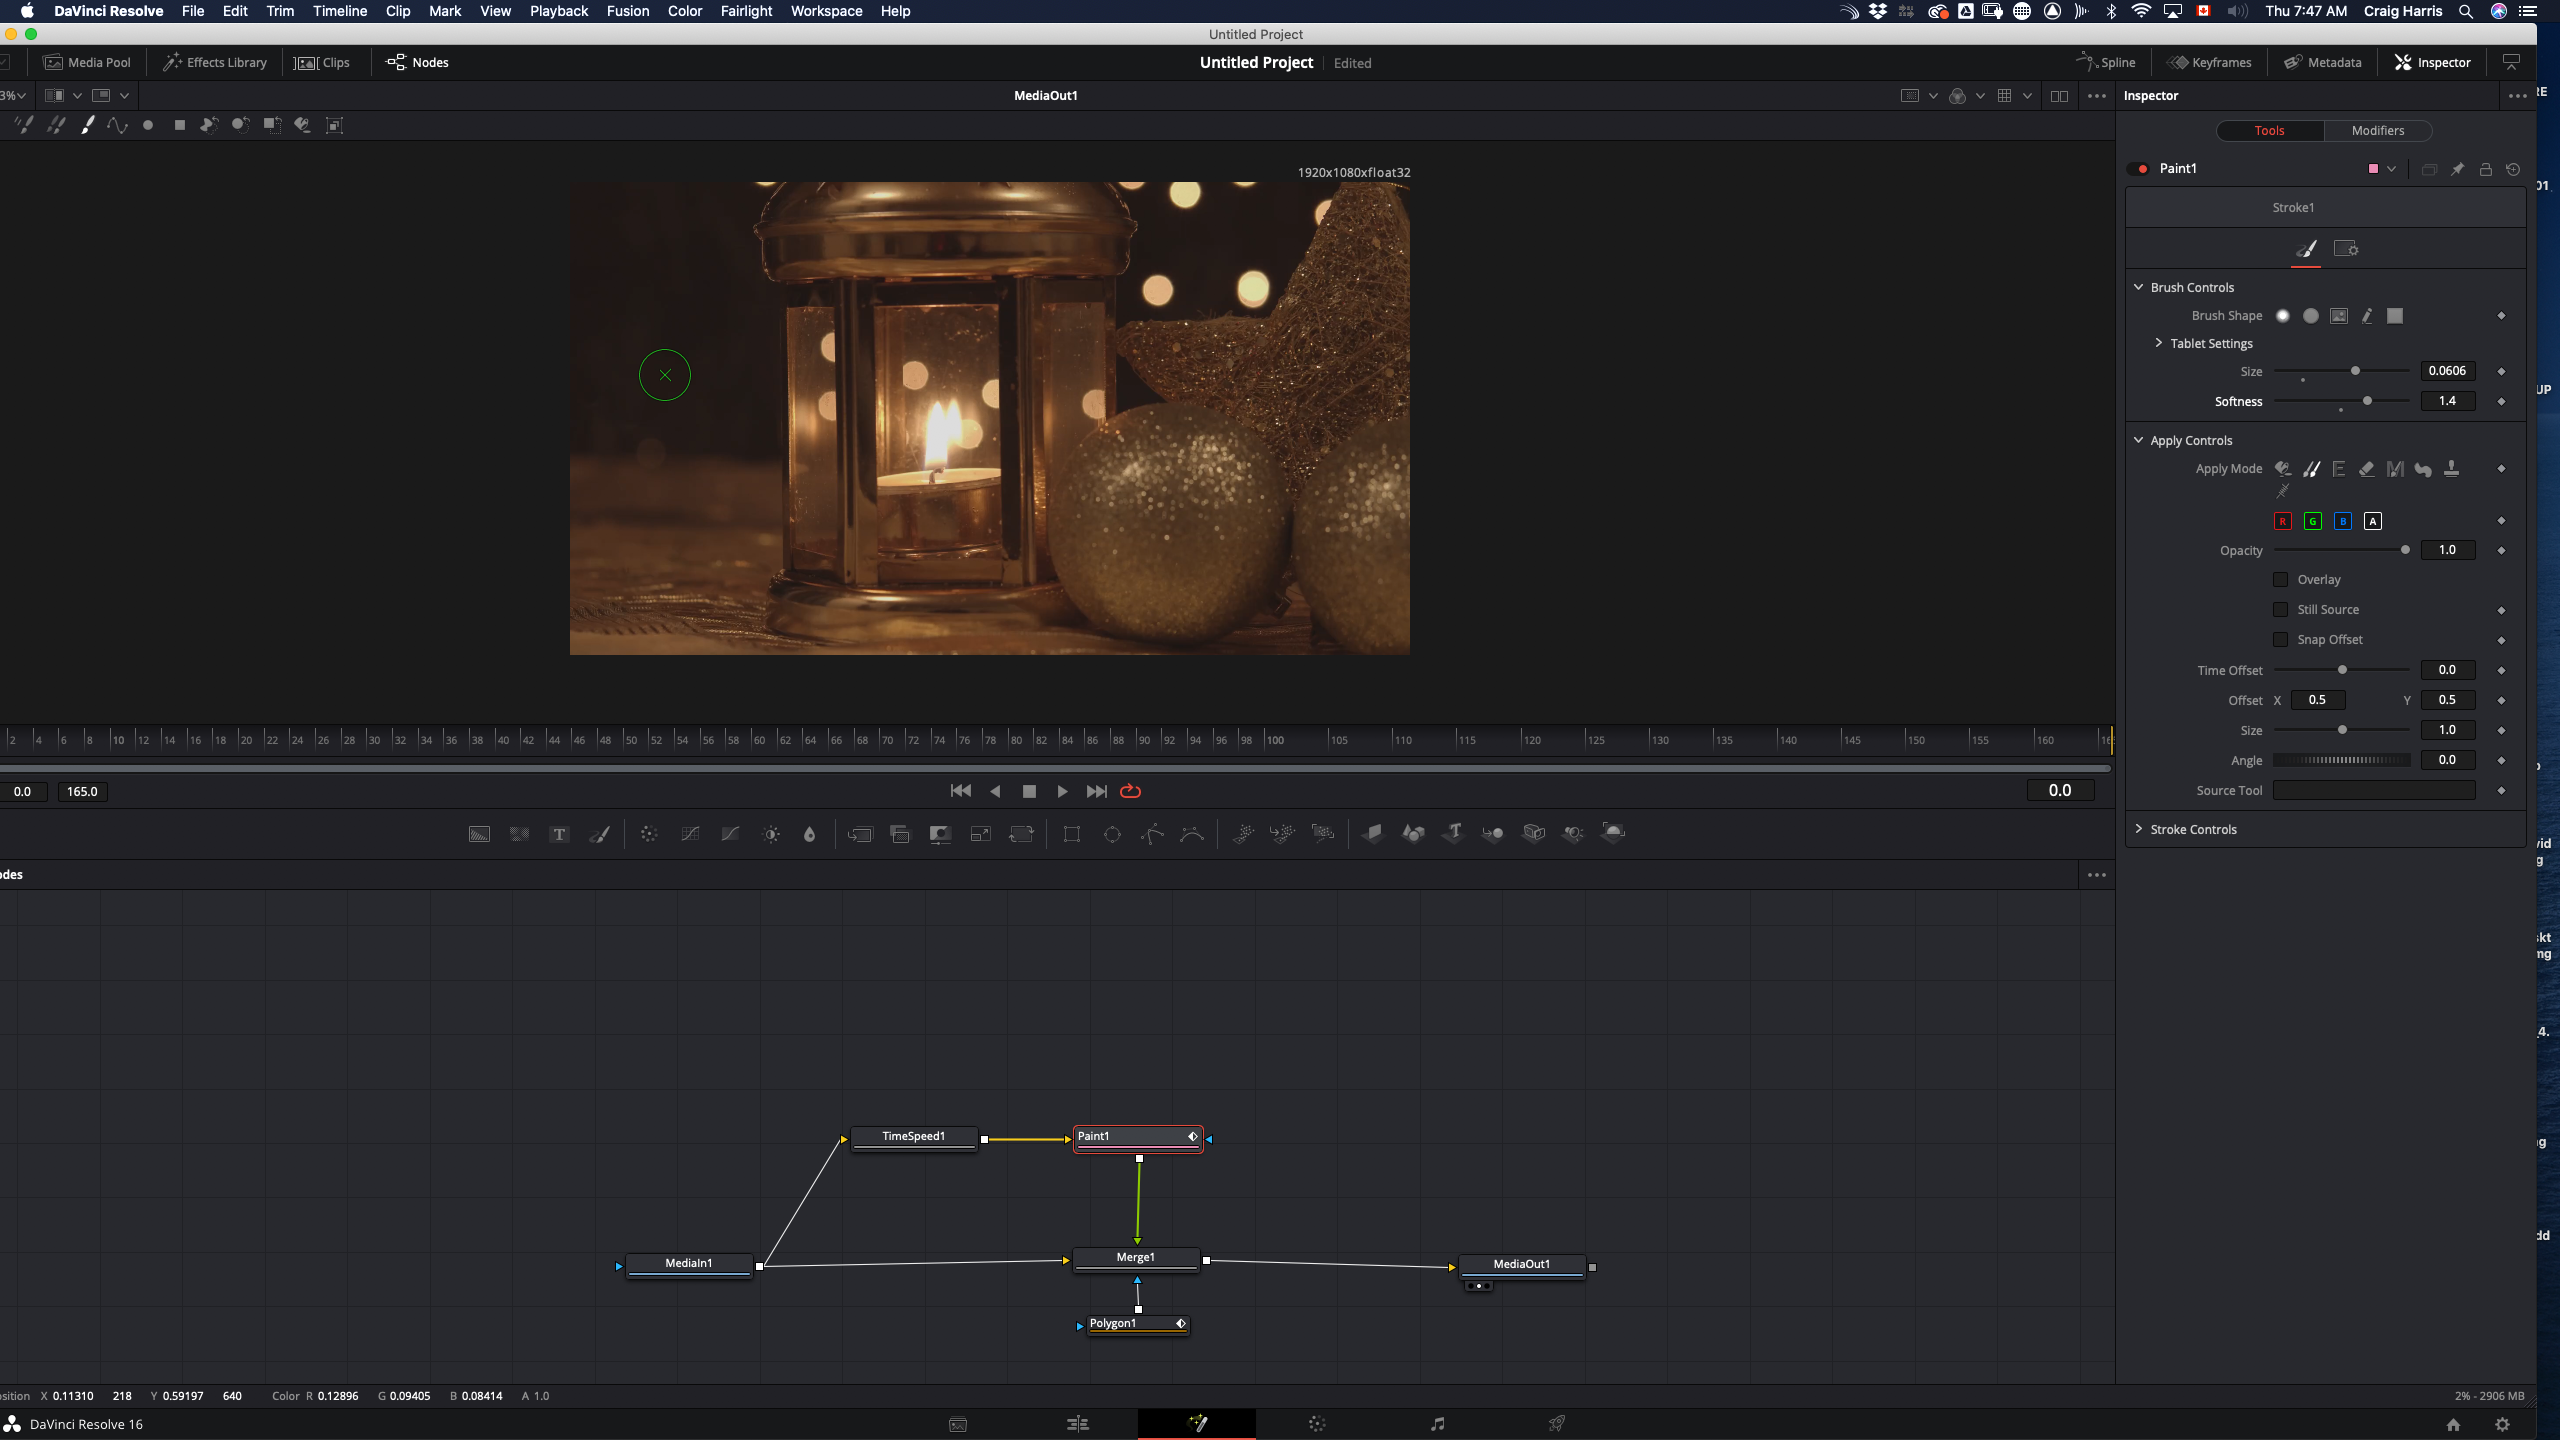
Hey, Cristian.
This was a really quick result of your shot using Fusion with a TimeSpeed node combined with the Paint Clone tool. For this example I created an animate polygon mask around the left side of the screen where I applied the TimeSpeed to "0" and then painted out some of the bokeh with the PaintClone tool. Once you get familiar with some of the approaches like this it's actually very fast.
The same technique would apply to the spots on the glass or any other part of the image you want to remove. Members on this forum probably have other ways they would approach this kind of work, too. This is just one way that I find works for some of my projects.

-
1
-
-
Marc’s list summed it up for me.
I am curious if there will be a new panel in the works to handle the added functions of the new zone based controls or it the existing panels will be able to handle that.
-
I'm grading a feature shot with the Canon C300 that used Canon Cinema Gamut/Log2. For my workflow I'm using DaVinci Color Managed with a Rec709 timeline, Canon Cinema Gamut/Log2 input color space, and no LUTs. For the most part it's fairly straight forward but there are several shots with a large dynamic range and I'm having an issue handling the highlights. To bring the highlights into legal range I'm using a mix of controls (gain, high soft, log), but by the time the highlights are in range I end up pushing the rest of the image to a range that I'm not happy with. Also, the brighter regions are really blue/magenta which is not pleasant.
Wondering if anyone has experience working with Canon Log footage and could provide any insight.
-
That’s great!
-
Alter Ego post in Toronto pairs their Baselight systems with calibrated LG OLED monitors. You can't use an LG consumer models for HDR mastering but they are a really great option for grading.
-
1
-
 1
1
-
-
I know there are some colorists who use Baselight Editions to grade entire projects within the AVID. One of the drawbacks though is that AVID prevents the plugin from playing back footage with the plugin window open. Other than that I believe all of the same tools are there.
Craig
-
I'm looking for a used and well-taken-care-of Tangent Element panel. Is anyone selling?
-
2
-
-
Well, Fusion crashed which isn't surprising but now I can't reopen my project.
The project opens on the Fusion page and I get the spinning wheel of death... forever. Does anyone have any insight or suggestions as to how I can get around that?
Craig
-
On 4/8/2017 at 7:31 PM, Abby Bader said:
Tonal skin rendering is controlled by how we blend the three channels, so you should treat them seperately if you want fine control. The blue channel represents detail, and red tends to have smoother tones than green. You can use this insight to adjust the values to your liking. You could also blur different channels.
Hey, Abby. Could you explain how you do this?
-
12 hours ago, dermot.shane said:
ACES + trim pass here
Hey, Dermot.
Can you explain?
-
Getting an accurate calibration on an HP Dreamcolor is pretty much impossible. I've never seen two Dreamcolors next to each other that match. Better off getting an Eizo or FSI.
-
1 hour ago, RAMI ABOU FAKHER said:
yes in the fusion node there is 3 dots so the 3rd one in the right is for the output, or you can press 3 in the keyboard.
Thank you!
-
1
-
-
Is it possible to monitor the output from Fusion via SDI?
-
2 hours ago, Emily Haine said:
One of the old great Panasonic Plasma's or a new pro line?
One of the old greats and it's still looking awesome. I wish they still made them.
-
1
-
-
Early days in my new room but loving it. Running an FSI for my monitor and rocking a Panasonic Pro Plasma for clients.
-
On 8/2/2018 at 3:58 PM, Alex Winker said:
The client can create .r3d trims out of Red Cine X that will accomplish exactly what you need. As for the workflow necessary on their end, I'm not quite sure what would be best, possibly some type of xml / edl out of premiere to red cine x to collect the media to deliver to you.
I've used this workflow for most of my projects.
You take an EDL or XML into RedCineX, set your export to R3D Trim, set your handle lengths, and the export. It creates trimmed R3D files that you can easily manage and import into your grading app of choice.
-
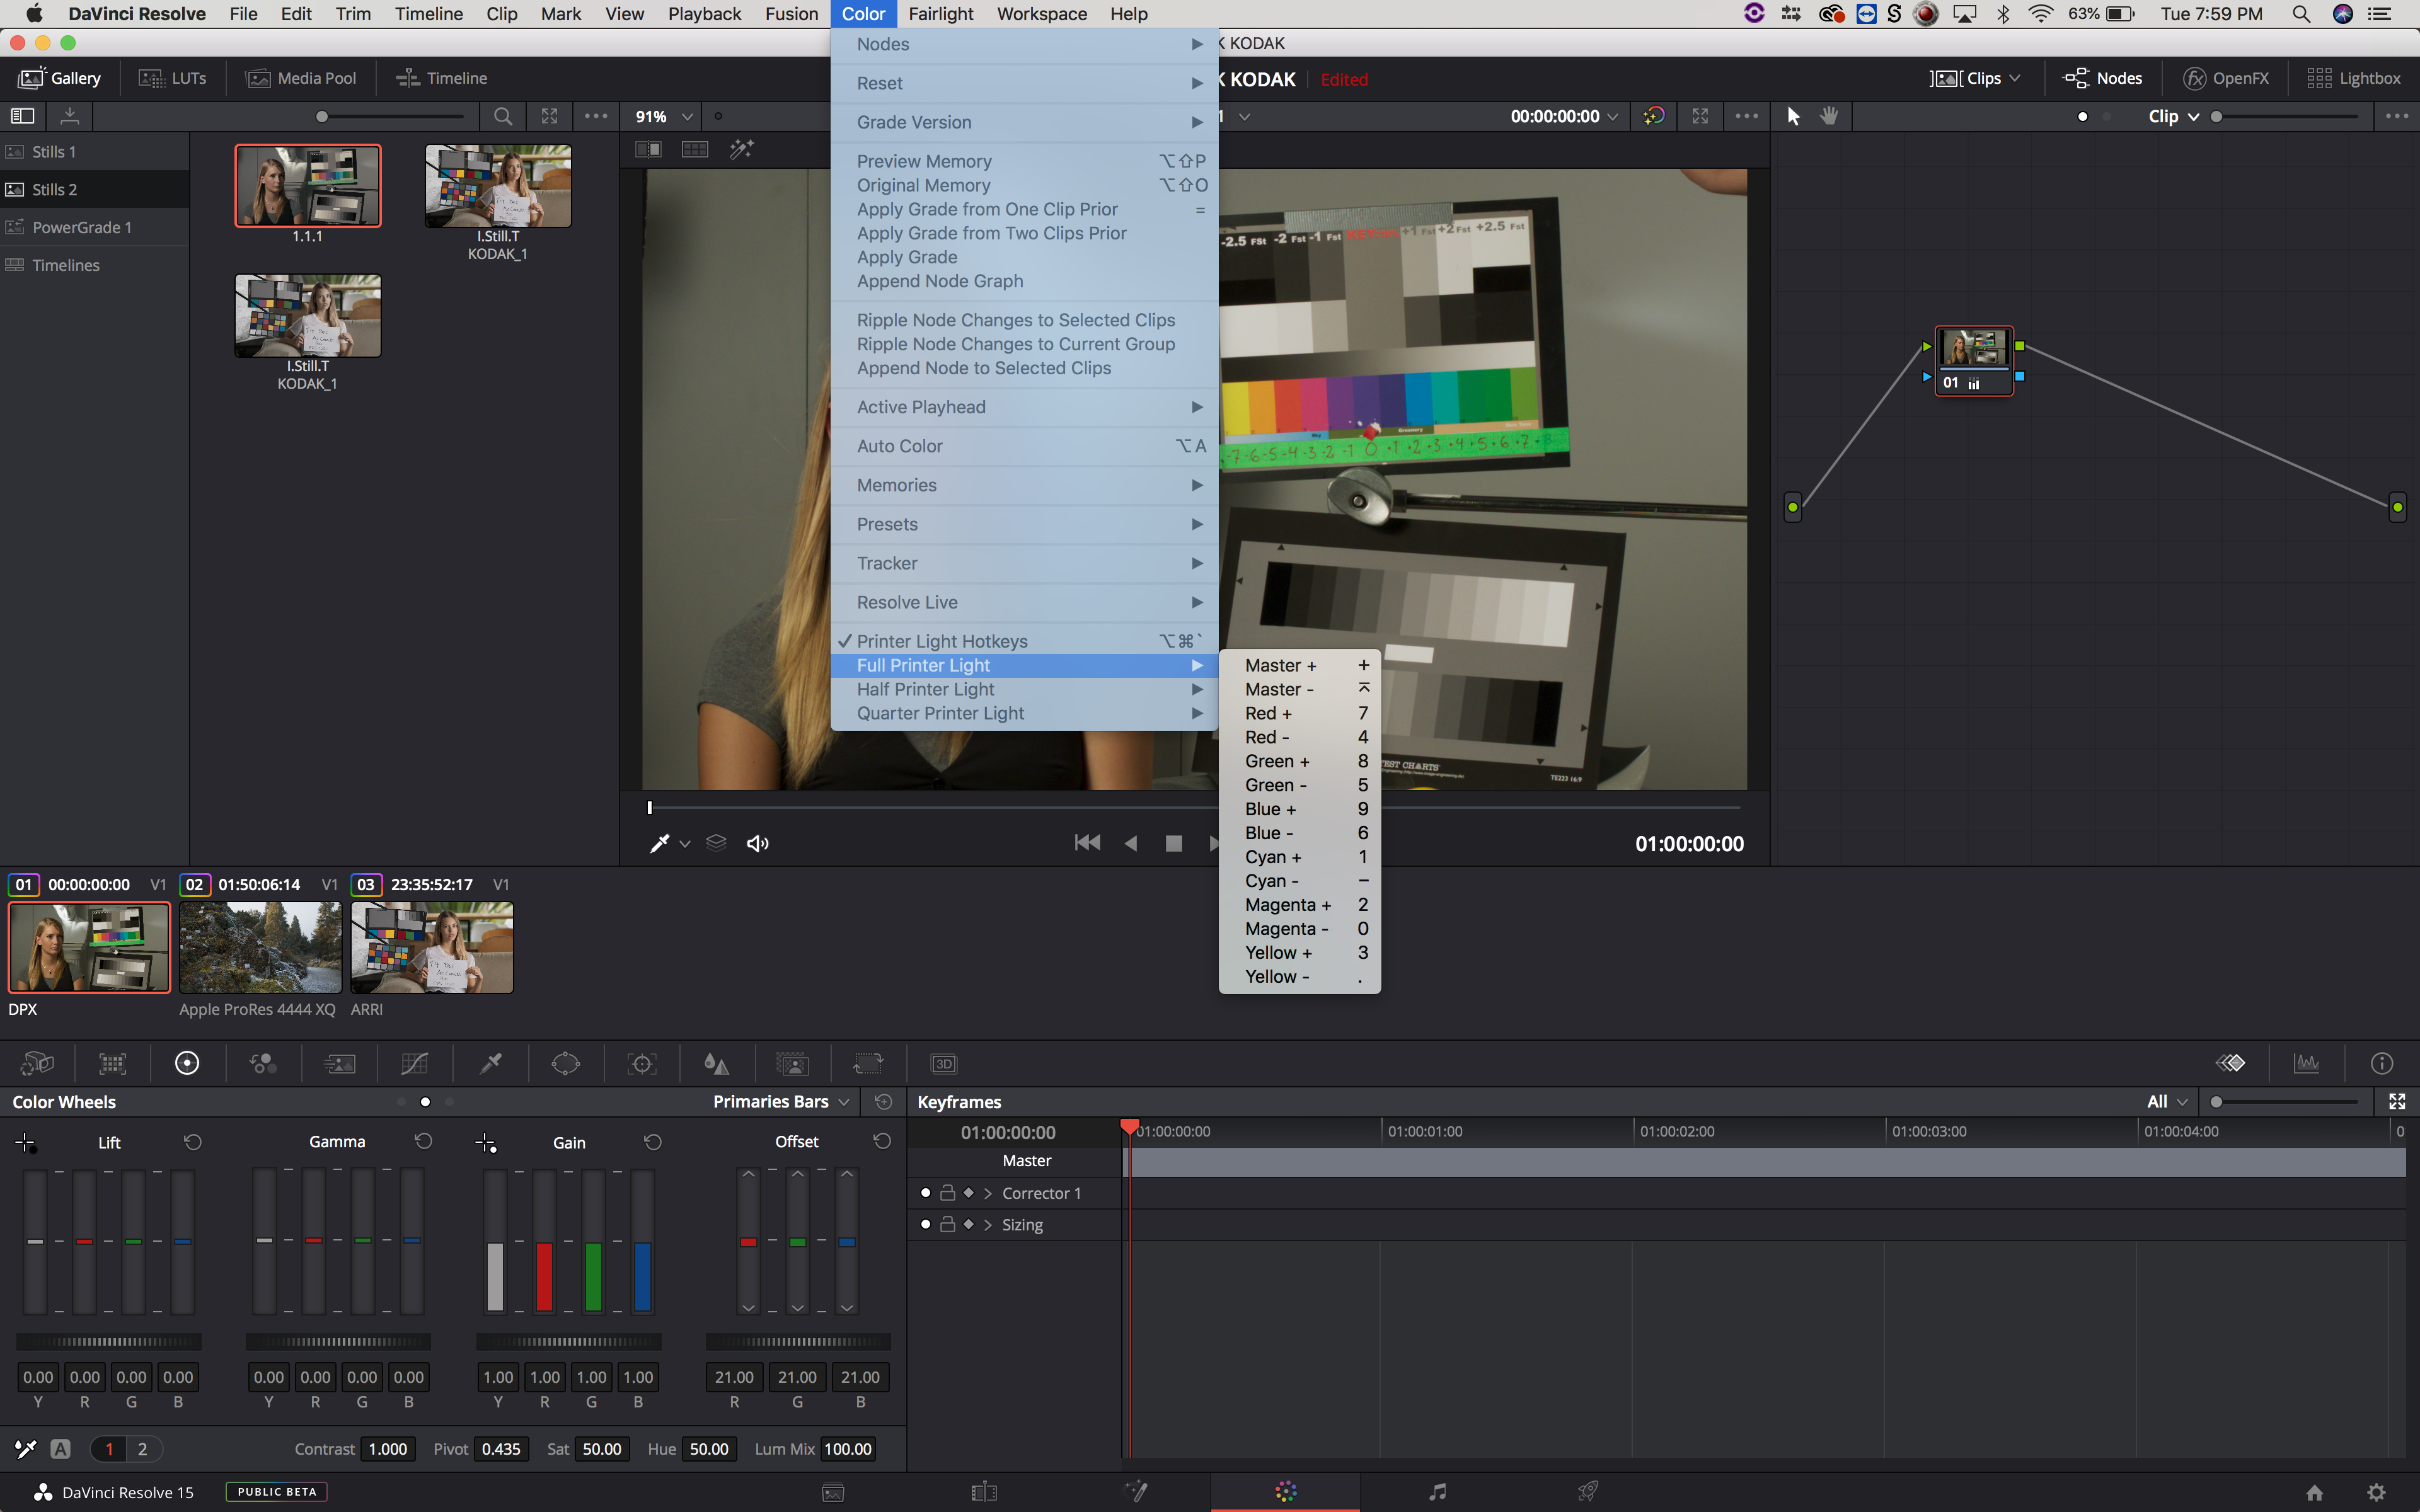
Just now, Nicolas Hanson said:
Cool, it looks great! Will check out stream deck! Can full, half etc be configured in the software menus as well?
The DaVinci menu simply shows you what hotkeys control the various printer light steps. With Stream Deck, you can configure that any way you like with deep menus. Hope that helps.
-
1
-
1
-
-
On 7/18/2018 at 7:32 AM, Nicolas Hanson said:
How can I change the offset increments to half etc in the menu?
Once the Printer Lights hotkey's are turned "ON" you can use hotkeys to make full, half, and quarter adjustments. I recently added a Stream Deck to my setup and programmed the printer lights to it, which makes the process much faster.
-
2
-
-
-
1
-
-
On 3/28/2018 at 2:40 PM, Chris Hall said:
Craig, I've got a series on vimeo of my own grades called Anatomy of a Grade that does this (I haven't updated it in a while) but you might find the later episodes interesting (early episodes are a bit basic). I literally talk through my process on how I got from A to B. Not mind blowing, but helpful if you're newer to grading. https://vimeo.com/channels/13864
Thanks, Chris!
-
1 hour ago, Abby Bader said:
Can you go more in detail about what you are looking for?
Hey, Abby.
I'm looking for video examples from colorists who deconstruct their corrections and grades—showing the process from original media to corrections and final grade. I've come across a couple of videos in the past and love watching how other people approach their work.


What is Your ‘Go-To’ For Delivery Format Conversions | Software or Hardware?
in DaVinci Resolve
You’ve graded your feature, episodes, or commercial and it looks awesome. What is your ‘go-to’ when converting your masterpiece from it’s original format to a range of formats for television and web? Software or hardware? And why?