
Aaron Rosapepe
-
Posts
45 -
Joined
-
Last visited
Content Type
Profiles
Case studies - Free
Case studies - Premium
Resources
Insider
Courses
Forums
Store
Posts posted by Aaron Rosapepe
-
-
Thanks @dermot.shane and @Tom Evans I will start researching your suggestions. Appreciate it!
-
Greetings,
I am about to start editing a project that has been shot on both Red Dragon and Black Magic Ursa Pro 4.6K. I have never graded a project using different raw formats in one session and am trying to formulate a workflow plan now so I won't get caught off guard during finishing. Is it possible to set more then one raw format on a single timeline in Resolve so the correct color science is being interpreted? If not, what would the most efficient approach be?
Any thoughts / advice appreciated!
-
I finally had some time to download the demo of Mocha Pro and try out the "remove" features and was very impressed. With just a few clean plates on a shot I was able to remove a blemish as the subject turned her head. It really seems to do a great job with matching the light as well. I have to say I'm surprised Adobe didn't think of this first considering Mocha is using a similar technology to the "heal" tool to interpolate between the clean plates.
-
 2
2
-
-
Black Magic's penchant for hyperbole aside, I can't afford to buy into Nuke or Flame so I'm looking forward to discovering what Fusion has to offer.
-
Looks like there's a recent course on FXPHD. I enjoyed their DR training so may be worth a look.
https://www.fxphd.com/details/564/-
1
-
-
For those of you interested in Fusion, the author of this course for Nuke mentioned in a youtube comment that he has a re-touching course for Fusion as well. Not sure if it's in the works or finished but if I find out anymore, I will report back.
https://www.fxphd.com/details/462/
-
A recent project that I cut and contributed motion graphics to. Color grade was done by Shinya Sato at Cosmo Street. This project really resonated with me and hope some others will enjoy it as well.
-
2
-
-
On 4/12/2018 at 7:38 AM, Abby Bader said:
Can you provide us with some stills, it might open up for other suggestions?
Finished that one up a few weeks ago. Thanks to all for the suggestions.
-
8 hours ago, cameronrad said:
Never heard of that plug-in, thanks!
-
6 minutes ago, Emily Haine said:
Whenever I can, I create some looks prior to the session as my experience is that most directors want to see alternatives, even if they have references and strong opinions about where they want.
In your experience, what do most clients expect to see in terms of different looks prior to committing to one aesthetic?
-
I would love to get some insight as to how you all kick off the first grading session. I'm courting more freelance projects and am finding it's tough to get the ball rolling with some people as they really don't know what they want. I don't want to waste time exploring the wrong path as most of these projects are low/no pay to build up my reel.
How do you deal with new clients? Do you ask for reference? Do you offer to grade a couple of stills to get the ball rolling? What have you found to be the most effective way to hone in on what your client really wants?
-
21 minutes ago, cameronrad said:
VSCO Presets are no magic at all. They are just some settings in Lightroom. Occasionally bundled with a RAW Camera Profile which just contains a modified tone curve. They are quite heavy handed. Especially in the shadow areas. The 3DLUTs used in film/video are much more accurate "emulations". VSCO is typically just trying to mirror the aesthetic from a Noritsu or Frontier scan (Common in photo labs).
There's other brands making presets as well for Lightroom such as RNI Films, Replichrome, Alien Skin, Mastin Labs, Tribe Archipelago.
I don't typically use any of these. I find it's better to learn the tools themselves rather than relying on preset looks. However that said, when learning it can help to reverse engineer things. I think the issue with presets is that people become reliant on them and don't develop a look of their own or know how to. For instance on instagram you'll see tons of photographers who don't have any style of their own. All their work looks exactly the same because they use the same presets and shoot similar things.
I like the VSCO stuff myself but Im not a professional photographer. Ill usually find a look I like then bring it into photoshop and mix it back into the original image until I get the look I desire. It would be nice if you could do this right in Lightroom but it's a nice way to back off on the effect.
Nice work on your site btw.
-
1 hour ago, Abby Bader said:
It is a common issue with retrieving digital highlights that it can introduce tints along the line of magenta or cyan. To eliminate the tint you can desaturate the highlight with a gentle lum vs sat curve.
Thanks Abby. I think the director is asking me to push it past a point that it's not really working but I will give that a go.
-
Hi Nicolas,
I love the VSCO presets for photography. I wish I had more technical knowledge of what was happening under the hood for you but pretty sure there's no magic to it as they work right within Lightroom. I think they've just done their homework as far as coming up with looks that can feel very natural or more processed depending on one's aesthetic. I usually use them for a little film grain and I like the emulations they achieve (a couple of my photos attached).
I think Ill have a go of analyzing a few of my favorite settings and see if I can emulate in Resolve. Should be good practice!

-
I've been getting the opportunity to color grade social media vids but mostly product type shoots with the product being the main focus. I'm taking on personal projects to develop my craft and hopefully get more interesting gigs eventually.
Im currently grading a short film that features an african-american male and an asian female both lit mainly from a single light source above. The initial pass looked great but the director has me crushing the highlights more and more to try and put the actors in a "candle lit" vibe which is a bit of a challenge due to the practical light on set.
I've been working between a balance of lowering the gamma, gain and highlights. While I now have it at a place that feels closer to the look he was hoping for, I am noticing greenish tints around the highlights on the skin. Is this a common side effect of crushing the highlights down or just inexperience on my part?
I've tried all kinds of approaches to eliminate the tint and get the skin tones looking natural again but haven't hit on the magic settings quite yet. Any tips/advice is appreciated.
-
Thanks for the info Jussi, Abby and Anton. This forum is the best!
-
1
-
-
Saturation is much closer now. Thank you both!
-
Got it, thanks!
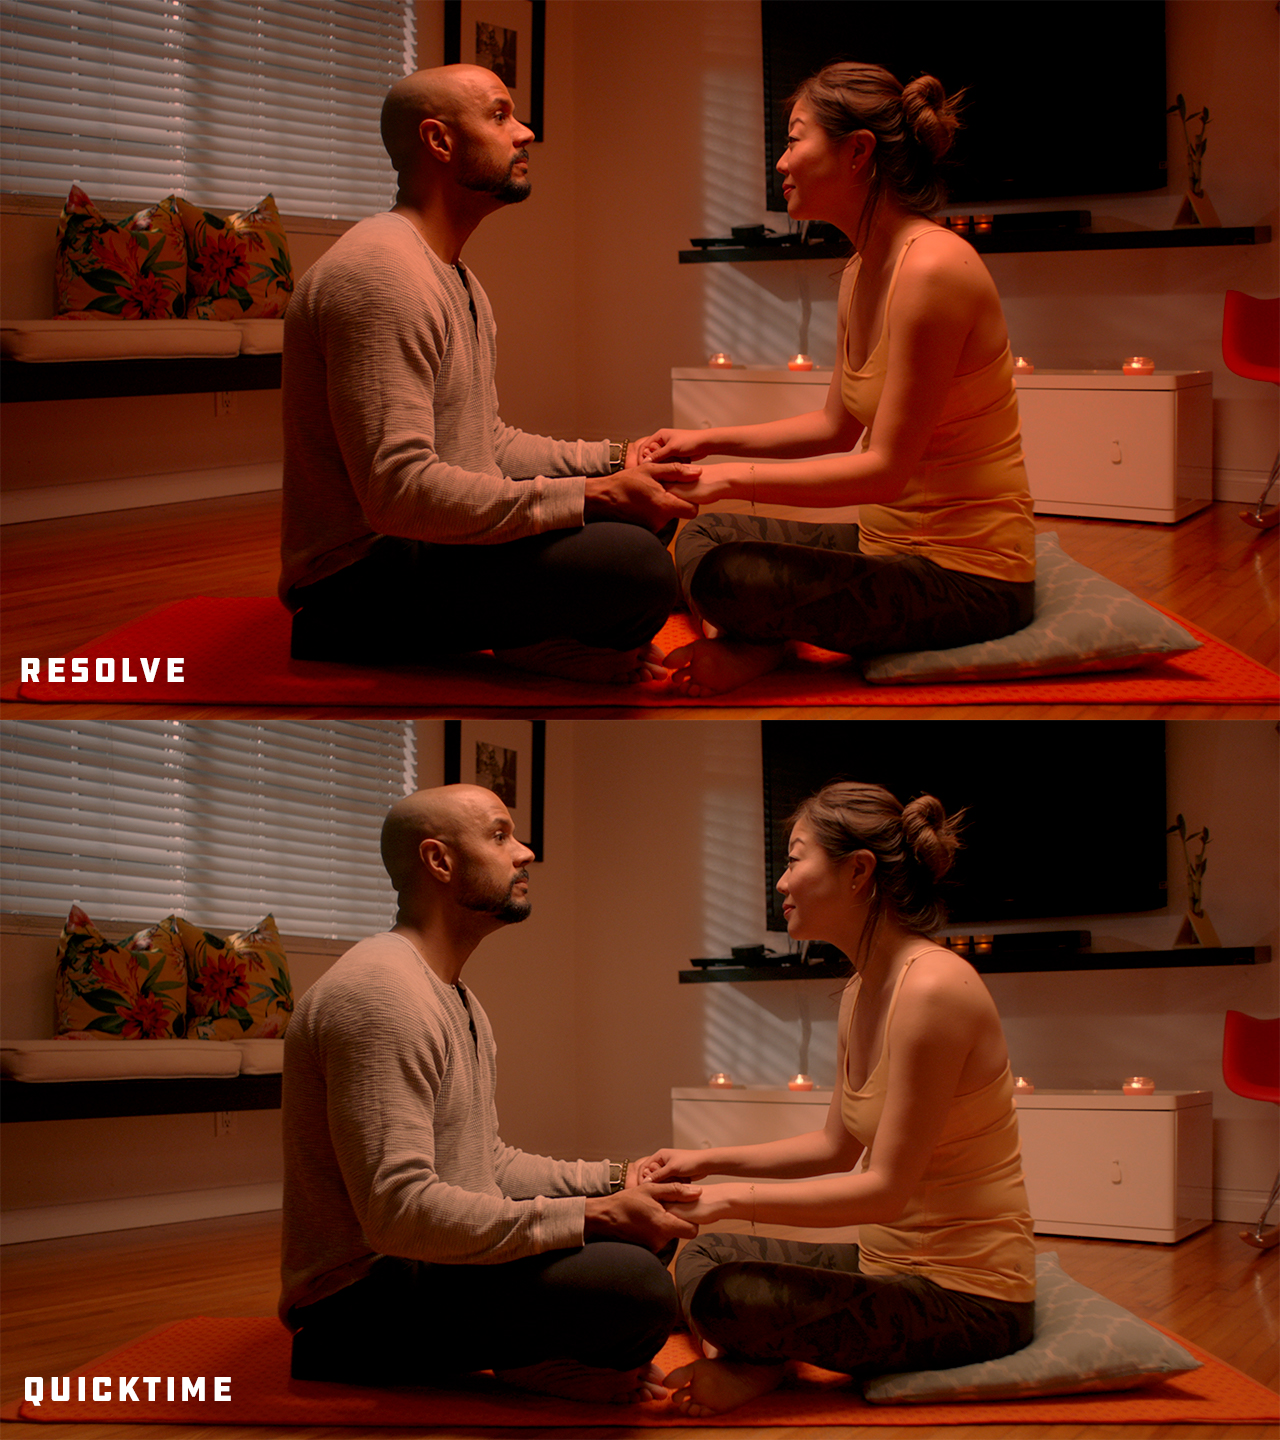
My monitor display is set to sRGB IEC61966-2.1 based on a previous recommendation. -
Working on a grade and I am noticing a really big shift in saturation levels between what I see when working in Resolve and what I am seeing in the Quicktime 422HQ render (indie project so working from home off of my iMac. No external monitoring involved). I'm having to boost the saturation by +20 to get the render to match what Im seeing in the Resolve window so something must be off.
If this is pilot error on my part, any solutions would be greatly appreciated!
-
1 hour ago, Thomas Singh said:
Exactly? A tutorial series made by Adam Scott, Tom Poole and Trish Cahill. LOL!
I don't think it's silly. For those of us who don't have the opportunity to assist with a senior colorist of that caliber, I think that would be awesome as well.
Master Class is already covering, composing, directing, writing, etc. Maybe we will get lucky and get something of this caliber for grading. That said, I am finding the Case Studies on this forum to be very enlightening so far.
-
2
-
-
22 hours ago, Thomas Singh said:
I want to hear with you all what color grading tutorials / color training online you have found most valuable. My impression is that most of the totorials available online is made by a little group of color enthusiasts that all know each other, teach the same things, arrange color meetings and contests but have limited imdb credits. I hope to find something from the guys that are represented on this site and other highly acknowledge colorists. What is your favorite online training?
What are you looking for exactly? I think all online training tends to overlap a bit at some point which is to be expected.
-
This looks like a cool course if one has access to Flame:
https://youtu.be/oa7g8Oj4HJoBe great to see a course like this for Fusion!
-
Just now, Chris DiBerardino said:
Hi Aaron,
I've been working with the Baselight plugin in Avid since it first came out. It's a wonderful and powerful tool if you need to do some more in depth grading inside of an Avid workflow. It's also great for going back and forth with a full Baselight system. I use the plugin as mostly a secondaries tool within Avid, doing most primaries in the Symphony tool. The speed at which you can execute high end grades within the Avid environment is awesome. So if your workflow is dependant on Avid, or turning something around quick, it's really not a bad way to go.
That being said, Davinci Resolve or a full Baselight are much better at workflow when it comes to coloring. I can color something a lot faster in DR than I can using the Baselight for Avid plugin. I don't think Baselight plugin is a substitute for a full fledged grading program, but in it's own right the plugin can really shine and improve a workflow. As with everything in this industry it's all about the time and budget!
Thanks for the insights!
-
6 hours ago, Bruno Mansi said:
I don't think you can really compare a full Resolve or Baselight system with a plugin on an editing system. If your workflow is such that you're not able to go to a dedicated grading suite, Baselight Editions is a very good substitute. It will certainly give you a good introduction to the power of Baselight, but someone who wants to go in-depth with the software would probably want to try out Baselight Student.
Thanks Bruno. I am currently evaluating the Student Edition as well. Unfortunately there are no studios in my area that have a full Baselight system so not sure what my future with the software will be. The Editions version is within reach but I am sure whatever the entry level hardware dongle is will be out of my price range as a freelancer.
At any rate, I am enjoying exploring the software and how the layer based workflow differs from DR.
Avid 2019
in Avid
· Edited by Aaron Rosapepe
Thanks Abby, I hadn't seen this. Looks like some nice updates!
http://www.avidblogs.com/whats-new-media-composer-2019/